Release 8.0
A58225-01
Library |
Product |
Contents |
Index |
| Oracle8
SQL Reference
Release 8.0 A58225-01 |
|
![]()
![]()
To remove a database link from the database.
To drop a private database link, the database link must be
in your own schema. To drop a PUBLIC database link, you must have DROP
PUBLIC DATABASE LINK system privilege. See also "Example"
below.
|
PUBLIC |
must be specified to drop a PUBLIC database link. |
|
dblink |
specifies the database link to be dropped. |
You cannot drop a database link in another user's schema
and you cannot qualify dblink with the name of a schema. Periods
are permitted in names of database links; therefore, Oracle interprets
the entire name, such as RALPH.LINKTOSALES, as the name of a database link
in your schema rather than as a database link named LINKTOSALES in the
schema RALPH.
The following statement drops a private database link named BOSTON:
DROP DATABASE LINK boston;
Use DROP DIRECTORY to remove a directory object from the
database. See also "Dropping a Directory" below.
To drop a directory you must have DROP ANY DIRECTORY system
privilege.
|
directory_name |
is the name of the directory database object to be dropped. |
Dropping a directory removes the database object, but does
not delete the associated operating system directory on the server's file
system.
You should not DROP a directory when files in the associated
file system are being accessed by PL/SQL or OCI programs.
The following statement drops the directory object BFILE_DIR:
DROP DIRECTORY bfile_dir;
To remove a standalone stored function from the database.
See also "Dropping Functions" below.
The function must be in your own schema or you must have
DROP ANY PROCEDURE system privilege.
|
schema |
is the schema containing the function. If you omit schema, Oracle assumes the function is in your own schema. |
|
function |
is the name of the function to be dropped. |
When you drop a function, Oracle invalidates any local objects
that depend on, or call, the dropped function. If you subsequently reference
one of these objects, Oracle tries to recompile the object and returns
an error message if you have not re-created the dropped function. For more
information on how Oracle maintains dependencies among schema objects,
including remote objects, see Oracle8 Concepts.
You can use this command to drop only a standalone function. To remove a function that is part of a package, use one of the following methods:
The following statement drops the function NEW_ACCT in the schema RIDDLEY:
DROP FUNCTION riddley.new_acct;
When you drop the NEW_ACCT function, Oracle invalidates all
objects that depend upon NEW_ACCT.
To remove an index from the database. See also "Dropping
an Index" below.
The index must be in your own schema or you must have DROP
ANY INDEX system privilege.
|
schema |
is the schema containing the index. If you omit schema, Oracle assumes the index is in your own schema. |
|
index |
is the name of the index to be dropped. |
When the index is dropped, all data blocks allocated to the
index are returned to the index's tablespace.
This command drops an index named MONOLITH:
DROP INDEX monolith;
To remove an external procedure library from the database.
You must have the DROP LIBRARY system privilege.
|
libname |
is the name of the external procedure library being dropped. |
The following statement drops the EXT_PROCS library:
DROP LIBRARY ext_procs;
To remove a stored package from the database. See also "Dropping
a Package" below.
The package must be in your own schema or you must have DROP
ANY PROCEDURE system privilege.
When you drop the body and specification of a package, Oracle
invalidates any local objects that depend on the package specification.
If you subsequently reference one of these objects, Oracle tries to recompile
the object and returns an error if you have not re-created the dropped
package. For information on how Oracle maintains dependencies among schema
objects, including remote objects, see Oracle8
Concepts.
When you drop only the body of a package but not its specification,
Oracle does not invalidate dependent objects. However, you cannot call
one of the procedures or stored functions declared in the package specification
until you re-create the package body.
The DROP PACKAGE command drops the package and all its objects
together. To remove a single object from a package, re-create the package
without the object using the CREATE PACKAGE and CREATE PACKAGE BODY commands
with the OR REPLACE option.
The following statement drops the specification and body of the BANKING package, invalidating all objects that depend on the specification:
DROP PACKAGE banking;
To remove a standalone stored procedure from the database.
See also "Dropping a Procedure" below.
The procedure must be in your own schema or you must have
DROP ANY PROCEDURE system privilege.
|
schema |
is the schema containing the procedure. If you omit schema, Oracle assumes the procedure is in your own schema. |
|
procedure |
is the name of the procedure to be dropped. |
When you drop a procedure, Oracle invalidates any local objects
that depend upon the dropped procedure. If you subsequently reference one
of these objects, Oracle tries to recompile the object and returns an error
message if you have not re-created the dropped procedure. For information
on how Oracle maintains dependencies among schema objects, including remote
objects, see Oracle8 Concepts.
You can use this command only to drop a standalone procedure. To remove a procedure that is part of a package, use one of the following methods:
The following statement drops the procedure TRANSFER owned by the user KERNER:
DROP PROCEDURE kerner.transfer
When you drop the TRANSFER procedure, Oracle invalidates
all objects that depend upon TRANSFER.
To remove a profile from the database. See also "Dropping
a Profile" below.
You must have DROP PROFILE system privilege.
You cannot drop the DEFAULT profile.
The following statement drops the profile ENGINEER:
DROP PROFILE engineer CASCADE;
Oracle assigns the DEFAULT profile to any users currently
assigned the ENGINEER profile.
To remove a role from the database. See also "Dropping
a Role" below.
You must have been granted the role with the ADMIN OPTION
or you must have DROP ANY ROLE system privilege.
|
role |
is the role to be dropped. |
When you drop a role, Oracle revokes it from all users and
roles to whom it has been granted and removes it from the database.
To drop the role FLORIST, issue the following statement:
DROP ROLE florist;
To remove a rollback segment from the database. See also
"Dropping Rollback Segments" below.
You must have DROP ROLLBACK SEGMENT system privilege.
|
rollback_segment |
is the name the rollback segment to be dropped. |
When you drop a rollback segment, all space allocated to
the rollback segment returns to the tablespace.
You can drop a rollback segment only if it is offline. To
determine whether a rollback segment is offline, query the data dictionary
view DBA_ROLLBACK_SEGS. Offline rollback segments have the value 'AVAILABLE'
in the STATUS column. You can take a rollback segment offline with the
OFFLINE option of the ALTER ROLLBACK SEGMENT command.
You cannot drop the SYSTEM rollback segment.
The following statement drops the rollback segment ACCOUNTING:
DROP ROLLBACK SEGMENT accounting;
To remove a sequence from the database. See also "Dropping
Sequences" below.
The sequence must be in your own schema or you must have
DROP ANY SEQUENCE system privilege.
|
schema |
is the schema containing the sequence. If you omit schema, Oracle assumes the sequence is in your own schema. |
|
sequence |
is the name of the sequence to be dropped. |
One method for restarting a sequence is to drop and re-create it. For example, if you have a sequence with a current value of 150 and you would like to restart the sequence with a value of 27, you would:
The following statement drops the sequence ESEQ owned by the user ELLY. To issue this statement, you must either be connected as user ELLY or have DROP ANY SEQUENCE system privilege:
DROP SEQUENCE elly.eseq;
To remove a snapshot from the database. See "Dropping
Snapshots" below.
The snapshot must be in your own schema or you must have
DROP ANY SNAPSHOT system privilege. You must also have the privileges to
drop the internal table, views, and index that Oracle uses to maintain
the snapshot's data. For information on these privileges, see DROP
TABLE, DROP VIEW, and DROP
INDEX.
|
schema |
is the schema containing the snapshot. If you omit schema, Oracle assumes the snapshot is in your own schema. |
|
snapshot |
is the name of the snapshot to be dropped. |
When you drop a simple snapshot that is the least recently
refreshed snapshot of a master table, Oracle automatically purges from
master table's snapshot log only the rows needed to refresh the dropped
snapshot.
When you drop a master table, Oracle does not automatically
drop snapshots based on the table. However, Oracle returns an error message
when it tries to refresh a snapshot based on a master table that has been
dropped.
The following statement drops the snapshot PARTS owned by the user HQ:
DROP SNAPSHOT hq.parts;
To remove a snapshot log from the database. See also "Dropping
Snapshot Logs" below.
A snapshot log consists of a table and a trigger. To drop
a snapshot log, you must have the privileges listed for DROP
TABLE. You must also have the privileges to drop a trigger from the
snapshot log's master table. For information on these privileges, see DROP
TRIGGER.
After you drop a snapshot log, snapshots based on the snapshot
log's master table can no longer be refreshed fast. They must be refreshed
completely. For more information on refreshing snapshots, see CREATE
SNAPSHOT.
The following statement drops the snapshot log on the PARTS master table:
DROP SNAPSHOT LOG ON parts;
To remove a synonym from the database. See also "Dropping
Synonyms" below.
If you want to drop a private synonym, either the synonym
must be in your own schema or you must have DROP ANY SYNONYM system privilege.
If you want to drop a PUBLIC synonym, either the synonym must be in your
own schema or you must have DROP ANY PUBLIC SYNONYM system privilege.
You can change the definition of a synonym by dropping and
re-creating it.
To drop a synonym named MARKET, issue the following statement:
DROP SYNONYM market;
To remove a table or an object table and all its data from
the database. See also "Dropping Tables" below.
The table must be in your own schema or you must have DROP
ANY TABLE system privilege.
When you drop a table, Oracle also automatically performs the following operations:
If you choose to re-create the table, it must contain all the columns selected by the queries originally used to define the views and all the columns referenced in the stored procedures, functions, or packages. Any users previously granted object privileges on the views, stored procedures, functions, or packages need not be regranted these privileges.
If you choose to re-create the table, it must contain all the columns selected by the queries originally used to define the snapshots.
You can drop a cluster and all of its tables using the DROP
CLUSTER command with the INCLUDING TABLES clause to avoid dropping each
table individually.
The following statement drops the TEST_DATA table:
DROP TABLE test_data;
To remove a tablespace from the database. See also "Dropping
Tablespaces" below.
You must have DROP TABLESPACE system privilege. You cannot
drop a tablespace if it contains any rollback segments holding active transactions.
You can drop a tablespace regardless of whether it is online
or offline. Oracle recommends that you take the tablespace offline before
dropping it to ensure that no SQL statements in currently running transactions
access any of the objects in the tablespace.
You may want to alter any users who have been assigned the
tablespace as either a default or temporary tablespace. After the tablespace
has been dropped, these users cannot allocate space for objects or sort
areas in the tablespace. You can reassign users new default and temporary
tablespaces with the ALTER USER command.
You cannot drop the SYSTEM tablespace.
The following statement drops the MFRG tablespace and all its contents:
DROP TABLESPACE mfrg
    INCLUDING CONTENTS
        CASCADE CONSTRAINTS;
To remove a database trigger from the database. See also
"Dropping Triggers" below.
The trigger must be in your own schema or you must have DROP
ANY TRIGGER system privilege.
|
schema |
is the schema containing the trigger. If you omit schema, Oracle assumes the trigger is in your own schema. |
|
trigger |
is the name of the trigger to be dropped. |
When you drop a database trigger, Oracle removes it from
the database and does not fire it again.
The following statement drops the REORDER trigger in the schema RUTH:
DROP TRIGGER ruth.reorder;
To drop the specification and body of an object, a VARRAY,
or nested table type. To drop just the body of an object, use the DROP
TYPE BODY. See also "Dropping Types" below.
|
Note: This command is available only if the Oracle objects option is installed on your database server. |
The object, VARRAY, or nested table type must be in your
own schema or you must have DROP ANY TYPE system privilege.
Unless you specify FORCE, you can drop only object, nested
table, or VARRAY types that are standalone schema objects with no dependencies.
This is the default behavior.
|
warning: Oracle does not recommend using the FORCE option to drop types with dependencies. This operation is not recoverable and could cause the data in the dependent tables to become inaccessible. For information about type dependencies, see Oracle8 Application Developer's Guide. |
The following statement removes object type PERSON_T:
DROP TYPE person_t;
To drop the body of an object, a VARRAY, or nested table
type. See also "Dropping Type Bodies" below.
To drop the specification of an object, see DROP TYPE.
|
Note: This command is available only if the Oracle objects option is installed on your database server. |
The object type body must be in your own schema, and you
must have CREATE TYPE or CREATE ANY TYPE system privilege, or you must
have DROP ANY TYPE system privilege.
When you drop a type body, the object type specification
still exists, and you can re-create the type body. You can still use the
object type, although you cannot call the member functions.
The following statement removes object type body RATIONAL:
DROP TYPE BODY rational;
To remove a database user and optionally remove the user's
objects. See also "Dropping Users and Their Objects"
below.
You must have the DROP USER system privilege.
|
user |
is the user to be dropped. |
|
CASCADE |
drops all objects in the user's schema before dropping the user. You must specify this option to drop a user whose schema contains any objects. |
Oracle does not drop users whose schemas contain objects. To drop such a user, you must either
If you specify the CASCADE option and drop tables in the user's schema, Oracle automatically drops any referential integrity constraints on tables in other schemas that refer to primary and unique keys on these tables. The CASCADE option also causes Oracle to invalidate, but not drop, the following objects in other schemas:
Oracle does not drop snapshots on tables or views in the
dropped user's schema, but if you specify CASCADE, the snapshots can no
longer be refreshed.
Oracle does not drop roles created by the user.
If BRADLEY's schema contains no objects, you can drop BRADLEY by issuing the statement:
DROP USER bradley;
If BRADLEY's schema contains objects, you must use the CASCADE option to drop BRADLEY and the objects:
DROP USER bradley CASCADE;
To remove a view or an object view from the database. See
also "Dropping Views" below.
The view must be in your own schema or you must have DROP
ANY VIEW system privilege.
|
schema |
is the schema containing the view. If you omit schema, Oracle assumes the view is in your own schema. |
|
view |
is the name of the view to be dropped. |
When you drop a view, views and synonyms that refer to the
view are not dropped, but become invalid. Drop them or redefine them, or
define other views in such a way that the invalid views and synonyms become
valid again.
You can change the definition of a view by dropping and re-creating
it.
The following statement drops the VIEW_DATA view:
DROP VIEW view_data;
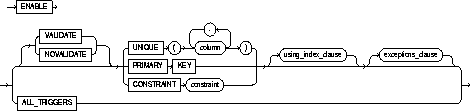
To enable an integrity constraint or all triggers associated with a table:
To enable a single trigger, use the ENABLE option of ALTER
TRIGGER.
See also "Enabling and Disabling Constraints".
An ENABLE clause that enables an integrity constraint can
appear in either a CREATE TABLE or ALTER TABLE statement. To enable a constraint
in this manner, you must have the privileges necessary to issue one of
these statements. For information on these privileges, see CREATE
TABLE or ALTER TABLE.
If you enable a UNIQUE or PRIMARY KEY constraint, Oracle
creates an index on the columns of the unique or primary key in the schema
containing the table. To enable such a constraint, you must have the privileges
necessary to create the index. For information on these privileges, see
CREATE INDEX.
If you enable a referential integrity constraint, the referenced
UNIQUE or PRIMARY KEY constraint must already be enabled.
For an integrity constraint to appear in an ENABLE clause, either
An ENABLE clause that enables triggers can appear only in
an ALTER TABLE statement. To enable triggers with the ENABLE clause, you
must have the privileges necessary to issue the ALTER TABLE statement.
For information on these privileges, see ALTER
TABLE. Also, the triggers must be in your own schema or you must have
ALTER ANY TRIGGER system privilege.
storage_clause:
See the STORAGE clause.
|
VALIDATE |
ensures that all new insert, delete, and update operations on the constrained data comply with the constraint, and that all old data also obeys the constraint. An enabled and validated constraint guarantees that all data is and will continue to be valid. This is the default. See also "How Oracle Validates Integrity Constraints". |
|
NOVALIDATE |
ensures that all new insert, update, delete operations on the constrained data comply with the constraint. Oracle does not verify that existing data in the table complies with the constraint. |
|
UNIQUE |
enables the UNIQUE constraint defined on the specified column or combination of columns. |
|
PRIMARY KEY |
enables the table's PRIMARY KEY constraint. |
|
CONSTRAINT |
enables the integrity constraint named constraint. |
|
using_index_clause |
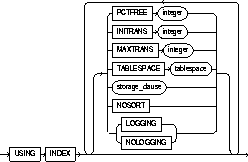
specifies parameters for the index Oracle creates to enforce a UNIQUE or PRIMARY KEY constraint. Oracle gives the index the same name as the constraint. You can choose the values of the INITRANS, MAXTRANS, TABLESPACE, STORAGE, and PCTFREE parameters for the index. For information on these parameters, see CREATE TABLE. For a description of NOSORT and LOGGING/NOLOGGING, see CREATE INDEX. |
|
|
Use these parameters only when enabling UNIQUE and PRIMARY KEY constraints. |
|
exceptions_clause: |
|
|
EXCEPTIONS INTO |
specifies a table into which Oracle places information about rows that violate the integrity constraint. The table must exist on your local database before you use this option. If you omit schema, Oracle assumes the exception table is in your own schema. See also "How to Identify Exceptions". |
|
ALL TRIGGERS |
enables all triggers associated with the table. You can use this option only in an ENABLE clause in an ALTER TABLE statement, not in a CREATE TABLE statement. See also "Enabling Triggers". |
Constraints can have one of three states:
Taking a constraint from a DISABLE to ENABLE VALIDATE state
requires an exclusive lock on the table, because while Oracle is checking
all old data for validity, no new data can be entered into the table. Due
to this behavior, only one constraint can be enabled at a time and each
new constraint must check all existing rows by serial scan. (Placing constraints
concurrently in the ENABLE VALIDATE state requires that you issue multiple
ALTER TABLE commands from separate sessions.)
To avoid locking the table, place the constraint in the ENABLE
NOVALIDATE state. This state ensures that all new DML statements on the
table are validated; therefore, Oracle does not need prevent concurrent
access to the table.
ENABLE NOVALIDATE also allows you to place several of the
table's constraints in the ENABLE VALIDATE state concurrently. Each scan
that Oracle performs to validate existing data can also be performed in
parallel when possible.
Enabling a primary key or unique key constraint automatically
creates a unique index to enforce the constraint. This index is dropped
if the constraint is subsequently disabled, thus causing Oracle to rebuild
the index every time the constraint is enabled.
To avoid this behavior, create new primary key and unique
key constraints initially disabled. Then create nonunique indexes or use
existing nonunique indexes to enforce the constraint. Oracle does not drop
the nonunique index when the constraint is disabled, so any ENABLE operation
on a primary key or unique key constraint occurs almost instantly because
the index already exists. This technique also eliminates redundant indexes.
You can enable a constraint when you create it (see CREATE TABLE and ALTER TABLE), or you can enable a disabled constraint with the ENABLE clause. To ensure maximum concurrency and performance, constraints should be created or subsequently enabled as follows:
To enable disabled constraints, you need only perform steps
3 and 4.
Note that constraints are placed in the ENABLE VALIDATE state
by default upon creation. Use the procedure outlined above to avoid the
default behavior and thereby ensure maximum performance.
When you attempt to place an integrity constraint in ENABLE VALIDATE state, Oracle scans the table and applies the integrity constraint to any existing rows in the table:
Once an integrity constraint is in ENABLE VALIDATE state, Oracle applies the integrity constraint whenever an INSERT, UPDATE, or DELETE statement tries to change table data:
An exception is a row in a table that violates an integrity constraint. You can request that Oracle identify exceptions to an integrity constraint when you attempt to place it in ENABLE VALIDATE state. If you specify an exception table in your ENABLE clause, Oracle inserts a row into the exception table for each exception. A row of the exception table contains the following information:
A definition of a sample exception table named EXCEPTIONS
appears in a SQL script available on your distribution medium. Your exception
table must have the same column datatypes and lengths as the sample. The
common name of this script is UTLEXCPT.SQL; its exact name and location
depend on your operating system. You can request that Oracle send exceptions
from multiple enabled integrity constraints to the same exception table.
For index-organized tables, rows that violate a constraint
are identified by primary key and not by ROWID. This means that the exception
table created for index-organized tables uses a different format. Use the
BUILD_EXCEPTIONS_TABLE procedure in the DBMS_IOT package to create the
EXCEPTIONS table for inserting rows from index-organized tables that violate
integrity constraints.
The following example creates the ORDER_EXCEPTIONS table to hold rows from an index-organized table ORDERS that violate integrity constraint CHECK_ORDERS:
CREATE TABLE orders
  (ord_num NUMBER PRIMARY KEY,
   ord_quantity NUMBER) ORGANIZATION INDEX;

EXECUTE DBMS_IOT.BUILD_EXCEPTIONS_TABLE
  ('SCOTT', 'ORDERS', 'ORDER_EXCEPTIONS');

ALTER TABLE orders
  ADD CONSTRAINT CHECK_ORDERS CHECK(ord_quantity > 0)
  EXCEPTIONS INTO ORDER_EXCEPIONS;
To specify an exception table in an ENABLE VALIDATE clause,
you must have the privileges necessary to insert rows into the table. For
information on these privileges, see ALTER TABLE.
To examine the identified exceptions, you must have the privileges necessary
to query the exceptions table. For information on these privileges, see
SELECT.
If a CREATE TABLE statement contains both the AS clause and
an ENABLE VALIDATE clause with the EXCEPTIONS option, Oracle ignores the
EXCEPTIONS option. If there are any exceptions, Oracle does not create
the table and returns an error message.
The following statement creates the DEPT table, defines a PRIMARY KEY constraint, and places it in ENABLE VALIDATE state:
CREATE TABLE dept
    (deptno  NUMBER(2) PRIMARY KEY,
     dname   VARCHAR2(10),
     loc     VARCHAR2(9) )
     TABLESPACE user_a
     ENABLE VALIDATE PRIMARY KEY;
The following statement places in ENABLE VALIDATE state an integrity constraint named FK_DEPTNO in the EMP table:
ALTER TABLE emp
    ENABLE VALIDATE CONSTRAINT fk_deptno
        EXCEPTIONS INTO except_table;
Each row of the EMP table must satisfy the constraint for Oracle to enable the constraint. If any row violates the constraint, the constraint remains disabled. Oracle lists any exceptions in the table EXCEPT_TABLE. You can query this table with the following statement:
SELECT *
    FROM except_table;
The output of this query might look like this:
ROW_ID              OWNER   TABLE_NAME  CONSTRAINT
------------------ -----  ----------  ----------
AAAAZzAABAAABrXAAA  SCOTT   EMP         FK_DEPTNO
You can also identify the exceptions in the EMP table with the following statement:
SELECT emp.*
    FROM emp, except_table
    WHERE emp.row_id except_table.row_id
      AND except_table.table_name = 'EMP'
      AND except_table.constraint = 'FK_DEPTNO';
If there are exceptions to the FK_DEPTNO constraint, the output of this query might look like this:
EMPNo  ENAME    JOB       MGR   HIREDATE     SAL     COMM   DEPTNO
----  --------  -----  ------  ---------  ------  --------  ------
8001    JACK    CLERK     778  25-AUG-92    1100                70
The following statement tries to place in ENABLE NOVALIDATE state two constraints on the EMP table:
ALTER TABLE emp
    ENABLE NOVALIDATE UNIQUE (ename)
    ENABLE NOVALIDATE CONSTRAINT nn_ename;
The preceding statement has two ENABLE clauses:
In this case, Oracle only enables the constraints if both
are satisfied by each row in the table. If any row violates either constraint,
Oracle returns an error message and both constraints remain disabled.
To place the constraints in Example IV in ENABLE VALIDATE state, issue the following:
ALTER TABLE emp
  ENABLE VALIDATE UNIQUE (ename)
  ENABLE VALIDATE CONSTRAINT nn_ename;
This method of enabling constraints allows both constraints
to be enabled concurrently, because they were both previously in the ENABLE
NOVALIDATE state. This method also allows each constraint to be enabled
in parallel.
You can enable all triggers associated with the table by
including the ALL TRIGGERS option in an ENABLE clause of an ALTER TABLE
statement. After you enable a trigger, Oracle fires the trigger whenever
a triggering statement is issued that meets the condition of the trigger
restriction. When you create a trigger, Oracle enables it automatically.
The following statement enables all triggers associated with the EMP table:
ALTER TABLE emp
    ENABLE ALL TRIGGERS;
To determine the execution plan Oracle follows to execute
a specified SQL statement. This command inserts a row describing each step
of the execution plan into a specified table. If you are using cost-based
optimization, this command also determines the cost of executing the statement.
See also "Using EXPLAIN PLAN", "EXPLAIN
PLAN and Partitioned Tables", and "EXPLAIN PLAN and
Parallel DML".
To issue an EXPLAIN PLAN statement, you must have the privileges
necessary to insert rows into an existing output table that you specify
to hold the execution plan. For information on these privileges, see INSERT.
You must also have the privileges necessary to execute the
SQL statement for which you are determining the execution plan. If the
SQL statement accesses a view, you must have privileges to access any tables
and views on which the view is based. If the view is based on another view
that is based on a table, you must have privileges to access both the other
view and its underlying table.
To examine the execution plan produced by an EXPLAIN PLAN
statement, you must have the privileges necessary to query the output table.
For more information on these privileges, see SELECT.

|
SET STATEMENT_ID |
specifies the value of the STATEMENT_ID column for the rows of the execution plan in the output table. If you omit this clause, the STATEMENT_ID value defaults to null. |
|
INTO |
specifies the schema, name, and database containing the output table. This table must exist before you use the EXPLAIN PLAN command. If you omit schema, Oracle assumes the table is in your own schema. |
|
|
The dblink can be a complete or partial name of a database link to a remote Oracle database where the output table is located. For information on referring to database links, see the section, "Referring to Objects in Remote Databases". You can specify a remote output table only if you are using Oracle's distributed functionality. If you omit dblink, Oracle assumes the table is on your local database. |
|
|
If you omit the INTO clause altogether, Oracle assumes an output table named PLAN_TABLE in your own schema on your local database. |
|
FOR statement |
specifies a SELECT, INSERT, UPDATE, or DELETE statement for which the execution plan is generated. |
The definition of a sample output table PLAN_TABLE is available
in a SQL script on your distribution media. Your output table must have
the same column names and datatypes as this table. The common name of this
script is UTLXPLAN.SQL the exact name and location depend on your operating
system.
The value you specify in the SET STATEMENT_ID clause appears
in the STATEMENT_ID column in the rows of the execution plan. You can then
use this value to identify these rows among others in the output table.
Be sure to specify a STATEMENT_ID value if your output table contains rows
from many execution plans.
The EXPLAIN PLAN command is a data manipulation language
(DML) command, rather than a data definition language (DDL) command. Therefore,
Oracle does not implicitly commit the changes made by an EXPLAIN PLAN statement.
If you want to keep the rows generated by an EXPLAIN PLAN statement in
the output table, you must commit the transaction containing the statement.
Do not use the EXPLAIN PLAN command to determine the execution
plans of SQL statements that access data dictionary views or dynamic performance
tables.
You can also issue the EXPLAIN PLAN command as part of the
SQL trace facility. For information on how to use the SQL trace facility
and how to interpret execution plans, see Oracle8
Tuning.
This EXPLAIN PLAN statement determines the execution plan and cost for an UPDATE statement and inserts rows describing the execution plan into the specified OUTPUT table with the STATEMENT_ID value of 'Raise in Chicago':
EXPLAIN PLAN
    SET STATEMENT_ID = 'Raise in Chicago'
    INTO output
    FOR UPDATE emp
        SET sal = sal * 1.10
        WHERE deptno =  (SELECT deptno
                  FROM dept
                  WHERE loc = 'CHICAGO');
This SELECT statement queries the OUTPUT table and returns the execution plan and the cost:
SELECT LPAD(' ',2*(LEVEL-1))||operation operation, options,
object_name, position
    FROM output
    START WITH id = 0 AND statement_id = 'Raise in Chicago'
    CONNECT BY PRIOR id = parent_id AND
    statement_id = 'Raise in Chicago';
The query returns this execution plan:
OPERATION             OPTIONS     OBJECT_NAME     POSITION
----------------------------------------------------------
UPDATE STATEMENT                                         1
    FILTER                                               0
      TABLE ACCESS    FULL        EMP                    1
      TABLE ACCESS    FULL        DEPT                   2
The value in the POSITION column of the first row shows that
the statement has a cost of 1.
Information for partitioning is provided in the steps (rows of the Explain table) of the Explain plan for a SQL statement. The information consists of:
The partition_start and partition_stop columns
describe how the partitions being accessed are computed by Oracle and provide
the range of accessible partitions (if known).
The partition_start column describes the start partition of a range of accessed partitions. It can take one of these values:
The partition_stop column describes the stop partition of a range of accessed partitions. It can take these values:
The partition_id column identifies the step that has
computed a pair of values of the partition_start and partition_stop columns.
The PARTITION step describes partition boundaries applicable
to a single partitioned object (table or index) or to a set of equi-partitioned
objects (a partitioned table and its local indexes). The partition boundaries
are provided by the values of partition_start and partition_stop of the
PARTITION step. Possible values for partition_start and partition_stop
are NUMBER(n), KEY, and INVALID.
The options column of a PARTITION step can take these values:
The TABLE ACCESS and INDEX steps describing access to a partitioned
table or index are enhanced to provide partition boundary information in
the partition_start, partition_stop, and partition_id columns.
The partition boundaries may have been computed by:
The options column of a TABLE ACCESS step describing access by ROWID to a table may contain the following values:
Assume that STOCKS is a table that is 8-way partitioned according
to a STOCK_NUM column, and that a local prefixed index STOCK_IX on column
STOCK_NUM exists. The partition HIGHVALUES are 1000, 2000, 3000, 4000,
5000, 6000, 7000, and 8000.
Consider the query:
SELECT * FROM stocks WHERE stock_num BETWEEN 3800 AND: h;
EXPLAIN PLAN executes this query with PLAN_TABLE as the output table. The basic execution plan, including partitioning information, is obtained with the query:
SELECT id, operation, options, object_name,
  partition_start, partition_stop, partition_id FROM plan_table;
When you use EXPLAIN PLAN to determine the execution of a
statement that includes the PARALLEL option, the resulting execution plan
will indicate parallel execution. Note, however, that EXPLAIN PLAN actually
inserts the statement into the plan table, so that the parallel DML statement
you submit is no longer the first DML statement in the transaction. This
violates the Oracle restriction of one parallel DML statement per transaction,
and the statement will be executed serially.
To maintain parallel execution of the statements, you must
commit or roll back the EXPLAIN PLAN command, and then submit the parallel
DML statement.