Release 8.0
A58225-01
Library |
Product |
Contents |
Index |
| Oracle8
SQL Reference
Release 8.0 A58225-01 |
|
![]()
![]()
For illustrations, see "Examples".
A filespec can appear in CREATE DATABASE, ALTER DATABASE,
CREATE TABLESPACE, or ALTER TABLESPACE commands. You must have the privileges
necessary to issue one of these commands. For information on these privileges,
see CREATE DATABASE, ALTER
DATABASE, CREATE TABLESPACE, and ALTER
TABLESPACE.
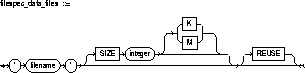

The following statement creates a database named PAYABLE that has two redo log file groups, each with two members, and one datafile:
CREATE DATABASE payable
   LOGFILE GROUP 1 ('diska:log1.log', 'diskb:log1.log') SIZE 50K,
           GROUP 2 ('diska:log2.log', 'diskb:log2.log') SIZE 50K
   DATAFILE 'diskc:dbone.dat' SIZE 30M;
The first filespec in the LOGFILE clause specifies
a redo log file group with the GROUP value 1. This group has members named
'DISKA:LOG1.LOG' and 'DISKB:LOG1.LOG', each with size 50 kilobytes.
The second filespec in the LOGFILE clause specifies
a redo log file group with the GROUP value 2. This group has members named
'DISKA:LOG2.LOG' and 'DISKB:LOG2.LOG', also with sizes of 50 kilobytes.
The filespec in the DATAFILE clause specifies a datafile
named 'DISKC:DBONE.DAT' of size 30 megabytes.
All of these filespecs specify a value for the SIZE
parameter and omit the REUSE option, so none of these files can already
exist. Oracle must create them.
The following statement adds another redo log file group with two members to the PAYABLE database:
ALTER DATABASE payable
   ADD LOGFILE GROUP 3 ('diska:log3.log', 'diskb:log3.log')
   SIZE 50K REUSE;
The filespec in the ADD LOGFILE clause specifies a
new redo log file group with the GROUP value 3. This new group has members
named 'DISKA:LOG3.LOG' and 'DISKB:LOG3.LOG' with sizes of 50 kilobytes
each. Since the filespec specifies the REUSE option, each member
can already exist. If a member exists, it must have a size of 50 kilobytes.
If it does not exist, Oracle creates it with that size.
The following statement creates a tablespace named STOCKS that has three datafiles:
CREATE TABLESPACE stocks
   DATAFILE 'diskc:stock1.dat',
            'diskc:stock2.dat',
            'diskc:stock3.dat';
The filespecs for the datafiles specifies files named
'DISKC:STOCK1.DAT', 'DISKC:STOCK2.DAT', and 'DISKC:STOCK3.DAT'. Since each
filespec omits the SIZE parameter, each file must already exist.
The following statement alters the STOCKS tablespace and adds a new datafile:
ALTER TABLESPACE stocks
   ADD DATAFILE 'diskc:stock4.dat' REUSE;
The filespec specifies a datafile named 'DISKC:STOCK4.DAT'.
Since the filespec omits the SIZE parameter, the file must already
exist and the REUSE option is not significant.
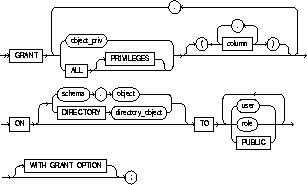
To grant system privileges and roles to users and roles.
To grant object privileges, use the GRANT command (Object Privileges) described
in the next section of this chapter. For more information, see "Granting
System Privileges and Roles". For illustrations, see "Examples".
|
Note: Descriptions of commands and clauses preceded by |
To grant a system privilege, you must either have been granted
the system privilege with the ADMIN OPTION or have been granted GRANT ANY
PRIVILEGE system privilege.
To grant a role, you must either have been granted the role
with the ADMIN OPTION or have been granted GRANT ANY ROLE system privilege,
or you must have created the role. See also "Other Authorization
Methods".

|
system_priv |
is a system privilege to be granted. |
|
|
role |
is a role to be granted. |
|
|
TO |
identifies users or roles to which system privileges and roles are granted. |
|
|
PUBLIC |
grants system privileges or roles to all users. |
|
|
WITH ADMIN OPTION |
grant the system privilege or role to other users or roles. If you grant a role with ADMIN OPTION, the grantee can also alter or drop the role. See also "Granting the ADMIN OPTION". |
|
Use this form of the GRANT command to grant both system privileges and roles to users, roles, and PUBLIC. Table 4-10 indicates which user or role can be given which authorizations:
If you grant a privilege to a user, Oracle adds the
privilege to the user's privilege domain. The user can immediately exercise
the privilege.
If you grant a privilege to a role, Oracle adds the
privilege to the role's privilege domain. Users who have been granted and
have enabled the role can immediately exercise the privilege. Other users
who have been granted the role can enable the role and exercise the privilege.
If you grant a privilege to PUBLIC, Oracle adds the
privilege to the privilege domains of each user. All users can immediately
perform operations authorized by the privilege.
If you grant a role to a user, Oracle makes the role
available to the user. The user can immediately enable the role and exercise
the privileges in the role's privilege domain.
If you grant a role to another role, Oracle adds the
granted role's privilege domain to the grantee role's privilege domain.
Users who have been granted the grantee role can enable it and exercise
the privileges in the granted role's privilege domain.
If you grant a role to PUBLIC, Oracle makes
the role available to all users. All users can immediately enable the role
and exercise the privileges in the roles privilege domain.
In addition, the following restrictions apply:
Table 4-11 lists system privileges
and the operations that they authorize. You can grant any of these system
privileges with the GRANT command.
A grant with the ADMIN OPTION supersedes a previous identical
grant without the ADMIN OPTION. If you grant a system privilege or role
to a user without the ADMIN OPTION, and then subsequently grant the privilege
or role to the user with the ADMIN OPTION, the user has the ADMIN OPTION
on the privilege or role.
A grant without the ADMIN OPTION does not supersede a previous
grant with the ADMIN OPTION. To revoke the ADMIN OPTION on a system privilege
or role from a user, you must revoke the privilege or role from the user
altogether and then grant the privilege or role to the user without the
ADMIN OPTION.
You can authorize database users to use roles through means
other than the database and the GRANT statement. For example, some operating
systems have facilities that grant operating system privileges to operating
system users. You can use such facilities to grant roles to Oracle users
with the initialization parameter OS_ROLES. If you choose to grant roles
to users through operating system facilities, you cannot also grant roles
to users with the GRANT command, although you can use the GRANT command
to grant system privileges to users and system privileges and roles to
other roles.
For information about other authorization methods, see Oracle8
Administrator's Guide.
To grant the CREATE SESSION system privilege to RICHARD, allowing RICHARD to log on to Oracle, issue the following statement:
GRANT CREATE SESSION
TO richard;
To grant the CREATE TABLE system privilege to the role TRAVEL_AGENT, issue the following statement:
GRANT CREATE TABLE
TO travel_agent;
TRAVEL_AGENT's privilege domain now contains the CREATE TABLE
system privilege.
The following statement grants the TRAVEL_AGENT role to the EXECUTIVE role:
GRANT travel_agent
TO executive;
TRAVEL_AGENT is now granted to EXECUTIVE. EXECUTIVE's privilege
domain contains the CREATE TABLE system privilege.
To grant the EXECUTIVE role with the ADMIN OPTION to THOMAS, issue the following statement:
GRANT executive
TO thomas
WITH ADMIN OPTION;
THOMAS can now perform the following operations with the EXECUTIVE role:
To grant privileges for a particular object to users and
roles. To grant system privileges and roles, use the GRANT command (System
Privileges and Roles) described in the previous section of this chapter.
See also "Database Object Privileges". For illustrations,
see "Examples".
You must own the object or the owner of the object must have
granted you the object privileges with the GRANT OPTION. This rule applies
to users with the DBA role.
|
object_priv |
is an object privilege to be granted. You can substitute any of the following values: |
|
|
ALL [PRIVILEGES] |
grants all the privileges for the object that you have been granted with the GRANT OPTION. The user who owns the schema containing an object automatically has all privileges on the object with the GRANT OPTION. (The keyword PRIVILEGES is optional.) |
|
|
column |
specifies a table or view column on which privileges are granted. You can specify columns only when granting the INSERT, REFERENCES, or UPDATE privilege. If you do not list columns, the grantee has the specified privilege on all columns in the table or view. |
|
|
ON |
identifies the object on which the privileges are granted. |
|
|
|
DIRECTORY |
identifies a directory_object on which privileges are granted by the DBA. You cannot qualify directory_object with a schema name. See also "Directory Privileges". See CREATE DIRECTORY. |
|
|
object |
identifies the schema object on which the privileges are granted. If you do not qualify object with schema, Oracle assumes the object is in your own schema. The object can be one of the following types:
|
|
TO |
identifies users or roles to which the object privilege is granted. |
|
|
|
PUBLIC |
grants object privileges to all users. |
|
WITH GRANT OPTION |
allows the grantee to grant the object privileges to other users and roles. The grantee must be a user or PUBLIC, rather than a role. |
|
You can use this form of the GRANT statement to grant object privileges to users, roles, and PUBLIC. Each database object privilege that you grant authorizes the grantee to perform some operation on the object. Table 4-12 summarizes the object privileges that you can grant on each type of object.
If you grant a privilege to a user, Oracle adds the
privilege to the user's privilege domain. The user can immediately exercise
the privilege.
If you grant a privilege to a role, Oracle adds the
privilege to the role's privilege domain. Users who have been granted and
have enabled the role can immediately exercise the privilege. Other users
who have been granted the role can enable the role and exercise the privilege.
If you grant a privilege to PUBLIC, Oracle adds the privilege to the privilege domain of each user. All users can immediately exercise the privilege.
Table 4-13 lists object privileges
and the operations that they authorize. You can grant any of these system
privileges with the GRANT command.
| Object Privilege | Allows Grantee to . . . |
|---|---|
|
Table privileges authorize operations on a table. Any one of following object privileges allows the grantee to lock the table in any lock mode with the LOCK TABLE command. |
|
|
ALTER |
allows the grantee to change the table definition with the ALTER TABLE command. |
|
DELETE |
remove rows from the table with the DELETE command. Note: You must grant the SELECT privilege on the table along with the DELETE privilege. |
|
INDEX |
create an index on the table with the CREATE INDEX command. |
|
INSERT |
add new rows to the table with the INSERT command. |
|
REFERENCES |
create a constraint that refers to the table. You cannot grant this privilege to a role. |
|
SELECT |
query the table with the SELECT command. |
|
UPDATE |
change data in the table with the UPDATE command. Note: You must grant the SELECT privilege on the table along with the UPDATE privilege. |
|
View privileges authorizes operations on a view. Any one of the above object privileges allows the grantee to lock the view in any lock mode with the LOCK TABLE command. To grant a privilege on a view, you must have that privilege with the GRANT OPTION on all of the view's base tables. |
|
|
DELETE |
remove rows from the view with the DELETE command. |
|
INSERT |
add new rows to the view with the INSERT command. |
|
SELECT |
query the view with the SELECT command. |
|
UPDATE |
change data in the view with the UPDATE command. |
|
Sequence privileges authorize operations on a sequence. |
|
|
ALTER |
change the sequence definition with the ALTER SEQUENCE command. |
|
SELECT |
examine and increment values of the sequence with the CURRVAL and NEXTVAL pseudocolumns. |
|
Procedure, function, and package privileges authorize operations on procedures, functions, or packages. |
|
|
EXECUTE |
execute the procedure or function or to access any program object declared in the specification of a package. |
|
Snapshot privileges authorize operations on a snapshot. |
|
|
SELECT |
query the snapshot with the SELECT command. |
|
Synonym privileges are the same as the privileges for the base object. See "Synonym Privileges" below. |
|
|
Directory privileges provide secured access to the files stored in the operating system directory. See "Directory Privileges" below. |
|
|
READ |
read files in the directory. |
The object privileges available for a synonym are the same
as the privileges for the synonym's base object. Granting a privilege on
a synonym is equivalent to granting the privilege on the base object. Similarly,
granting a privilege on a base object is equivalent to granting the privilege
on all synonyms for the object. If you grant a user a privilege on a synonym,
the user can use either the synonym name or the base object name in the
SQL statement that exercises the privilege.
The object privileges available for a directory provide secured
database access to the files stored in the operating system directory to
which the directory object serves as a pointer. The directory object contains
the full pathname of the operating system directory where the files reside.
Because the files are actually stored outside the database, Oracle8 server
processes also need to have appropriate file permissions on the file system
server.
Granting object privileges on the directory database object
to individual database users, rather than on the operating system, allows
Oracle8 to enforce security during file operations.
To grant READ on directory BFILE_DIR1 to user SCOTT, with the GRANT OPTION, issue the following statement:
GRANT READ ON DIRECTORY bfile_dir1 TO scott
WITH GRANT OPTION;
To grant all privileges on the table BONUS to the user JONES with the GRANT OPTION, issue the following statement:
GRANT ALL ON bonus TO jones
WITH GRANT OPTION;
JONES can subsequently perform the following operations:
To grant SELECT and UPDATE privileges on the view GOLF_HANDICAP to all users, issue the following statement:
GRANT SELECT, UPDATE
ON golf_handicap TO PUBLIC;
All users can subsequently query and update the view of golf
handicaps.
To grant SELECT privilege on the ESEQ sequence in the schema ELLY to the user BLAKE, issue the following statement:
GRANT SELECT
ON elly.eseq TO blake;
BLAKE can subsequently generate the next value of the sequence with the following statement:
SELECT elly.eseq.NEXTVAL
FROM DUAL;
To grant BLAKE the REFERENCES privilege on the EMPNO column and the UPDATE privilege on the EMPNO, SAL, and COMM columns of the EMP table in the schema SCOTT, issue the following statement:
GRANT REFERENCES (empno), UPDATE (empno, sal, comm)
ON scott.emp
TO blake;
BLAKE can subsequently update values of the EMPNO, SAL, and
COMM columns. BLAKE can also define referential integrity constraints that
refer to the EMPNO column. However, because the GRANT statement lists only
these columns, BLAKE cannot perform operations on any of the other columns
of the EMP table.
For example, BLAKE can create a table with a constraint:
CREATE TABLE dependent
(dependno NUMBER,
dependname VARCHAR2(10),
employee NUMBER
CONSTRAINT in_emp REFERENCES scott.emp(empno) );
The constraint IN_EMP ensures that all dependents in the
DEPENDENT table correspond to an employee in the EMP table in the schema
SCOTT.
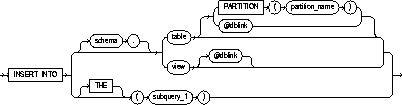
To add rows to:
For illustrations of inserting, see "Examples".
|
Note: Descriptions of commands and clauses preceded by |
For you to insert rows into a table, the table must be in
your own schema or you must have INSERT privilege on the table.
For you to insert rows into the base table of a view, the
owner of the schema containing the view must have INSERT privilege on the
base table. Also, if the view is in a schema other than your own, you must
have INSERT privilege on the view.
If you have the INSERT ANY TABLE system privilege, you can
also insert rows into any table or any view's base table.

|
schema |
is the schema containing the table or view. If you omit schema, Oracle assumes the table or view is in your own schema. |
|
table / view |
is the name of the table or object table into which rows are to be inserted. If you specify a view or object view, Oracle inserts rows into the view's base table. See also "Inserting Into Views". |
|
PARTITION (partition_name) |
specifies partition-level row inserts for table. The partition_name is the name of the partition within table targeted for inserts. |
|
|
Note: |
|
dblink |
is a complete or partial name of a database link to a remote database where the table or view is located. For information on referring to database links, see "Referring to Schema Objects and Parts". You can only insert rows into a remote table or view if you are using Oracle's distributed functionality. |
|
|
If you omit dblink, Oracle assumes that the table or view is on the local database. |
|
|
informs Oracle that the column value returned by the subquery is a nested table, not a scalar value. A subquery prefixed by THE is called a flattened subquery. See "Using Flattened Subqueries". |
|
subquery_1 |
is a subquery that Oracle treats in the same manner as a view. See "Subqueries". |
|
column |
is a column of the table or view. In the inserted row, each column in this list is assigned a value from the VALUES clause or the subquery. |
|
|
If you omit one of the table's columns from this list, the column's value for the inserted row is the column's default value as specified when the table was created. If you omit the column list altogether, the VALUES clause or query must specify values for all columns in the table. |
|
VALUES |
specifies a row of values to be inserted into the table or view. See the syntax description in "Expressions". You must specify a value in the VALUES clause for each column in the column list. See also "The VALUES Clause and Subqueries". |
|
subquery_2 |
is a subquery that returns rows that are inserted into the table. The select list of this subquery must have the same number of columns as the column list of the INSERT statement. See "Subqueries". |
|
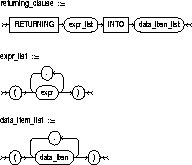
RETURNING |
retrieves the rows affected by the INSERT. You can retrieve only scalar, LOB, ROWID, and REF types. See also "The RETURNING Clause". |
|
expr |
is some of the syntax descriptions in "Expressions". You must specify a column expression in the RETURNING clause for each variable in the data_item_list. |
|
INTO |
indicates that the values of the changed rows are to be stored in the variable(s) specified in data_item_list. |
|
data_item |
is a PL/SQL variable or bind variable that stores a retrieved expr value. |
|
You cannot use the RETURNING clause with Parallel DML or with remote objects. See also "Parallel DML". |
|
An INSERT statement with a VALUES clause adds to the table
a single row containing the values specified in the VALUES clause.
An INSERT statement with a subquery instead of a VALUES clause
adds to the table all rows returned by the subquery. Oracle processes the
subquery and inserts each returned row into the table. If the subquery
selects no rows, Oracle inserts no rows into the table. The subquery can
refer to any table, view, or snapshot, including the target table of the
INSERT statement.
The number of columns in the column list of the INSERT statement
must be the same as the number of values in the VALUES clause or the number
of columns selected by the subquery. If you omit the column list, then
the VALUES clause or the subquery must provide values for every column
in the table.
Oracle assigns values to fields in new rows based on the
internal position of the columns in the table and the order of the values
in the VALUES clause or in the select list of the query. You can determine
the position of each column in the table by examining the data dictionary.
See Oracle8 Reference.
If you omit any columns from the column list, Oracle assigns
them their default values as specified when the table was created. For
more information on default column values, see CREATE
TABLE. If any of these columns has a NOT NULL constraint, then Oracle
returns an error indicating that the constraint has been violated and rolls
back the INSERT statement.
Issuing an INSERT statement against a table fires any INSERT
triggers defined on the table.
You can place a parallel hint immediately after the INSERT
keyword to parallelize an INSERT operation. Parallel DML must also be enabled
for the session. See ALTER SESSION for information
about enabling parallel DML. For detailed information about Parallel DML,
see Oracle8 Tuning, Oracle8
Parallel Server Concepts & Administration, and Oracle8
Concepts.
If a view was created using the WITH CHECK OPTION, then you
can insert into the view only rows that satisfy the view's defining query.
If a view was created using a single base table, then you
can insert rows into the view and then retrieve those values using the
RETURNING clause.
You cannot insert rows into a view if the view's defining query contains one of the following constructs:
An INSERT statement with a RETURNING clause retrieves the
rows inserted and stores them in PL/SQL variables or bind variables. Using
a RETURNING clause in INSERT statements with a VALUES clause enables you
to return column expressions, ROWIDs, and REFs and store them in output
bind variables. You can also use INSERT with a RETURNING clause for views
with single base tables.
PL/SQL does not allow multiple row inserts; you can retrieve
only a single row value into a PL/SQL variable. For information about using
the RETURNING clause, see the PL/SQL User's
Guide and Reference.
The following statement inserts a row into the DEPT table:
INSERT INTO dept
   VALUES (50, 'PRODUCTION', 'SAN FRANCISCO');
The following statement inserts a row with six columns into
the EMP table. One of these columns is assigned NULL and another is assigned
a number in scientific notation:
INSERT INTO emp (empno, ename, job, sal, comm, deptno)
   VALUES (7890, 'JINKS', 'CLERK', 1.2E3, NULL, 40);
The following statement has the same effect as Example II:
INSERT INTO (select empno, ename, job, sal, comm, deptno from emp)
   VALUES (7890, 'JINKS', 'CLERK', 1.2E3, NULL, 40);
The following statement copies managers and presidents or employees whose commission exceeds 25% of their salary into the BONUS table:
INSERT INTO bonus
   SELECT ename, job, sal, comm
   FROM emp
   WHERE comm > 0.25 * sal
   OR job IN ('PRESIDENT', 'MANAGER');
The following statement inserts a row into the ACCOUNTS table owned by the user SCOTT on the database accessible by the database link SALES:
INSERT INTO scott.accounts@sales (acc_no, acc_name)
   VALUES (5001, 'BOWER');
Assuming that the ACCOUNTS table has a BALANCE column, the
newly inserted row is assigned the default value for this column because
this INSERT statement does not specify a BALANCE value.
The following statement inserts a new row containing the next value of the employee sequence into the EMP table:
INSERT INTO emp
   VALUES  (empseq.nextval, 'LEWIS', 'CLERK',
            7902, SYSDATE, 1200, NULL, 20);
The following example adds rows from LATEST_DATA into partition OCT96 of the SALES table:
INSERT INTO sales PARTITION (oct96)
   SELECT * FROM latest_data;
The following example returns the values of the inserted rows into output bind variables :BND1 and :BND2:
INSERT INTO emp VALUES (empseq.nextval, 'LEWIS', 'CLARK',
                        7902, SYSDATE, 1200, NULL, 20)
   RETURNING sal*12, job INTO :bnd1, :bnd2;
The following example returns the reference value for the inserted row into bind array :1:
INSERT INTO employee
   VALUES ('Kitty Mine', 'Peaches Fuzz', 'Meena Katz')
RETURNING REF(employee) INTO :1;
To lock one or more tables in a specified mode. This lock
manually overrides automatic locking and permits or denies access to a
table or view by other users for the duration of your operation. See also
"Locking Tables".
The table or view must be in your own schema or you must
have LOCK ANY TABLE system privilege or you must have any object privilege
on the table or view.
|
schema |
is the schema containing the table or view. If you omit schema, Oracle assumes the table or view is in your own schema. |
|
table / view |
is the name of the table to be locked. If you specify view, Oracle locks the view's base tables. |
|
dblink |
is a database link to a remote Oracle database where the table or view is located. For information on specifying database links, see the section, "Referring to Objects in Remote Databases". You can lock tables and views on a remote database only if you are using Oracle's distributed functionality. All tables locked by a LOCK TABLE statement must be on the same database. |
|
|
If you omit dblink, Oracle assumes the table or view is on the local database. |
|
lockmode |
ROW SHARE allows concurrent access to the locked table, but prohibits users from locking the entire table for exclusive access. ROW SHARE is synonymous with SHARE UPDATE, which is included for compatibility with earlier versions of Oracle. ROW EXCLUSIVE is the same as ROW SHARE, but also prohibits locking in SHARE mode. Row Exclusive locks are automatically obtained when updating, inserting, or deleting. SHARE allows concurrent queries but prohibits updates to the locked table. SHARE ROW EXCLUSIVE is used to look at a whole table and to allow others to look at rows in the table but to prohibit others from locking the table in SHARE mode or updating rows. EXCLUSIVE allows queries on the locked table but prohibits any other activity on it. |
|
NOWAIT |
specifies that Oracle returns control to you immediately if the specified table is already locked by another user. In this case, Oracle returns a message indicating that the table is already locked by another user. |
|
|
If you omit this clause, Oracle waits until the table is available, locks it, and returns control to you. |
Some forms of locks can be placed on the same table at the
same time; other locks only allow one lock per table. For example, multiple
users can place SHARE locks on the same table at the same time, but only
one user can place an EXCLUSIVE lock on a table at a time. For a complete
description of the interaction of lock modes, see Oracle8
Concepts.
When you lock a table, you choose how other users can access
it. A locked table remains locked until you either commit your transaction
or roll it back, either entirely or to a savepoint before you locked the
table.
A lock never prevents other users from querying the table.
A query never places a lock on a table. Readers never block writers and
writers never block readers.
The following statement locks the EMP table in exclusive mode, but does not wait if another user already has locked the table:
LOCK TABLE emp
IN EXCLUSIVE MODE
NOWAIT;
The following statement locks the remote ACCOUNTS table that is accessible through the database link BOSTON:
LOCK TABLE accounts@boston
IN SHARE MODE;
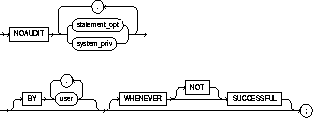
To stop auditing previously enabled by the AUDIT command
(SQL Statements). To stop auditing enabled by the AUDIT command (Schema
Objects), refer to NOAUDIT (Schema Objects). See also
"Stopping Auditing".
You must have AUDIT SYSTEM system privilege.
|
statement_opt |
is a statement option for which auditing is stopped. For a list of the statement options and the SQL statements they audit, see Table 4-6 and Table 4-7. |
|
|
system_priv |
is a system privilege for which auditing is stopped. For a list of the system privileges and the statements they authorize, see Table 4-6. |
|
|
BY user |
stops auditing only for SQL statements issued by specified users in their subsequent sessions. If you omit this clause, Oracle stops auditing for all users' statements, except for the situation described in the section that follows. |
|
|
WHENEVER SUCCESSFUL |
stops auditing only for SQL statements that complete successfully. |
|
|
|
NOT |
stops auditing only for statements that result in Oracle errors. |
|
|
|
If you omit the WHENEVER clause entirely, Oracle stops auditing for all statements, regardless of success or failure. |
The NOAUDIT statement must have the same syntax as the previous
AUDIT statement. Further, it reverses the effects only of that particular
statement. Therefore, if one AUDIT statement (statement A) enables auditing
for a specific user, and a second (statement B) enables auditing for all
users, then a NOAUDIT statement to disable auditing for all users (statement
C) reverses statement B, but leaves statement A in effect and continues
to audit the user that statement A specified. For information on auditing
specific SQL commands, see the AUDIT (SQL Statements).
The following examples correspond to the first three examples
listed in AUDIT (SQL Statements).
If you have chosen auditing for every SQL statement that creates or drops a role, you can stop auditing of such statements by issuing the following statement:
NOAUDIT ROLE;
If you have chosen auditing for any statement that queries or updates any table issued by the users SCOTT and BLAKE, you can stop auditing for SCOTT's queries by issuing the following statement:
NOAUDIT SELECT TABLE
   BY scott;
The above statement stops auditing only SCOTT's queries,
so Oracle continues to audit BLAKE's queries and updates and SCOTT's updates.
To stop auditing on all statements that are authorized by DELETE ANY TABLE system privilege, issue the following statement:
NOAUDIT DELETE ANY TABLE;
To stop auditing previously enabled by the AUDIT command
(Schema Objects). To stop auditing enabled by the AUDIT command (SQL Statements),
refer to NOAUDIT (SQL Statements). For illustrations,
see "Examples".
The object on which you stop auditing must be in your own
schema or you must have AUDIT ANY system privilege. In addition, if the
object you choose for auditing is a directory, even if you created it,
you must have AUDIT ANY system privilege.

|
object_opt |
stops auditing for particular operations on the object. For a list of these options, see Table 5-8. |
|
|
ON |
identifies the object on which auditing is stopped. If you do not qualify object with schema, Oracle assumes the object is in your own schema. |
|
|
object |
identifies the object on which auditing is stopped. The object must a table; view; sequence; stored procedure, function, or package; snapshot; or library. |
|
|
|
For information on auditing specific schema objects, refer to AUDIT (Schema Objects). |
|
|
DIRECTORY directory_name |
identifies the name of the directory on which auditing is being stopped. |
|
|
DEFAULT |
removes the specified object options as default object options for subsequently created objects. |
|
|
WHENEVER SUCCESSFUL |
stops auditing only for SQL statements that complete successfully. |
|
|
|
NOT |
stops auditing only for statements that result in Oracle errors. |
|
|
If you omit the WHENEVER clause entirely, Oracle stops auditing for all statements, regardless of success or failure. |
|
If you have chosen auditing for every SQL statement that queries the EMP table in the schema SCOTT, you can stop auditing for such queries by issuing the following statement:
NOAUDIT SELECT
   ON scott.emp;
You can stop auditing for such queries that complete successfully by issuing the following statement:
NOAUDIT SELECT
   ON scott.emp
   WHENEVER SUCCESSFUL;
This statement stops auditing only for successful queries,
Oracle continues to audit queries resulting in Oracle errors.
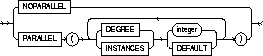
To specify whether Oracle should execute an operation serially
or in parallel. See also "Using the PARALLEL Clause".
For illustrations, see "Examples".
This clause can only be used in the following commands:
|
Note: The PARALLEL clause syntax is allowed when creating a table, index, or cluster in a CREATE SCHEMA statement. However, parallelism is not used and no error message is issued. |
|
NOPARALLEL |
specifies serial execution of an operation. This is the default. |
|
|
PARALLEL |
specifies parallel execution of an operation. |
|
|
DEGREE |
determines the degree of parallelism for an operation on a single instance--that is, the number of query servers used in the parallel operation. |
|
|
|
integer |
uses integer query servers. |
|
|
DEFAULT |
the default number of query servers used is calculated from the number of CPUs and the number of DEVICES storing tables to be scanned in parallel. |
|
INSTANCES |
determines the number of parallel server instances used in the parallel operation. This keyword is ignored if you do not have a parallel server. |
|
|
|
integer |
uses integer instances |
|
|
DEFAULT |
uses all available instances |
|
|
|
Note: INSTANCES only applies to an instance using the Oracle Parallel Server. See also "Nonpartitioned Tables and Indexes" and "Partitioned Tables and Indexes". |
Use the PARALLEL clause to specify table parallelism in the
CREATE TABLE and ALTER TABLE commands. When you specify this clause in
a table definition, Oracle uses the clause to determine parallelism of
DML statements as well as queries. Explicit parallel hints, however, override
the effect of the PARALLEL clauses for that table.
If you do not specify the PARALLEL clause, Oracle determines
the type of parallelism to use by the default PARALLEL attributes of the
table or index.
For more information on parallelized operations, see Oracle8
Tuning, Oracle8 Concepts, and Oracle8 Parallel Server Concepts
& Administration.
Used in a CREATE command, the PARALLEL clause causes the
creation of the schema object to be parallelized. If the CREATE command
is CREATE TABLE, the PARALLEL clause also sets the default degree of parallelism
for queries and DML on the table after creation.
Used in a command to alter an object, the PARALLEL clause
changes the default degree of parallelism for queries and DML on the object.
In an ALTER DATABASE RECOVER command, the PARALLEL clause causes the recovery
to be parallelized.
Specifying PARALLEL (DEGREE 1 INSTANCES 1) is equivalent
to specifying NOPARALLEL.
A hint in a query can override a default of NOPARALLEL. Likewise,
a hint in a query can override a default of PARALLEL.
The INSTANCES parameter of CREATE TABLE ... AS SELECT and
CREATE INDEX determines the number of instances used by the CREATE operation.
Instances are chosen for physical affinity to the (first) datafiles underlying
the partitions. If the INSTANCES parameter is greater than the number of
instances with affinity to the underlying datafiles, additional instances
(up to the total number of partitions) are chosen arbitrarily. The DEGREE
and INSTANCES parameters, stored in the data dictionary, are used later
to compute the default PARALLEL attributes of the schema object.
The following command creates a table using 10 query servers, 5 to scan SCOTT.EMP and another 5 to populate EMP_DEPT:
CREATE TABLE emp_dept
PARALLEL (DEGREE 5)
AS SELECT * FROM scott.emp
WHERE deptno = 10;
The following command creates an index using 10 query servers, 5 to scan SCOTT.EMP and another 5 to populate the EMP_IDX index:
CREATE INDEX emp_idx
ON scott.emp (ename)
PARALLEL 5;
The following command performs tablespace recovery using 5 recovery processes on 5 instances in a parallel server, for a total of 25 (5 * 5) query servers:
ALTER DATABASE
RECOVER TABLESPACE binky
PARALLEL (DEGREE 5 INSTANCES 5);
The following command changes the default number of query servers used to query the EMP table:
ALTER TABLE emp
PARALLEL (DEGREE 9);
The following command causes the index to be rebuilt from the existing index by using 6 query servers, 3 each to scan the old and to build the new index:
ALTER INDEX emp_idx
REBUILD
PARALLEL 3;