Release 2.4
A63822-01
Library |
Product |
Contents |
Index |
| Oracle8
ConText Cartridge Workbench User's Guide
Release 2.4 A63822-01 |
|
This chapter introduces and describes the administration
tools provided by the ConText Workbench.
The following topics are covered in this chapter:
| See
Also:
For more information about ConText administration, see Oracle8 ConText Cartridge Administrator's Guide |
This section provides setup and usage information for the
System Administration tool.

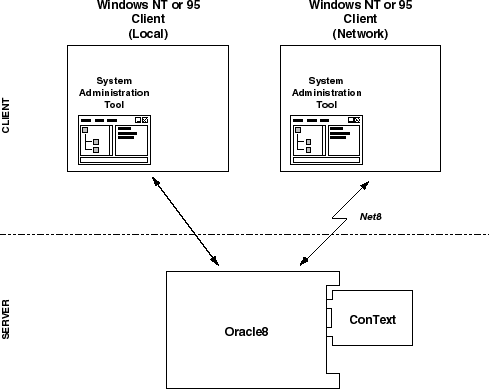
The System Administration Tool is a client-side Visual Basic
application that provides a graphical user interface (GUI) for ConText
administrators (i.e. users with the CTXADMIN role) to manage ConText servers,
users, and queues for multiple Oracle8 databases.
It also can be used by ConText designers (i.e. users with the CTXAPP role) to perform the following tasks:
The System Administration Tool can be installed on any client
PC running Microsoft Windows NT or Windows 95 and connects to Oracle8 using
Net8.
The following tasks may be required for using the System
Administration tool.
Before Oracle users with the CTXADMIN or CTXAPP role can
connect to a database from the System Administration tool, the CTXSYS user
may have to connect once to the database. If this is required, the System
Administration tool will notify you.
|
Note: CTXSYS needs to connect only once per database. Once CTXSYS connects to a database for the first time, the database is enabled thereafter for all users with the appropriate ConText roles. |
The TNSNAMES.ORA file lists all of the available databases
to which an Oracle user can connect via Net8. If a user wants to connect
to a database that does not appear in the list of known database in the
System Administration tool, an alias for the database must be added to
TNSNAMES.ORA and the System Administration tool restarted.
To start the System Administration tool, simply click on
the System Administration icon in the ConText Cartridge Workbench program
group or choose Start > Programs > ConText Cartridge Workbench > System
Administration.
Full usage information for the System Administration Tool
is provided online as a WinHelp file.
This section provides set-up and usage information for the Configuration Manager.

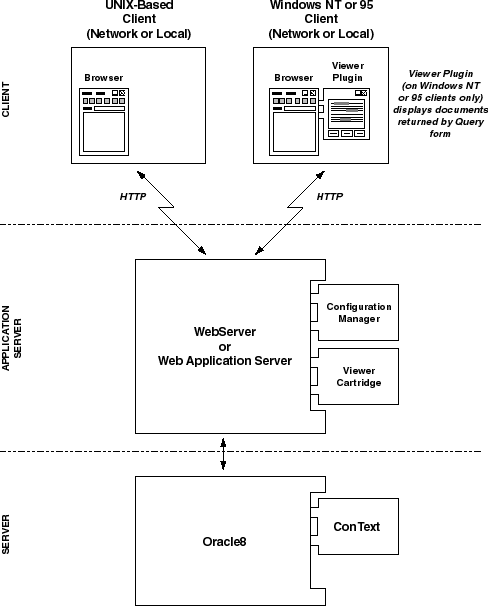
The Configuration Manager is a platform-independent, Web-based
application that allows the CTXSYS user to quickly and easily manage ConText
servers, users, and queues for a single database. It also provides a simple
ad-hoc query interface and an application generator for quickly and easily
creating prototype ConText applications
There is one installation of the Configuration Manager per
database; each installation runs under the CTXSYS user.
The Configuration Manager utilizes a generic PL/SQL package
for processing HTML pages extended with special tags that allow transparent
interaction with a database.
The Configuration Manager includes an application generator
that lets you build prototype ConText applications and then run them, using
the querying facilities and theme and Gist viewing. You can access this
tool by clicking Applications on the Configuration Manager Menu
page.
| See
Also:
For more information about ConText administration, see Oracle8 ConText Cartridge Administrator's Guide |
Before you configure the Configuration Manager, ensure the following requirements are met:
Configuration of the Configuration Manager involves:
|
Note: If creation of the PL/SQL packages fails or configuration of WebServer/Web Application Server for the Configuration Manager fails, you can manually create the packages and configure WebServer/Web Application Server. In addition, deconfiguration procedures can be applied to manually remove the Configuration Manager from the appropriate release of WebServer/Web Application Server. For more information, see Appendix B, "Configuration Manager: Manual Configuration". |
If WebServer/Web Application Server is installed on the current
machine (i.e. the machine from which Configuration Manager configuration
is performed), this is considered a 'local' configuration.
If WebServer/Web Application Server is not installed on the
current machine, this is considered a 'remote' configuration.
Configuration is carried out via two Oracle Installer dialog boxes:
To configure the ConText Configuration Manager:
Choose Start > Programs > ConText Cartridge Workbench -
[HOME_NAME] > Configuration Manager Setup.
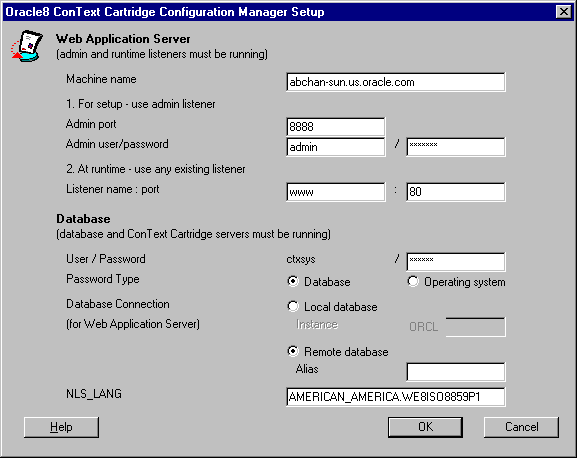
The Oracle Installer starts and the Oracle8 ConText Cartridge
Configuration Manager Setup dialog box appears:

| Field1 | Description |
|---|---|
|
Web Application Server |
|
|
Machine name |
Enter the machine name on which Web Application Server is installed. By default, the name of the current machine appears. If you are performing a local configuration (i.e. Web Application Server is installed on the current machine), use the default. If you are performing a remote configuration, enter the name of the remote machine on which Web Application Server is installed. |
|
Admin listener port |
Enter the port number of the admin listener for Web Application Server. The default ('8888') is the default admin listener port for Oracle Web Application Server 3.0. |
|
Admin listener user and password |
Enter the username and password for the admin listener. The default username ('admin') is the default for Oracle Web Application Server 3.0. |
|
Listener name : port |
Enter the name and port of an existing runtime listener for Web Application Server. The defaults ('www' and '80') are the default runtime listener name and port for Oracle Web Application Server 3.0 on NT. Other runtime listener name defaults include: weblsn (WebServer 2.1 on Unix) websvr (WebServer 2.1 on Unix) |
|
Database |
|
|
User/Password |
Enter the password for CTXSYS, the owner of the Configuration Manager installation. |
|
Password Type |
Specify the type ('database' or 'Operating system') for the CTXSYS password. |
|
Database Connection |
Select the connection type that will be used between Web Application Server and Oracle8:
If you select this option, you must also provide the SID of the Oracle8 database. If you select this option, you must also provide the Net8
alias (database connection) to the Oracle8 database for Web Application
Server.
Note: The alias that you enter here is not the alias between the current machine and Oracle8 machine. |
|
NLS_LANG |
Enter the NLS_LANG value for the Oracle8 database. |
| 1 Ask your web server administrator for assistance with these values. |
ORACLE_HOME\ctxw\middle\cfgmgr\remote
The files must be copied to the following directory on the remote machine:
ORACLE_HOME/ctxw/middle/cfgmgr
|
Note: The 'remote' subdirectory is not required on the remote machine. |
Select how you want to copy the required files to the Web Application Server machine:
You can select 'Automatically' only if Web Application Server is installed on a machine that is mounted to the current machine. If you select this option, you must also specify the directory on the current machine to which the ORACLE_HOME on the Web Application Server remote machine is mounted.
|
Note: If the remote machine is not running Windows NT, all file and directory names must be in lowercase on the remote machine. |
An HTML-based help system is delivered as part of the Configuration
Manager. The help system utilizes ConText to generate a text index that
enables you to search the help system; therefore, detailed usage information
for the Configuration Manager is not included in this user's guide.