Release 1.6
A63731-01
Library |
Product |
Contents |
Index |
| Oracle
Enterprise Manager Administrator's Guide
Release 1.6 A63731-01 |
|
![]()
![]()
This chapter describes how to use Schema Manager to administer
schema objects in your database. This chapter assumes that you have read
Chapter 7, "Overview of the Database Tools"
and are familiar with the interface elements of the database tools.
With Schema Manager, you can create, alter, or drop schema
objects such as clusters, database links, execution plans, PL/SQL, sequences,
snapshots, snapshot logs, synonyms, tables, and views.
The topics in this chapter are:
To start Schema Manager, click on the Schema Manager icon in the Administrator Console or choose Schema Manager from the Tools menu.
You can change the database connection with the Change Database
Connection option in the File menu. For information, see Application
Menus on page 7-10.
After Schema Manager successfully connects to a database,
the schema navigator displays on the left side of Schema Manager window.
The navigator consists of a series of schema object containers, one for
each type schema object contained in the main Schema Objects folder. The
name of the connected database is displayed next to the Schema Objects
folder.
The display on the right side of the window is determined
by the objects selected on the left side of the screen. The right side
may contain a multi-column scrolling list, property sheet.
For general information, see:
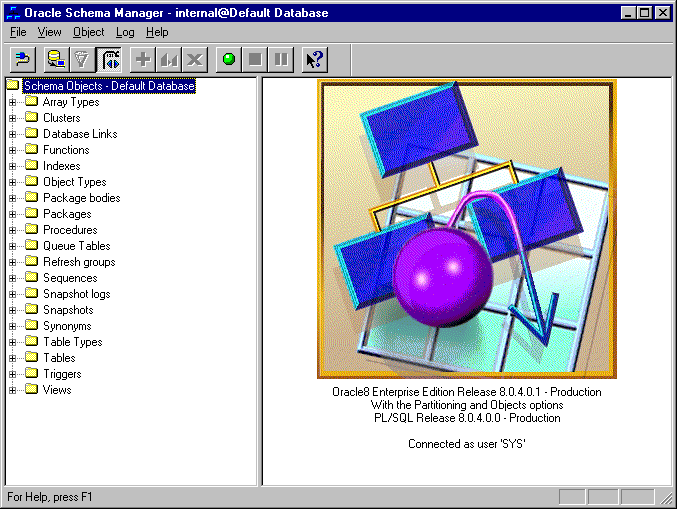
An example of a Schema Manager window is shown in Table
11-1, "Schema Manager Window".
Schema Manager includes four standard menus, File, View, Log, and Help, plus the Object menu. The Object menu contains the following menu options:
Creates a new schema object.
Creates a new schema object based on the currently selected object in the tree list.
Removes the selected schema object in the tree list.
Displays database objects that rely on a selected schema object and any objects that the selected schema object relies on.
Grant object privileges to a user or role.
Creates a new synonym for a schema object.
Allows you to quickly create indexes on tables and clusters selected from the tree list.
Removes a partition from a table.
Drop Storage: Deallocates space previously used by
the partition and make that space available for use by other schema objects.
Reuse Storage: Specifies that space previously used by the partition.remains allocated to the partition. This space is only available for inserts and updates to the same partition.
Make Unusable: Marks the local index partitions corresponding
to a table partition unusable.
Rebuild Unusable: Rebuilds all unusable local index partitions corresponding to a table partition. This operation is not parallelized.
Converts a partition into a non-partitioned table by exchanging the data segments.
Split an existing partition into multiple partitions (Oracle8)
Start the selected queue for enqueue and dequeue.
Stop the selected queue for enqueue and dequeue.
The Schema folder contains all database objects pertinent
to database schema. Specific schema object types are listed alphabetically
under the Schema Object folder.
Alternatively, you can view the navigator by specific schemas
defined within the connected database rather than by schema type. To view
the navigator by defined schemas, select By Schema from the View menu.
All schemas defined in the database are listed alphabetically in the navigator
as containers. You expand the specific schema folder in the navigator to
view the complete list of schema object types defined for that schema.
There are two property pages that are used in several schema object property sheets. They are available when Advanced UI Mode is selected from the View menu. The common property sheets are as follows:
The Storage page allows you to specify database storage parameters for a particular schema object. Schema Manager provides two methods for defining storage parameters:
The Storage page layout and options depend on the method
chosen.
Initial Size: Size of the object's first extent. You
can enter a value, the minimum being the size of one data block. The default
value is the size of five data blocks.
Next Size: Size of the next extent to be allocated
to the object. The default value is the size of five datablocks. The smallest
permissible value is the size of one datablock.
Increase Size by: Percent by which each extent grows
(after the second extent) compared to the previous extent.
Minimum Number: Total number of extents allocated
when a segment is created. The default value is one. You can enter a value
of one or greater.
Maximum Number: Total number of extents, including the first, that an Oracle database can allocate for the object. There are two extent options available, Unlimited and Value.
% Free: Percentage of space in each of the object's
data blocks that is reserved for future updates to the object. You can
enter values from 0 to 99.
% Used: Minimum percentage of used space that an Oracle database maintains for each data block of the object. A block becomes a candidate for row insertions when its used space falls below the % Used value. You can enter a value from 1 to 99. The default value is 40.
Initial: Initial number of transaction entries allocated
within each data block allocated to the object. You can enter a value from
1 or 2(for clusters and indexes) to 255.
Maximum: Maximum number of concurrent transactions that can update a data block allocated to the object. You can enter a value from 1 to 255.
Lists: Number of free lists for each of the free list
groups for the table, cluster, or index. You can enter a value of one or
greater. The default value is one.
Groups: Number of groups of free lists for a table,
cluster, or index. You can enter a value of one or greater. The default
value is one.
In order to use Auto Calculation, you must have select privilege on v$type_size.
Initial # rows: number of rows in the indexed table.
Schema Manager uses the number of rows to determine the size of the first
extent.
Growth rate: expected table growth rate in rows/unit of time. Enter the number of rows, then select day, week, month, or year from the drop-down list. Schema manager uses the growth rate to determine the size (in bytes) of the next extent.
Determines the percentage of space to leave free for updates
and insertions within each of the index's data blocks.
High: sets the percentage of reserved space for index
updates to 40 percent.
In Ascending Order: available when Insert Activity
is High, specifies that the index be created in ascending order. When selected,
the percentage of space reserved for updates and insertions is set to 5
percent.
Low or None: sets the percentage of reserved space
for index updates to 40 percent.
When checked, specifies parallel execution of an operation.
Degree: The degree of parallelism for an operation on a single instance.
Instances: Maximum number of instances allowed to participate in parallel query processing.
An array is an ordered set of data elements, of all the same datatype, with size corresponding to the number of elements in the array. Arrays can be of variable size (VARRAY). When defining an array type, you specify the maximum size. Creating an array type does not allocate space; it defines a datatype which you can use as
For detailed information on using VARRAYs, see Oracle8
Server Application Developer's Guide.
The Array Types multi-column list displays when the Array Types folder is selected from the navigator. The multi-column list contains the following columns:
Schema to which the array type belongs.
Name of the array type.
Maximum number of elements allowed in a variable array of the type currently being defined/edited.
Schema to which the datatype (for individual elements within the array) belongs.
Name of the datatype (for individual elements within the
array).
To create an array type:
This single-page property sheet allows you to define the requisite attributes for an array type.
Name of the variable array type.
Schema to which the variable array type belongs.
Maximum number of elements allowed in a variable array of the type currently being defined/edited.
Schema: Schema to which the datatype belongs. When
a datatype is defined as one of the built-in types (for example, VARCHAR2),
schema does not apply. <NONE> is displayed in this case.
Type: Datatype of the element(s) in the array.
Length: Number of bytes allowed for values defined
in the column (for CHAR, VARCHAR2, NUMBER, RAW datatypes).
Precision (for NUMBER datatype): Number of digits
to the right of the decimal point. If CHAR is selected in the Datatype
drop-down list, you may specify length. If VARCHAR2 or RAW is selected,
you may specify a length. If NUMBER is selected, you may specify a length,
a length and a precision, or neither.
User defined object will be a reference: Specifies
that the elements contained in the variable array be a REF. This option
is only available if a user-defined datatype is selected from the Type
drop-down list.
To create an array type with parameters that are identical to an existing type:
To edit an existing array type:
The Clusters folder consolidates information about clustered
tables.
A cluster is a group of tables that share the same data blocks
because they share common columns. Clustered tables are often joined in
queries.
The Clusters multi-column list displays when the Clusters folder is selected from the navigator. The Clusters multi-column list contains the following columns:
Name of the schema to which the cluster belongs. This column is not shown when viewing a particular schema.
Name of the cluster.
Type of cluster (index or hash).
Tablespace in which the cluster is stored.
To create a new cluster:
The Cluster property sheet contains the following pages:
This page allows you to define the cluster name, type, and cluster key column attributes. The General page contains the following:
Name of the cluster being defined.
Name of the schema containing the cluster. The drop-down list contains all schemas available in the current database.
Name of the tablespace to which the cluster will belong.
An estimate of the total amount of space required to store the average number of rows associated with each cluster key value or hash value (kilobytes or megabytes)
When selected, indicates that an index is specifically defined for the cluster.
When selected, indicates that related rows are stored in
the same data block.
Hashkeys: Maximum number of unique hash values that
can be generated by the hash function.
Hash Function: Specify that Oracle's internal hash function use the current function (Default) or bypass the Oracle internal hash function and specify a SQL expression.
Datatype: CHAR, VARCHAR2, NUMBER, LONG, RAW, LONG
RAW, DATE, ROWID, MLSLABEL
The following buttons appear when creating a new cluster.
New: Displays the Column Details dialog box.
Edit: Displays the Column Details dialog box for the
cluster key column selected in the list.
Remove: Deletes a cluster key column that is selected
in the list.
Note: This dialog box displays when you click on the New or Edit button.
Name of the table column being defined or edited. You can specify a valid Oracle identifier as the name of the column. This field is disabled for columns that have already been defined in the database.
Column's Oracle datatype. See Oracle Server SQL Reference
for specific information on Oracle datatypes.
You can select one of the following items: CHAR, VARCHAR2,
NUMBER, RAW, DATE, ROWID, MLSLABEL
Length: Number of bytes allowed for values defined
in the column (for CHAR, VARCHAR2, NUMBER, RAW).
Precision (for NUMBER datatype): Number of digits to the right of the decimal point. If CHAR is selected in the Datatype drop-down list, you may specify length. If VARCHAR2 or RAW is selected, you may specify a length. If NUMBER is selected, you may specify a length, a length and a precision, or neither.
Maximum size for values of a given datatype. For specific information on datatypes, see Oracle Server SQL Reference.
For Number datatypes, value specifies the precision (total
number of digits). Precisions values can range from 1 to 38.
To create a cluster with parameters that are identical to an existing cluster:
To edit an existing cluster:
The Database Links folder contains database links defined
within the connected database.
A database link allows you to access a remote database. For
information about database links, see Oracle Server SQL Reference.
The Database Links multi-column list displays when the Database
Links folder is selected in the navigator. The list contains information
about the status of links defined within the connected database. For information
about database links, see Oracle Server Concepts.
The columns of the Database Links list are described below:
The name of the schema containing the link. This column is not shown when viewing a particular schema.
The name of the database link.
The name of the user the database connects as when connecting to the remote database.
SQLNet connect string to the host.
Date on which the link was created.
If you view the navigator by schema, a Database Links folder
appears in an alphabetical list of all schema objects under each schema
in the navigator. When the Database Links folder is selected, the multi-column
list is displayed.
To create a new database link:
The Database Link property sheet consists of a single General
page:
The General page contains the following information:
The name of the database link being defined. You can specify any valid Oracle identifier.
Specifies that the database link be available to all users (public) or only the owner (private).
Current User (Oracle 8 only): Need to do determine
function.
Connected User: Specifies that the database link use
the username and password of the user accessing the database link.
Fixed User
Username: Username used to connect to the
remote database. If the Username field is left blank during the creation
process, the newly defined link acquires the username of the person accessing
the remote database.
Password: Password used to connect to the remote database. If the Username and Password fields are left blank, the database link uses the username password of the person accessing the database link.
Service Name: Database specification of a remote database.
Checks the validity of the Username, Password, and Service Name when a database link is created. This button is only available when altering an existing database link.
Displays the date of database link creation. By default,
the current date is displayed.
To create a database link with parameters that are identical to an existing database link:
To look at the parameters for an existing link:
Select a specific database link from the navigator. A property sheet with the link's current parameters is displayed. The property sheet is nearly identical to the Create Database Link property sheet with the following exceptions:
The Functions folder contains an alphabetical list of functions
defined within the database.
A function is a PL/SQL subprogram that executes an operation
and returns a value at the completion of the operation. A function can
be either built-in or user-named. For information about functions, see
Oracle Server SQL Reference.
The Functions multi-column list displays when the Functions
folder is selected in the navigator. The list contains information about
the status of links defined within the connected database.
The columns of the Functions list are described below:
Name of the schema containing the function. This column is not shown when viewing a particular schema.
Name of the function.
Date on which the function was created.
Date the function was last modified.
Current status of the function (Valid or Invalid).
To create a new function:
The property sheet contains a single General page.
The General page consists of the following information:
Name of the function being defined.
Name of the schema containing the function. The drop-down list contains all schemas available in the current database.
Recompile the PL/SQL source for the function so that it can be stored and executed from within the database.
Created: Date the function was originally created.
Last Modified: Date the function was last modified.
Current status of the Function (valid or invalid).
Show Errors: Displays the Error Message dialog box listing the errors encountered while trying to compile the function source. This button is only enabled when the function status is invalid. For detailed error message information pertaining to PL/SQL, see the Oracle Server Messages Manual.
Function SQL statements or PL/SQL constructs.
To create a function with parameters and code that is identical to an existing function:
To alter an existing function:
Note: To change the parameters and any code modifications
back to their original setting, click Revert.
The Indexes folder contains table indexes defined within
the database. An index is an optional structure associated with a table,
used by Oracle to locate rows of that table quickly and can be used to
guarantee that every row is unique. For information about indexes, see
the Oracle Server SQL Reference, or the PL/SQL User's Guide and
Reference .
The Indexes multi-column list appears when you select the Indexes folder in the navigator. This multi-column list contains the following information:
Name of the schema. This column is not shown when viewing a particular schema.
Name of the index.
Owner of the table for which the index is created.
Table for which the index is created.
Type of table (table or cluster).
Status of the table (Valid or Invalid).
When you view the navigator by schema, an Indexes folder
appears listing all available schema in alphabetical order. Selecting the
Indexes folder displays a multi-column list of indexes contained in the
parent schema.
To create a new index:
The Create Index property sheet consists of up to three pages:
Note: You can also call up the Index property sheet
by selecting a table from the navigator and choosing Create Index On from
the Object menu.
The General page of the index property sheet allows you to define an index on one or more columns of a table or a cluster. The General page consists of the following information:
Name of the index. When creating an index you can specify a valid Oracle identifier
Schema in which the index will be defined. The default schema for a new index is the user's default schema. When creating an index link, you can also select any schema defined in the connected database from the Schema drop-down list.
Name of the tablespace to which the index belongs.
Table/Cluster: Specifies whether the index is to be placed
on a table or cluster.
Schema: Drop-down list displaying available schema
to which the index can belong.
Table: Drop-down list displaying all available tables
belonging to the selected schema.
Index Type (Oracle 8 only): Specifies whether a partitioned
index is local (equi-partitioned with the underlying table) or global (patitioning
defined explicitly when you create the index). Partitioning of global indexes
must be maintained manually.
Table Spreadsheet
To add a column to the index, click on the desired column
in the spreadsheet. The order of the column appears in the Order column.
To remove a column from the index click on the desired column entry in the spreadsheet. The column are automatically reordered.
Unique: Specifies that the value of the column (or
combination of columns) in the table to be indexed must be unique.
Bitmap: Specifies that the index is to be created
as a bitmap rather than as a B-tree. This option does not apply when creating
a global partitioned index.
Sorted (Default): If deselected, indicates to Oracle
that rows are stored in the database are in ascending order and therefore
do not have to be sorted when creating the index.
Recoverable: Specifies that the creation of the index
will be logged in the redo log file.
To create an index with parameters that are identical to an existing index:
To alter an existing index:
The Object Types folder consolidates information about user-defined
datatypes (object types) within the connected database. Object types are
schema objects that can represent real-world entities, such as a purchase
order used by an inventory control application.
The Object Type multi-column list displays when the Object Types folder is selected in the Navigator. The list contains the following columns:
Schema to which the object type belongs. Column is not displayed if an individual schema is selected in the Navigator.
Name of the object type.
Whether or not the object type is incomplete (NO-object type has at least one attribute or method) or complete (YES-object type has no attributes or methods).
Total number of attributes that are defined for the object type.
Total number of methods defined for the object type.
To create a new object type:
The General page allows you to specify the name of the object type and the schema within which to create it. Object types are abstractions of real-world entities, such as a purchase order. You have the option of defining either an incomplete (no attributes or methods specified) or a complete object type.
Name of the user-defined object type.
Schema in which the object is to reside.
Multi-column list displaying all currently defined attributes.
Add: Displays the Object Type Attribute property sheet
allowing you to define a new object attribute. Newly created attributes
appear in the multi-column list.
Edit: Displays the Object Type Attribute property
sheet allowing you to modify the attribute selected in the multi-column
list.
Remove: Deletes the attribute selected in the Attributes multi-column list.
Multi-column list displaying all available object methods.
Add: Displays the Object Type Method property sheet
allowing you to define a new method for the object. Newly created methods
appear in the Methods multi-column list.;
Edit: Displays the Object Type Method property sheet
allowing you to modify a method selected in the multi-column list.
Remove: Deletes the method selected in the Attributes
multi-column list.
To add attributes to an object type:
This page allows you to define the attributes of a user-defined object. Attributes are built-in types or other user-defined types which model the structure of real world entities. Attributes are the variables that form the data structure of a user-defined object.
Name of the object attribute.
Schema containing the object to which the attribute belongs.
Name of the object to which the attribute belongs.
Schema: Attributes's datatype schema. When an attribute
is defined as one of the built-in types (for example, VARCHAR2), schema
does not apply. Hence, <NONE> is displayed.
Type: Attribute datatype. The drop-down list displays
all standard Oracle built-in types. If a schema containing user-defined
types is selected, these types also appear in the list.
Length: Number of bytes allowed for values defined
in the column (for CHAR, VARCHARZ, NUMBER, RAW).
Precision (for NUMBER datatype): Number of digits
to the right of the decimal point. If CHAR is selected in the Datatype
drop-down list, you may specify length. If VARCHAR2 or RAW is selected,
you may specify a length. If NUMBER is selected, you may specify a length,
a length and a precision, or neither.
User defined object will be a reference (REF): Specifies
that the attribute be a REF datatype. A REF datatype allows the attribute
to "refer" or point to an object stored elsewhere. This option is only
available if a user-defined datatype is selected from the Type drop-down
list.
You can edit or remove an attribute from an object type by
selecting the desired attribute in the method multi-column list and clicking
on Edit (to bring up the Object Method property sheet) or Remove to delete
the selected method.
To add methods to an object type:
The Object Method property sheet consists of the three pages:
The object method property sheet allows you define functions or procedures written in PL/SQL and stored in the database.
Name of the method being created.
Schema of the object to which the method belongs.
Name of the object to which the method belongs.
Drop-down list allows you to select one of four possible
types: Procedure, Function, Map Function, or Order Function. Method type
selection determines which fields are active in the Return Type area.
Parameters: An editable spreadsheet allowing you define method input parameters (one parameter per row).
Schema: Schema to which the parameter belongs.
If a built-in datatype is selected, <NONE> is displayed. Built-in types
are common to all schemas.
Type: Datatype of the parameter. Drop-down
list displays all built-in datatypes in addition to any user-defined types
belonging to the selected schema.
Ref: Indicates whether the parameter is a
reference. The field is enabled if the selected datatype can be referrenced.
Direction: Specifies the behavior of method. There are three modes: IN (default-allows you to pass values to the subprogram being called), OUT (allows you return values to the caller of a subprogram), and IN OUT (allows you to pass initial values to the subprogram being called and return updated values to the caller).
New additions (defined but not yet created) are graphically
identified by a hand with a plus sign. After selecting an entry in the
spreadsheet, you can use the context-sensitive menu (right mouse button)
to drop the selected parameter.
Return Type: Allows you to specify the datatype of the result being returned from the defined method.
Schema: Schema to which the return value type
belongs.
Type: Datatype of the return value.
User defined object will be a reference: Specifies that the method return value be a REF datatype. This option is only available if a user-defined datatype is selected from the Type drop-down list.
This page allows you to define/edit the PL/SQL code which
makes up the various methods of the object type body. An empty object type
body (which includes its heading and the keyword END;) is automatically
provided. Within the edit area, you specify the individual headings and
bodies of the various methods that belong in the object type body.
This page allows you to set method restrictions (pragma)denying
member functions read/write access to database tables, packaged variables,
or both. Changes made to pragma on this page override the settings specified
at the object type level. Pragma are processed when the method is compiled.
See the Oracle8 PL/SQL User's Guide and Reference for more information
on user-defined exceptions.
Override Default Method restrictions (Pragma): When
selected, overrides object type settings and allows you to choose any or
all of the following restrictions for the method currently being defined
or edited:
Writes No Database State (WNDS): Does not modify database
tables.
Writes No Package State (WNPS): Does not modify packaged
variables.
Reads No Database State (RNDS): Does not query database
tables.
Reads No Package State (RNPS): Does not reference
packaged variables.
You can edit or remove methods from an object type by selecting
the desired method in the method multi-column list and clicking on Edit
(to bring up the Object Method property sheet) or Remove to delete the
selected method.
The Package Bodies folder consists of a list of package bodies
defined within the connected database. Package bodies are organized by
schema within the Package Bodies folder.
A package consists of two parts: the specification and the
body. The package body defines all constructs (public and private) of the
package while the specification declares all public constructs. For information
about package bodies, see Oracle Server SQL Reference, or the
PL/SQL User's Guide and Reference.
The Package Bodies multi-column list displays when the Package
Bodies folder is selected in the navigator. The list contains all package
bodies defined within the connected database.
The columns of the package bodies list are described below:
Name of the schema containing the package body.
Name of the package body.
Date on which the package body was created.
Date on which the package body was last modified.
Current status of the package body (Valid or Invalid).
To create a new package body:
The Package Body property sheet contains a single General
page.
The General page consists of the following information:
Name of the package body being defined.
Name of the schema containing this package body. The drop-down list contains all schemas available in the current database.
Recompile the PL/SQL source for the package body so that it can be stored and executed from within the database.
PL/SQL source code for the package body.
Created: Date the package body was originally created.
Last Modified: Date the package body was last modified.
Current status of the package body (valid or invalid).
Show Errors/Hide Errors: Opens or closes the Error
Messages dialog box. This button is available when the package body status
is invalid.
To create an package body with parameters that are identical to an existing one:
To edit an existing package body:
The Package folder consists of a list of all packages defined
within the connected database. Packages within this folder are organized
by schema.
A package is a group of related procedures and functions,
together with cursors and variables they use, stored together in the database
for continued use as a unit. For information about packages, see Oracle
Server SQL Reference, or the PL/SQL User's Guide and Reference .
The Packages multi-column list appears when the Packages folder is selected in the navigator. The list contains information about:
Name of the schema containing the package. This column is not displayed when viewing a particular schema.
Name of the package.
Date on which the package was created.
Date on which the package was last modified.
Current status of the package (valid or invalid).
To create a new package:
The Package property sheet consists of a single General page.
The General page consists of the following information:
Name of the package being defined.
Name of the schema containing this package. The drop-down list contains all schemas available in the current database.
Recompile the PL/SQL source for the package so that it can be stored and executed from within the database.
Created: Date the package was originally created.
Last Modified: Date the package was last modified.
Current status of the package (valid or invalid).
Show Errors/Hide Errors: Opens or closes the Error Messages dialog box. This button is available when the package status is invalid.
PL/SQL source code for the package.
To create an package with parameters that are identical to an existing package:
To edit an existing package's PL/SQL source:
The Procedures folder consists of a list of all procedures
defined within the connected database. Procedures in the navigator are
organized by schema.
A procedure groups a set of SQL and PL/SQL statements together
to perform a specific task. For more information on procedures, see Oracle
Server SQL Reference, Vol. II, or the PL/SQL User's Guide and Reference.
The Procedures multi-column list appears when the Procedures folder is selected in the navigator. The list contains the following information:
Name of the schema containing the procedure. This column is not shown when viewing a particular schema.
Name of the procedure.
Date the procedure was originally created.
Date the procedure was last modified.
Current status of the procedure (Valid or Invalid).
To create a new procedure:
The property sheet consists of a single General page.
The General page consists of the following information:
Name of the procedure being defined.
Name of the schema containing this procedure. The drop-down list displays the names of all available schemas.
Recompile the PL/SQL source for the procedure so that it can be stored and executed from within the database.
PL/SQL source code for the procedure.
Current status of the procedure (valid or invalid).
Show Errors: Displays the Error Message dialog box listing the errors encountered while trying to compile the function source. This button is only enabled when the function status is invalid.
Created: Date the procedure was originally created.
Last Modified: Date the procedure was last modified.
To create an procedure with parameters that are identical to an existing one:
To alter an existing procedure:
Advanced Queuing allows you to defer execution of a database
request. After a request for work is entered, advanced queuing defers processing
of that request until the requestor completes the task or process or transaction
that created the request. For more information about Advanced Queueing,
see the Advanced Queueing chapter in the Oracle Server Application Developer's
Guide.
Selecting Queue Tables from the tree list displays multi-column list containing all queues in the database organized by schema. The columns are defined as follows:
Name of the schema containing the queue. The column is not displayed if an individual schema is selected.
Valid queue identifier.
Table (data repository containing one or more set of queues) created using the DBMS_AQADM package.
Normal (Reply): An application server can communicate through
queues.
Exception: If an application server is unable to process a queue message, it is ENQUEUED to an exception queue to be processed by another application server.
Enabled or Disabled. Ability to add a queue message onto a queue specified by a user.
Enabled or Disabled. Ability to remove a queue message from a queue specified by a user.
Textual description of queue function.
To create a queue table:
The Queue Table property sheet consists of the three pages:
Queue tables are database tables in which queues (repository for messages) are stored. This property sheet allows you to create queue tables.
Name of the queue table to be created.
Schema in which queue table is to reside.
User-specified description of the queue table. This comment is added to the queue catalog.
Tablespace in where the queue table is created.
Specifies the type of user data to be stored in the queue
table (queue datatype). Queue table datatypes consist of the standard object
types (Oracle-defined or user-defined). In addition the RAW datatype has
been added, permitting queue tables to handle large objects (LOBs). Although
LOBs can hold up to 4 gigabytes of RAW binary data, the size of the payload
is limited to 32 KB.
Raw: Specifies that the queue table store payloads
of type RAW. When the RAW datatype is selected the LOB Storage property
sheet appears in addition to the General and Storage property sheets.
Object: Specifies that the queue table store conventional object type payloads. Datatypes can be either Oracle-defined or user-defined. The following drop-down lists are active when Object is selected:
Schema: Schema containing the user-defined
type.
Type: Payload datatype to be stored in the queue table.
Allow Subscriber: Permits a single message to be consumed
by multiple consumers. (one-to-many). When this option is selected, a Subscribers
page appears within the Queue property sheet.
Allow Message Group: Permits one or more messages belonging to a single queue to be grouped into set that can only be consumed by one user at a time (many to one). Message grouping allows you to segment complex messages into simple messages.
Specifies the columns to be used as the sort key in ascending
order. The allowed column names are Priority (priority) and Enqueue Time
(enq_time). You click on a column entry to select it. If both columns are
selected, then the first column selected (Order 1) defines the most significant
order.
If no order is specified, all queues in the queue table are
sorted according to the enqueue time in ascending order.
This page allows you to set parameters for large object (LOB) storage within the queue table. This page displays when RAW is selected as the payload type for a queue table (Queue Table: General page) or if a selected queue table heirarchically contains a user-defined object type with LOB attributes.
Applies LOB storage characteristics to all data segments within the queue table
Allows you to explicitly indicate the tablespace and storage characteristics for each LOB. The drop-down list displays existing LOBs.
Data Segment
Tablespace: Drop-down list displaying all
tablespaces within current database. Selection determines the tablespace
in which the LOB data segment is to reside.
Data Segment Storage: Standard storage parameter
page allowing you to define specific data segment storage parameters.
Enable LOB storage in row: Specifies that
the LOB value is stored in the row (inline) if its length is less than
approximately 4000 bytes minus system control information (default value).
Number of blocks of LOB data that will be accessed
at one time (CHUNK): Integer representing the unit of LOB allocation
and manipulation by Oracle. This unit of LOB storage is calculated as the
specified integer multiplied by the data block size.
Percent of LOB storage space to be used as old versions
of LOB pages (PCTVERSION): Integer representing the maximum percentage
of overall LOB storage space used for creating new versions of the LOB.
The default value is 10.
LOB cache (On/Off): Specifies whether LOB
data should be cached. Caching is off by default. You should turn LOB caching
On if LOB data will be accessed frequently.
Generate full redo of LOB data pages (LOGGING): When selected, specifies that the LOB storage characteristics will logged in the redo log file. This option is only available if LOB cache Off.
To create another queue table with parameters that are identical to an existing queue table:
To alter an existing sequence:
To create a queue:
The Queue property sheet consists of two pages:
A queue is a repository for messages. This property sheet allows you to define one of two types of queues: A user queue (Normal), or an exception queue.
Name of the queue to be created.
Schema where the queue table containing the queue is located.
Queue table containing the queue.
User-specified description of the queue. The comment will be added to the queue catalog.
Normal: Specifies that the queue be a user queue for
normal message processing.
Exception: Specifies that the queue be an exception queue. Exception queues handle messages that for some reason cannot be retrieved and processed.
Enabled: Specifies that ENQUEUE should be enabled
on this queue.
Disabled: Disables enqueuing for this queue.
A queue cannot be stopped if there are outstanding transactions against the queue.
Enabled: Specifies that DEQUEUE should be enabled
on this queue.
Disabled: Disables dequeuing for this queue.
Note: Only dequeue operations are allowed for exception queues.
Max Retries: Number of times a dequeue with the REMOVE
mode can be attempted on a message. A message is moved to an exception
queue when the Max Retries limit is reached. By default, the limit is set
to zero, meaning no retry is allowed.
Delay: Specifies the delay time before a message is scheduled for processing again after an application rollback. You use the drop-down list to select the time units (seconds, minutes, hours, or days). By default, the delay time is set to zero, meaning the message can be retried as soon a possible.
Retention Time: The time a message will be retained in the
queue table after being dequeued from the queue. By default, the time is
set to zero, i.e., not retained.
This page allows you to add subscribers to the queue in addition to scheduling the propagation of messages from a queue to a destination identified by a specific database link. The Subscribers page only appears if an associated queue table had been created with the Allow Subscriber option.
An editable spreadsheet allowing you to define the queue
subscribers. The spreadsheet consists of three columns:
For Oracle release 8.0.3, you can only define a name for
a subscriber.
Address: Protocol-specific address of the message
recipient. By default, the address is of the form SCHEMA.QUEUE
DBLINK: Database link associated with the message
consumer.
To add a subscriber name, click on the desired cell to activate
the cursor and type in the desired name, address, and database link. Entries
may consist of up to 30 characters.
To remove an entry from the list, click on the spreadsheet
button located to the immediate left of the name. Right click on the spreadsheet
button to display the context-sensitive menu. Select Delete.
You can perform standard editing functions (cut, copy, past, delete) by selecting the text in the spreadsheet and right clicking to display the context-sensitive menu.
An editable spreadsheet allowing you to schedule the propagation
of messages to a specific destination.
DB Link: Drop-down list displaying all database links
(destinations) defined in the current database. You can unschedule a queue
from a destination by clicking on the spreadsheet button to the immediate
left of the database link, and then using the right mouse button to display
the context-sensitive menu. Select Unschedule.
If no database link is selected, the destination is set to
the local database. Messages will be propagated to other queues within
the local database.
Schedule (for): Displays the current schedule for
the selected database link.
Start Time: Specifies the initial start time
for the propagation window for messages from the source queue to the destination.
Next Time: Date function to compute the start
of the next propagation window from the end of the current window. If this
field is left blank, propagation will be stopped at the end of the current
window. For example, to start the window at the same time every day, Next
Time should be specified as `SYSDATE + 1 - duration/86400'.
Duration: Specifies the duration of the propagation
window in seconds, minutes, or hours. Leaving the Duration field blank
specifies that the propagation window remain open until the propagation
is unscheduled.
Latency: Specifies the minimum wait (seconds,
minutes, or hours) in the propagation window for a message to be propagated
after it is enqueued.
To create another queue with parameters that are identical to an existing queue table:
To alter an existing sequence:
The Refresh Group folder contains all refresh groups defined
within the connected database. Within the folder, refresh groups are organized
by schema.
A refresh group consolidates multiple snapshots and allows
you to easily refresh two or more snapshots to a single point in time.
For information about refresh groups, see Oracle Server
Distributed Systems, Volume II: Replicated Data.
The Refresh Groups multi-column list appears when the Refresh Groups folder is selected in the navigator. The list contains the following information:
Name of the schema containing the refresh group. This column is not shown when viewing a particular schema.
Name of the refresh group. Refresh group names must follow the same naming conventions as tables.
Identification number of the refresh group.
Next date the refresh will occur.
Function used to calculate the next time to refresh the snapshots
in the group.
To create a new refresh group:
To add a snapshot to the refresh group, select an
item from the Available list and click the Up arrow. The snapshot appears
in the In Group list.
To remove a snapshot from the refresh group, select an item in the In Group list and click the Down arrow.
The Refresh Group property sheet consists of two pages:
The General page consists of the following information:
Name of the Refresh group.
Name of the schema containing the refresh group.
Refreshes the current refresh group immediately.
When checked, marks a job as broken so Oracle will not attempt to execute the job.
Upon deleting the last refresh group member, the refresh group is automatically deleted.
Next Date: Next date that you want a refresh to occur.
Interval: Function used to calculate the next time
to refresh the snapshots in the refresh group.
Continue refresh despite conflicts: Select this option
if you want the refresh to proceed even if there are outstanding conflicts
logged in the DefError table for the snapshot's master. This option is
active for updatable snapshots only.
Push changes from snapshot to master before refresh: Selected by default, this option allows you to push changes from the snapshot to its associated master before refreshing the snapshot. Otherwise, these changes may appear to be temporarily lost. This option is active for updatable snapshots only.
Use default rollback segment: When selected, the default
rollback segment is used. Segment name and Segment Schema are greyed out.
Segment Name: Name of the rollback segment to use
while refreshing snapshots.
Segment Schema: Name of the schema containing the
rollback segment.
The Snapshot page consists of the following information:
Scrolling list containing all snapshots in the refresh group.
Scrolling list containing all available snapshots.
To create a refresh group with parameters that are identical to an existing one:
To alter an existing refresh group:
The Sequence folder contains all sequences stored within
the connected database. Sequences are organized by schema.
A sequence is a database object used to generate a serial
list of unique numbers for numeric columns of a database's tables. Sequences
simplify data entry in a multi-user system by automatically generating
unique numerical values for the rows of a single table or multiple tables.
For information about sequences, see Oracle Server Concepts and
Oracle Server Administrator's Guide.
The Sequences multi-column list displays when the Sequences
folder is selected in the navigator. The list contains sequences defined
within the connected database. For information about sequences, see the
Oracle Server SQL Reference.
The columns of the Sequences multi-column list are described as follows:
Name of the schema containing the sequence. This column is not shown when viewing a particular schema.
Name of the sequence.
Smallest permissible value for the sequence.
Largest permissible value for the sequence.
Incremental value for the sequence (value may be positive or negative).
Most recent value of the sequence.
Indicates whether or not the sequence should continue to generate values after reaching its minimum or maximum value (Yes or No).
Indicates whether or not the sequence numbers should be generated in order of request (Yes or No).
Number of values to be preallocated and stored by the database.
To create a new sequence:
The property sheet consists of a single General page.
The General page contains the following information:
Name of the sequence being defined. During the Create operation, you can specify a valid Oracle identifier as the name of the sequence.
Schema in which the sequence is defined. The default schema for a new sequence is the user's default schema. During the Create operation, you can choose a schema from those defined in the connected database from the drop-down list.
When selected, sequence values increase from the initial value towards the maximum value. This is the default setting when creating a sequence.
When selected, the sequence values decrease from the initial value towards the minimum value.
Minimum: Minimum allowed value of the sequence. When
creating a sequence, this field is initially blank. If this field is blank
when you select the Create button, a default value of one for an ascending
sequence or -1026 for a descending sequence will be used.
Maximum: Maximum value of a sequence. When creating
a sequence this field is initially blank. If left blank when the Create
button is selected, a default value of 1027 for an ascending sequence and
-1 for a descending sequence will be used.
Increment: Interval by which the sequence increases
or decreases. When creating a sequence, this field is initially blank.
If left blank when the Create button is selected, a default value of 1
is used. Only positive integers are accepted in this field.
Decrement: Interval by which the sequence decreases.
When creating a sequence, this field is initially blank. If left blank
when the Create button is selected, a default value of 1 is used. Only
positive integers are accepted in this field.
Initial: The starting value of the sequence. If the
field is blank when the Create button is selected, a default value of the
sequence's minimum will be used for an ascending sequence. For a descending
sequence, a default value of the sequence's maximum value is used.
Recent: The most recent value of the sequence. This field is active when altering an existing sequence.
Cycle Values: When checked, specifies that the sequence
should continue to generate values after reaching its minimum or maximum
value. For ascending sequences, the minimum value is generated after the
maximum is reached. For descending sequences, the maximum value is generated
after the minimum is reached. If Cycle Values is not checked, the sequence
will stop generating values when it reaches its minimum or maximum. When
creating a sequence, this checkbox is unchecked by default.
Order Values: When checked, specifies that the sequence
numbers are to be generated in order of request. When creating a sequence,
this checkbox is unchecked by default.
Cache Size: Number of values to be pre-allocated and stored by the database. There are three options:
To create another sequence with parameters that are identical to an existing sequence:
To alter an existing sequence:
The Snapshot Logs folder contains a list of all snapshot
logs created in the connected database.
A snapshot log is a table associated with the master table
of a snapshot. The snapshot log contains information about changes made
to its associated master table. The information in the snapshot log is
used to refresh the snapshot.
The Snapshot Logs multi-column list displays when the Snapshots
folder is selected in the navigator. The multi-column list contains snapshot
log information defined within the connected database. For information
about snapshot logs, see Oracle Server Concepts.
The columns of the Snapshots multi-column list are described as follows:
Name of the schema containing the snapshot log. This column is not shown when viewing a particular schema.
Name of the table storing the ROWID and timestamp of rows updated in the master table.
Name of the AFTER ROW trigger on the master table.
Name of the table associated with the snapshot log.
To create a new snapshot log:
The Snapshot Logs property sheet consists of two pages:
The General page contains the following:
Schema: Name of the schema to which the master table
belongs. The drop-down list displays all schemas available to the user.
Table: Name of the master table. The drop-down list displays all tables belonging to the selected schema.
Tablespace to which the snapshot log belongs.
Name of the table that stores the ROWID and timestamp of rows updated in the master table.
Name of the AFTER ROW trigger on the master table that tells Oracle to insert the ROWIDs and timestamps of inserted, updated, and deleted rows into the master snapshot log.
The number of snapshots associated with the snapshot log.
To create a snapshot log with parameters that are identical to an existing log:
To alter an existing snapshot log:
The Snapshot folder contains of a list of all snapshots defined
within the database.
A snapshot is a read-only copy of a master table located
on a remote node. It is periodically refreshed to reflect changes made
to the master table. A snapshot can be queried, but not updated; only the
master table can be updated.
The Snapshots multi-column list displays when the Snapshots
folder is selected in the navigator. The list contains all snapshots defined
within the connected database.
The columns of the snapshots list are described below:
Name of the schema containing the snapshot. This column is not shown when viewing a particular schema.
Name of the snapshot.
Owner of the snapshot's master table.
Name of the master table.
Database link to the master site.
Date of the last refresh (at the master site).
Type of refresh for automatic refreshes: Complete, Fast,
or Force.
To create a new snapshot:
The property sheet consists of four pages:
The General page contains the following:
Name of the snapshot being defined. During the Create operation, you can specify a valid Oracle identifier as the name of the sequence.
Name of the schema containing the snapshot. The drop-down list contains all available schemas within the connected database.
Name of the tablespace to which the snapshot belongs.
Type of refresh for automatic refreshes: Complete, Fast,
or Force.
Complete: Specifies a refresh that executes the subquery.
Fast: Specifies a refresh using only the updated data
stored in the snapshot log associated with the master table.
Force: Specifies a fast refresh if one is possible
or a complete refresh if fast refresh is not possible.
Start Date: Date snapshot refresh is to begin.
Next Date: Expression that calculates the interval at which the snapshot is updated.
When selected, indicates that the snapshot is updatable. When used in conjunction with the Replication Option, updates are propagated to the master.
Snapshot query executed by Oracle when you create the snapshot.
Results of the query are placed in the snapshot. (Create only)
The Cluster page allows you to define the cluster to which a snapshot belongs. This property sheet contains the following:
Cluster to which the snapshot belongs. The drop-down list
displays all clusters contained within the selected schema.
Column Name: Name of the column to be used as part
of the snapshot. Click Add to add the column name to the Snapshot Columns
list.
Snapshot Columns: Scrolling list of all columns added
to the snapshot. Use the Up/Down arrows to reorder the list of columns
(column order must match the order in the cluster).
Remove: Deletes the selected snapshot column from
the list.
To create a snapshot with parameters that are identical to an existing snapshot:
To edit an existing snapshot:
This property sheet is similar to the Create Snapshot property sheet except that the Subquery entry field is replaced by the following information:
Associated AFTERROW trigger on the master table.
Associated snapshot log.
Owner: Name of the schema to which the snapshot belongs.
Table: Name of the master table.
Link: Database link to the database where the master table resides.
Whether or not the snapshot can be logged.
Associated refresh group.
Date the snapshot was last refreshed.
The Synonyms folder contains a list of all synonyms defined
within the connected database.
A synonym is an alias for a table, view, sequence, procedure,
function, package or another synonym.
The Synonyms multi-column list displays when the synonyms
folder is selected in the navigator. The list summarizes information for
synonyms defined within the connected database.
The columns of the Synonyms multi-column list are described as follows:
Name of the schema containing the synonym. This column is not shown when viewing a particular schema.
Name of the synonym.
Owner of the original database object.
Name of the original database object.
Database link to the the original schema object (e.g. table,
view, snapshot).
To create a new synonym:
The Create Synonym property sheet contains a single General
page.
The General page consists of the following information:
Name of the synonym.
Name of the schema containing the synonym. The drop-down list contains all available schemas within the connected database.
Local Database/Remote Database: Allows you to create
a synonym from an object on a local database or an accessible database
on the network.
Object Type (Local)/DB Link (Remote): Drop-down list
containing available database object types (tables, snapshots, etc.) for
local databases. If Remote Database is selected the field label changes
to DB Link. In this case, the drop-down list contains all database links
defined for the current instance.
Schema: Drop-down list containing all available schemas
for the current instance (local databases). If Remote Database is selected,
the schema name must be typed in explicitly.
Object: Drop-down list containing all available database
objects for the selected schema.
To create another synonym with parameters that are identical to an existing synonym:
To view the parameters of an existing synonym, select a synonym
in the navigator. A property sheet with the original synonym's current
parameters displays.
A nested table is an unordered set of data elements, all of the same datatype. This property sheet allows you to define a nested table type. This table type can be used as
The Table Types multi-column list displays when the Table Types folder is selected from the navigator. The multi-column list contains the following columns:
Schema to which the table type belongs.
Name of the table type.
Schema to which the datatype (for elements within a nested table) belongs.
Name of the datatype (for elements within a nested table).
To create a new table type:
The Table Types property sheet consists of a single General
page.
The General page consists of the following elements:
Table type name.
The schema to contain the table type.
Opens or closes the Error Messages dialog box. This button is active when the table type status is invalid.
Schema: Scheme to which the datatype belongs.
Type: Datatype of the element(s) in the nested table.
Length: Number of bytes allowed for values defined
in the column (for CHAR, VARCHARZ, NUMBER, RAW datatypes).
Precision (for NUMBER datatype): Number of digits
to the right of the decimal point. If CHAR is selected in the Datatype
drop-down list, you may specify length. If VARCHAR2 or RAW is selected,
you may specify a length. If NUMBER is selected, you may specify a length,
a length and a precision, or neither.
User defined object will be a reference (for user-defined
types): Specifies that an object of the table datatype be a REF. This option
is only available if a user-defined datatype is selected from the Type
drop-down list.
To create a table type with parameters that are identical to an existing table type:
To alter an existing table type:
The Tables folder contains a list of all tables defined within
the connected database.
As the basic unit of storage in a relational database management
system, a table represents entities and relationships, and consists of
one or more units of information (rows), each of which contains the same
kinds of values (columns). For information about tables, see Oracle
Server Concepts.
The Tables multi-column list displays when the Tables folder
is selected in the navigator. The list summarizes information for tables
defined within the connected database.
The columns of the Sequences multi-column list are described as follows:
Name of the schema in which the table is defined. This column is not shown when viewing a particular schema.
Name of the table.
Name of the tablespace to which the table belongs.
Number of rows in the table. (Shown only if the cost-based
optimizer is disabled.)
Note: Entries in the Rows column only appear if ANALYZE
has been run against the table. For more information on the ANALYZE command,
see Oracle Server SQL Reference.
To create a new table:
The Table Wizard is a rule-based series of dialogs that guide you the process of creating a table. See Oracle Enterprise Manager online help for more information about the Table Wizard.
The Create Table property sheet contains the following pages and dialog boxes:
The General page allows you to define or view the primary attributes of a table such as column definitions, schema in which the table resides, or query used to populate a new table. The General page contains the following information:
Name of the table being defined. During the Create operation, you can specify a valid Oracle identifier as the name of the table.
Schema in which the table is defined. The default schema for a new table is the user's default schema. During the Create operation, you can choose a schema from those defined in the connected database via the drop-down list.
Tablespace to which the table belongs.
This area of the property page changes according to the option
selected.
An editable spreadsheet allowing you to edit or add columns
to a database table. The columns of this spreadsheet consist of Column
(name), Datatype, Default, Nulls? and Cluster Column. New additions (defined
but not yet created) are graphically identified by a hand with a plus sign.
After selecting an entry in the spreadsheet, you can use the context-sensitive
menu (right mouse button) to carry out standard editing functions (cut,
copy, paste, delete).
The spreadsheet consists of 10 columns:
Name: Name of the table column being defined
or edited. You can specify a valid Oracle identifier as the name of the
column. This field is disabled for columns that have already been defined
in the database.
Schema: Schema containing the desired datatype.
If a built-in datatype is selected (for example, VARCHAR2), schema does
not apply and <NONE> is displayed.
Datatype: Drop-down list of user-defined object types contained within the selected schema.
If a user-defined datatype is selected, the nested table
dialog appears automatically. If you close the Nested Table dialog but
need to access it again at a later time, you can call up the dialog by
clicking on the spreadsheet button to the immediate left of the Column
Name and then use the right mouse button to call up the context-sensitive
menu. Select Nested Tables...
Length: Number of bytes allowed for values
defined in the column (for CHAR, VARCHARZ, NUMBER, RAW).
Precision (for NUMBER datatype): Number of
digits to the right of the decimal point. If CHAR is selected in the Datatype
drop-down list, you may specify length. If VARCHAR2 or RAW is selected,
you may specify a length. If NUMBER is selected, you may specify a length,
a length and a precision, or neither.
Ref?: When checked, indicates the column is
a reference to a row in an object table (type Ref).
Nulls?: When checked, indicates that the column
being defined is not permitted to contain null values.
Default Value: An expression that serves as
the default value for this column in any rows for which the INSERT statement
omits a value for the column.
Scope Schema: Schema containing the table
to be referenced. Cell is active when Ref? is checked.
Scope Table: Table being referenced. Cell is active when Scope is checked.
When selected, a scrolling editable text area appears allowing
you to enter a SQL query to be used to populate the table. A query does
not have to be specified (Create mode only).
When selected, allows you to create an object table utilizing user-defined object types.
Schema: Schema containing the user-defined
object type.
Object Type: Name of the user-defined object
type. Upon selecting an object type, the Nested Table dialog is automatically
displayed if there are any aggregated nested tables that for the selected
object type. Note: VARRAY, Nested Table, or built-in types are not displayed.
Nested Tables: Displays the Nested Tables
dialog box allowing you to create a storage table for each nested table
column. The button is active when a user-defined object type is selected.
Object Type Spreadsheet: An editable spreadsheet displaying the attributes of the selected user-defined type. The spreadsheet consists of the following columns:
The Constraint page allows you to define or edit integrity constraints for a table. This page contains the following information.
An editable spreadsheet containing the following columns:
Name: Name of the table constraint being defined.
To define a new constraint, you can enter a valid Oracle identifier as
the name of the constraint. If no name is entered, a default name will
be assigned by the database. This field is disabled if the column has already
been defined in the database.
Type: The type of constraint. The drop-down list displays
available constraint types: UNIQUE, PRIMARY, FOREIGN, CHECK.
Disable: Indicates that the constraint should be disabled
(checked) or enabled (`x') when the constraint is created. Click on the
spreadsheet cell to toggle this setting.
Referenced Schema: Schema referenced by the foreign
key in the constraint being defined. The drop-down list displays all available
schema for the database. This list is active only when FOREIGN is selected
as the constraint type.
Referenced Table: Table referenced by the column being
defined. This drop-down list displays all tables contained within the Referenced
Schema.
Cascade on Delete: When checked, indicates that rows
will automatically be removed from the child table if they reference values
contained in the referenced key column of rows being removed from the parent
table. You toggle this setting by clicking on the desired spreadsheet cell.
This control is disabled if a query is defined at Create time or if the
column has already been defined in the database.
Check Condition: Check constraint to be included in
the table constraint currently being defined.
You can enter the text of the check constraint in this spreadsheet cell or a valid expression. For more information see the Oracle Server SQL Reference for your server release.
An editable spreadsheet displaying both table and referenced
columns.
Table Columns: Column on which the constraint is to
be placed. The drop-down list displays all columns in the table. This cell
is active for UNIQUE and PRIMARY key constraints. If you are defining an
object table, this will be a list of all attributes of the object type
the object table is defined on.
Referenced Columns: Columns (unique or primary key)
referenced by a foreign key in a referential integrity constraint. The
drop-down list displays all columns available in the referenced table.
The Cluster Columns page (active when creating a new table) allows you to associate database cluster key columns with columns in a newly created table.
Drop-down list displaying all clusters available in the schema
selected on the General page of the Table property sheet.
Table Column : Drop-down list displaying all columns
in the new table.
Cluster Column: Cluster key columns contained within
the selected cluster.
To clear the Table Column entries, reselect the current cluster
from the drop-down list.
To drop a constraint from a table:
To remove a constraint definition:
To create a new table with parameters that are identical to an existing table:
To alter an existing table:
The Triggers folder contains a list of triggers defined within
the connected database.
A trigger is a stored PL/SQL procedure that is implicitly
executed when an INSERT, UPDATE, or DELETE statement is issued against
the associated table or view. For more information about using triggers,
see Oracle Server Administrator's Guide for your server release.
The Triggers multi-column list displays when the Triggers
folder is selected in the navigator. The list summarizes information for
all triggers defined within the connected database.
The columns of the Triggers multi-column list are described as follows:
Name of the schema containing the trigger. This column is not shown when viewing a particular schema.
Name of the trigger.
Trigger type (BEFORE EACH ROW, AFTER EACH ROW, or FOR EACH ROW).
Triggering statement (INSERT, UPDATE, DELETE).
Owner of the table with which the trigger is associated.
Name of the table with which the trigger is associated.
To create a new trigger:
The property sheet consists of two pages:
The General page allows you to define the primary characteristics of a trigger such as the name of trigger, schema to which the trigger belongs, and the trigger body. This page contains the following information:
Name of the trigger being defined.
Schema in which the trigger is to be defined. The default schema for a new trigger is SYSTEM.
Table/View: When selected, allows you to create a trigger on a table or a view.
Schema: Drop-down list displaying all available
schema in the database. This field specifies the schema that contains the
table.
Name: Drop-down list displaying all available tables or views in the selected schema. This field specifies the name of the table on which the trigger is to be created. Triggers on SYS schema tables cannot be created.
When selected, indicates that a trigger is to be recreated (if it already exists) without dropping, recreating and regenerating object privileges previously granted.
When checked, indicates that a trigger is enabled.
During a Create operation, this control is checked and disabled. It is not checked and enabled if a trigger is disabled.
Defines the PL/SQL block that Oracle executes to fire the
trigger.
The Timing page allows you to specify the conditions that initiate a trigger. This page contains the following information:
Fire Trigger:
Insert: When checked, indicates that Oracle fire the
trigger whenever an INSERT statement adds a row to a table.
Delete: When checked, indicates that Oracle fires
the trigger whenever a DELETE statement removes a row from a table.
Update of Columns: Indicates that Oracle fires the trigger whenever an UPDATE statement changes a value in a column selected in the multi-select list. It is only enabled and populated when the Update checkbox is selected.
When checked, designates the trigger to be a row trigger.
Oracle fires a row trigger once for each row that is affected by the triggering
statement and meets the optional trigger constraint defined in the Condition
field. When not checked, the trigger is a statement trigger and is fired
only once when the triggering statement is issued (assuming the optional
trigger constraint is met).
Referencing
You can use correlation names in the PL/SQL block and WHEN
clause of a row trigger to refer specifically to old and new values of
the current row. The default correlation names are OLD and NEW.
Condition : Specifies the trigger restriction.
The trigger restriction contains a SQL condition that must
be satisfied for Oracle to fire the trigger. This condition must contain
correlation names and not a query. You can only specify a trigger restriction
for a row trigger. Oracle evaluates this condition for each row affected
by the triggering statement. See the Oracle SQL Reference manual for more
information.
To create a new trigger with parameters that are identical to an existing trigger:
To alter an existing trigger:
Altering a trigger only affects values generated after the
alter is performed.
The Views folder contains a list of all views defined within
the connected database.
A view is a custom tailored presentation of the data in one
or more tables and can also be thought of as a stored query. Views
do not actually contain or store data; rather, they derive their data from
the tables on which they are based, called base tables. Base tables can
in turn be actual tables or can themselves be views. Views can be queried,
updated, inserted into, and deleted from, with restrictions. All operations
performed on a view actually affect the base tables of the view. For information
about views, see Oracle Server Concepts.
The Views multi-column list displays when the Views folder
is selected in the navigator. The list summarizes information for tables
defined within the connected database.
The columns of the Views multi-column list are described as follows:
Name of the schema containing the view. This column is not shown when viewing a particular schema.
Name of the view.
Current status of the view (Valid or Invalid).
To create a new view:
The Create View property sheet consists of two pages:
The General page contains the following information:
Name of the view being defined. During a Create operation, you can specify a valid Oracle identifier as the name of the view.
Schema in which the view should be defined. The default schema for a new view is the user's default schema.
Identifies columns and rows of the table(s) that the view
is based on. A view's query can be any SELECT statement without the ORDER
BY or FOR UPDATE clauses. Its select list can contain up to 254 expressions.
The Advance page allows you to specify options or place constraints on the view. This page consists of the following:
Replace if Exists: When checked, specifies that the view
is to be recreated, if it already exists, without dropping, recreating,
and regenerating object privileges previously granted on it.
Force: When checked, specifies that the view is to be created
regardless of whether the view's base tables exist or the owner of the
schema containing the view has privileges on them.
Read Only: When checked, specifies that no deletes, inserts or updates can be performed through the view.
Specifies the name assigned to the CHECK OPTION constraint.
With Check Option: When checked, specifies that inserts and
updates performed through the view must result in rows that the view query
can select.
The CHECK OPTION cannot make this guarantee if there is a
subquery in the query of this view or any view on which this view is based.
If you omit this identifier, Oracle automatically assigns the constraint a name of the form: SYS_Cn, where n is an integer that makes the constraint name unique within the database.
Allows you to create an object view.
Schema: Schema containing the object type.
Object Type: List of user-defined object types contained
within the selected schema.
Object ID: Allows you to specify the attributes of the object type that will be used as a key to uniquely identify each row in the object view.
Default: Specifies that the intrinsic object
identifier of the underlying object table or object view be used to uniquely
identify each row.
Specify Attributes: Allows you to specify attributes of an object type from which the object view is to be created. You can specify the unique order of the table columns using the two-column spreadsheet. Table columns correspond to the top-level attributes of the object type.
To create a new view with parameters that are identical to an existing view:
To alter an existing view: