Release 1.6
A63731-01
Library |
Product |
Contents |
Index |
| Oracle
Enterprise Manager Administrator's Guide
Release 1.6 A63731-01 |
|
![]()
![]()
This chapter describes how to use Oracle Enterprise Manager Backup Manager to administer your database backup and recovery environment. Backup Manager consists of three subsystems: Oracle8 Recovery Manager, Operating System Backup, and Enterprise Backup Utility. Subsystem availability depends on the version database you are attempting to back up. For Oracle7 databases, you can select Operating System Backup or the Enterprise Backup Utility. For Oracle8 databases, you can select Operating System Backup or Oracle8 Recovery Manager. All backup subsystems use wizards to simplify and automate backup and recovery tasks. Briefly, the three subsystems are:
At any time, you can change to a different backup subsystem
by choosing Change Backup Subsystem from the File menu.
For more information on backup and recovery strategies, see
your Oracle Backup and Recovery Guide. For more information on Recovery
Manager, see the Oracle8 Server Backup and Recovery Guide.
Before attempting to start Backup Manager, make sure the
Oracle Enterprise Manager Console is running and that the job and event
system is fully functional. Select a target database from the Oracle Enterprise
Manager Console's Navigator. Then click on the Backup Manager icon in the
Applications Launch Palette, or choose Oracle Backup Manager from the Console
Tools menu.
Attention: Backup Manager requires connecting to the
target database as SYSDBA. By default, this role is selected during login.
If your target database is not configured for remote operation, see the
Oracle Enterprise Manager Configuration Guide.
You can change the database connection with the Change Database
Connection option in the File menu. You can also change backup subsystems
by choosing Change Backup Subsystem from the Backup Manger File menu.
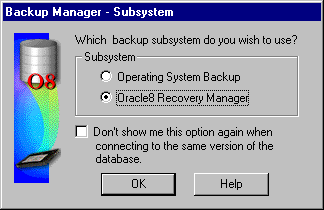
After Backup Manager has successfully connects to the target
database, the Backup Subsystem dialog displays. The following figure shows
the backup subsystem options available when connecting to an Oracle8 database.
If you are running this application against an Oracle8 target
database for the first time, Backup Manager displays a dialog box asking
where backup information will be maintained. You can use either a Recovery
Catalog or the target database control file. For information regarding
the pros and cons of using a recovery catalog rather than a control file,
see the Oracle8 Backup and Recovery Guide.
If you are using Backup Manager for the first time, a dialog
displays asking whether you wish to use a recovery catalog or a control
file. See the online help for that dialog for more information. You must
select one option before proceeding.
As shown in the following sections, each backup subsystem,
once started, is very similar in appearance to one another. Only menus
and options change.
This backup subsystem provides an easy-to-use graphical user
interface to Recovery Manager, an Oracle utility you use to back up, restore,
and recover database files. Recovery Manager starts Oracle server processes
on the database to be backed up or restored (the target database). These
Oracle server processes actually perform the backup and restore. For example,
during a backup, the server process reads the files to be backed up, and
writes the files out to your tertiary storage device.
Note: Making backups to tertiary media, such as tape,
requires vendor-supplied media management software that can interface with
Oracle. Oracle calls the media management software routines to back up
and restore datafiles to an from media controlled by the media management
software.
Recovery Manager capabilities are extended when used with
a recovery catalog, a repository of information that is used and maintained
by Recovery Manager.
The recovery catalog contains the following information:
Because most of this information is also available from the
target database's control file, you have the option of using the control
file instead of creating a recovery catalog. This operational mode is appropriate
for small databases. However, Oracle recommends using a recovery catalog.
If the controlfile is lost, the databse cannot be recovered.
Important: The recovery catalog and the Oracle Enterprise
Manager repository should not reside in the target database (database to
be backed up) because the database can not be recovered in the mounted
state. If you loose any data, you will need the recovery catalog for full
recovery. However, the recovery catalog can reside in the same database
as your Oracle Enterprise Manager repository. Oracle recommends placing
the recovery catalog in a separate tablespace. As with any important data,
you backup your recovery catalog regularly.
See the Oracle Enterprise Manager Configuration Guide
for complete information on setup and configuration.
When the job completes successfully, your backup and recovery
environment is configured. If the job does not succeed, certain functions
( those requiring a recovery catalog) will be unavailable. For more information
on recovery catalog maintenance, Recovery Manager, and backup and recover
strategies, see the Oracle8 Backup and Recovery Guide.
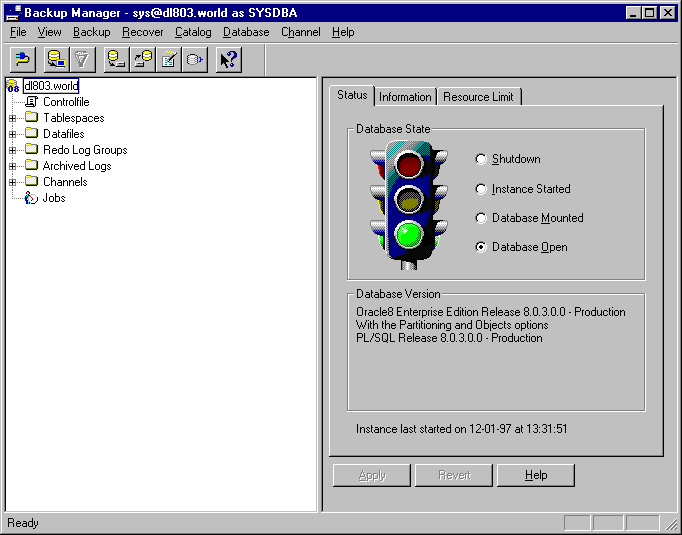
After selecting Oracle8 Recovery Manager from the Subsystem
selection dialog box, the Backup Manager window appears.
Backup Manager using the Oracle8 Recovery Manager subsystem
includes four standard menus, File, View, Log, and Help. It also includes
the Backup, Recover, Catalog, Database, and Channel menus. For information
on the standard menus, see Application Menus
on page 7-10.
Allows you to define a backup set for a selected object in the tree or multi-column list. Selected objects must consist of the same type (datafiles or archivelogs).
Allows you to define an image copy of the selected object. An image copy contains a single input file (datafile or control file).
Allows you to back up the target database control file by writing SQL commands to the target database's trace file to recreate the controlfile if it is lost and no backup of the ifle is available..
Simplifies the job of backing up a database, tablespaces,
datafiles, or archivelogs using an intelligent Wizard to guide you through
the backup process.
Restore the selected database objects in the tree or multi-column list. Restoring a datafile or tablespace requires that these objects be offline, or that the database be closed or in a mounted or unmounted state.
Switch the datafile copy into a current datafile. Media recovery is required after switching the datafile.
Recover the selected object in the tree list.
Displays Needs Recovery status for datafiles.
Starts the Restore Wizard that guides you through the restore,
rename, and recover processes.
Re-synchronizes the Recovery Catalog for the target database. The recovery catalog must be periodically resynced from the target database in order to ensure the catalog is up-to-date. The recovery catalog is not updated automatically when a log switch occurs or when an log is archived. Also, any structural changes to the target database would require re-synchronization of the Recovery Catalog.
Reset the Recovery Catalog for the target database. You must reset the recovery catalog if the target database had been previously opened with the RESETLOGS option.
Register the target database with the Recovery Catalog. .
Allows you to define the connect string to the Recovery Catalog.
Use the Recovery Catalog or V$views for database backup and recovery.
Simplifies the job of creating detailed analysis reports for the target database. Reports include: Files requiring backup, unrecoverable files, obsolete files, and the database schema at a point in time.
Allows you to create or access user-defined scripts consisting
of Recovery Manager commands. These scripts are stored in the recovery
catalog.
Shuts down the target database.
Starts a target database instance.
Switches the current redo log group.
Triggers a checkpoint. Note: After a checkpoint has been triggered, the redo in the redo log files is no longer useful for crash/instance recovery.
Creates a new redo log group.
Deletes the selected redo log group.
Adds a logfile to a redo log group.
Deletes the selected redo logfile member.
Allows you to create a new channel definition.
Allows you to create a new channel with the same connection properties as the selected channel.
The database object displays the name of the target database.
When selected, the database property sheet displays providing you with
information regarding database status and archive mode. This property sheet
contains the following information.
The Status page contains information about the state of the current database, database version, and any installed options. This page also allows you to change the state of the database by selecting one of the Database State options and clicking Apply.
Instance Started: Instance started but not mounted.
Database Mounted: Database mounted but not open.
Database Open: Database mounted and open.
Database version and any installed options.
Attention: If the database is not running, the message
"ORACLE not available" is displayed.
The Information page contains displays the current state of redo log archival and the system global area.
Log Mode: Specifies whether the connected database
is in ARCHIVELOG mode or NOARCHIVELOG mode. To easily switch log modes,
you can use Oracle Instance Manager.
Last SCN Archived: The last system change number that
was archived. The SCN uniquely identifies the last committed database transaction.
Archive Destination: Specifies the destination where
the archive log files are to be created. If you are archiving to disk,
it is recommended that a dedicated disk with sufficient storage be used.
Archive Format: Specified the naming convention for the archived log files. The following variables are appended to form a unique archive file name.
Automatic Archival: Allows you to specify that redo log files be automatically archived. To enable Automatic archiving upon instance startup, set the LOG_ARCHIVE_START initialization parameter to TRUE. This option is enabled when the connected database is running in ARCHIVELOG mode.
Database Buffers: Size of the database buffer cache
(in bytes).
Fixed Size: Memory allocated to the area of the SGA
that contains general information about the state of the database and the
instance. No user data stored here (in bytes).
Redo Buffers: Size of the redo log buffer (in bytes).
Variable Size: Memory allocated to variable size data
structures (in bytes).
The controlfile object represents the controlfile of the
target database. When selected from the tree-list, the control file property
sheet displays.This property sheet displays all available control files
used by the target database. The multi-column list displays the name and
location of the control file as well as its status.
The Tablespaces object type container contains each tablespace
in the database arranged alphabetically in a tree list. A particular tablespace
can be expanded to show each of its datafiles.
When you select the Tablespaces container in the tree list, a multi-column list displays on the right. This list includes a row for each tablespace in the database. The columns of the list are:
Name of the tablespace.
Backup status of the tablespace: Active (an online backup of this tablespace is currently in progress), Not Active (no online backup of this tablespace is currently in progress); or Offline.
Total size in megabytes of the datafiles that comprise the tablespace.
Amount of actual storage used.
The Tablespace property sheet allows you to alter the status of the tablespace selected in the tree list. After you select In addition, all datafiles contained within the tablespace are displayed.
The name of the selected tablespace.
Indicates the current status of the selected tablespace and
also allows you to change the status. The following options are available:
Online: Places the selected tablespace online.
Offline: Takes the selected tablespace offline. When
this option is selected, a dropdown list appears to the right allowing
you to select the following priorities:
Normal: Used if no error conditions exist for any
of the datafiles of the tablespace.
Temporary: Used if there are error conditions for
one or more datafiles of the tablespace.
Immediate: Note: You cannot take a tablespace offline
immediately if the database is running in NOARCHIVELOG mode.
Read Only: Makes the selected tablespace read-only to prevent further write operations on the datafiles in the tablespace. A tablespace should be backed up before being made read only.
A scrolling multi-column list displaying all datafiles contained
within the tablespace. For each datafile, the full name and path, size
(K), date and time of the last backup, whether the datafile needs to be
backed up, and any datafile errors are displayed.
The Datafiles object type container contains all datafiles
in the target database. Selecting an individual datafile from the tree
list displays its property sheet.
When you select the datafiles container, a multi-column list displays containing the following columns:
Full path and name of the datafile.
Tablespace to which the datafile belongs.
Recovery Manager error, if any.
Status as to whether the datafile requires recovery.
RECOVER, SYSTEM, ONLINE, OFFLINE
Size of the datafile in kilobytes.
The General page lets you view general information such as name, location, and size of the selected datafile. This page also allows you to change the online/offline status of the selected datafile.
Full path and name of the selected datafile. This field is read-only.
Tablespace to which the datafile belongs. This field is read-only.
The current datafile online/offline status is selected. You can change the status of the datafile by clicking on the desired option and then clicking the Apply button
The Backup page lists all backup sets or image copies ever taken for the selected datafile.
Date and time of the backup.
Indicates whether or not the backup is a BACKUP SET or an IMAGE COPY. Note: Datafile backup sets may also contain a controlfile backup.
Indicates whether a backup of the datafile is full or incremental. Levels range from 0 to 4. Levels one to four are user-defined and allow you to set up different levels of incremental backups. For example, you might set up the following backup scheme:
Incremental backups can only be performed with the Oracle
Enterprise Edition, not the Workgroup Server.
For explicit information on using levels in your backup environment, see the Oracle8 Backup and Recovery Guide.
User-defined name representing one or more backup sets or image copies. The maximum length of a tag is 30 characters.
Full path and name of a datafile.
The Redo Log Groups object type container contains each redo
log group of the database. A particular redo log group can be expanded
to show its redo log members contained within a Redo Log Members object
type container.
When you select the Redo Log Groups object type container in the tree list, a multi-column list displays on the right. This list includes a row for each redo log group in the database. The columns of the list are:
Group number of the redo log group.
Thread number used in Parallel Server environments. For single instance environments, the thread number is set to one.
Sequence number of the redo log group.
Space allocated in kilobytes to the redo log group.
Logging status of the redo log group: Current, Active, or Inactive.
Indicates whether the redo log group has been archived. YES or NO.
System Change Number for the first change recorded in the redo log group.
The Redo Log Group property sheet allows you to create a new redo log group, or view the parameters of an existing redo log group. The Create Redo Log Group property sheet includes these elements:
Displays the redo log group number that Oracle Enterprise Manager has automatically generated for this new redo log group. (For example, if redo log groups 1 and 2 already exist for the database, 3 appears by default in the Group # box.)
Used in Parallel Server environments, indicates the thread associated with a redo log group. For single instance environments, this number is set to one.
Use Existing File(s): Allows reuse of an existing
file(s).
New File(s) Size: Allows you to specify the size of the new Redo Log Group file(s) (Kilobytes or Megabytes).
Displays the current members of this redo log group.
The Current Members box is empty when the Create Redo Log Group property sheet first displays. After you add a new member to this redo log group, the new member then appears in this box.
Remove the redo log group member that is selected in the Current Members box.
Name of the new member.
Displays a standard Open dialog box, from which you can select
the redo log file you want to enter in the New Member box.
The Redo Log Member dialog allows you to view an existing or add a new redo log member to a redo log group in the target database.
Filename of the new member of the redo log group shown in the Group box. When creating a new redo log member, this field is editable.
Redo log group to which the redo log member belongs. When creating a new redo log member, you can select from all groups available in the target database using the drop-down list.
When selected, specifies that Oracle Backup Manager reuse an existing file.
When selected, specifies that Oracle Backup Manager create
a new file.
The Archived Logs Container displays the all archived logs
for the target database.
When you select the Archived Logs container, a multi-column list displays containing the following columns:
Full path and name of the archive log.
Archive date and time for the first member in the redo log group.
Archive date and time for the next member in the redo log group.
Status as to whether the archived log file will be deleted
upon backup.
The General page allows you to view parameters for the selected archived redo log file.
Full path and name of the archived redo log file.
Numeric archived redo logfile identifier used for parallel server environments. Thread numbers are used to identify archived redo logfiles belonging to a specific instance. A default value of 1 is used for single instance environments.
Unique numeric identifier for the selected archived redo log file. During media recovery, Oracle applies redo log files in ascending order by using the log sequence number of the necessary archived and online redo log files.
Physical size of the redo log file in kilobytes.
Status as to whether the selected redo log file has been
backed up
The Record page allows you to view the time stamp and system change number of the selected archived log.
Date: Archive date and time for the first member in
the redo log group.
System Change No.: Low SCN for the first member of the redo log group.
Date: Archive date and time for the last member of
the redo log group.
System Change No.: High SCN for the last member of
the redo log group.
A channel establishes a connection from the Oracle8 Recovery
Manager subsystem to the target database for backup or restore operations.
Multiple channels can be created to allow multiple backup sets or file
copies to be read or written in parallel by a single job. Important: Backup
in parallel can only be performed with Oracle Enterprise Edition and not
the Workgroup Server.
Note: At least one channel must exist before performing
backup or restore operations.
When you select the Channels folder, a multi-column list displays the following columns:
Name of the user-defined channel.
DISK or TAPE.
Status as to whether the channel is selected as the default
channel for the target database.
The General page allows you to create, view, or modify a
channel.
Note: At least one channel must exist before performing backup or restore operations.
User-specified name of the channel.
When checked, specifies that the current channel be used by default whenever the currently connected target database is accessed.
When checked, makes the current channel available to any target database.
Drop-down list allowing you to select from one of the following device types:
Format: Unique backup set name. The following parameters can be used
Destination (active when Channel Type is set to Disk):
Drive and path where backup sets are stored.
The Limits page allows you to set the limits for any backup or copy operation. For any setting, you move the slider bar to change the its value. The middle number on the scale changes according to the position of the slider bar.
When checked, it allows you set the maximum number of megabytes that a backup operation can write to a single backup piece.
When checked, it allows you to control the number of blocks per second read by a backup or copy operation from or to any input datafile. Controlling the read rate ensures that a backup or copy operation does not consume excessive disk bandwidth, which can degrade online performance.
When checked, it allows you to control the maximum number
of input files that a backup operation can have open simultaneously. Setting
maximum number of open files is particularly useful when backing up a large
number of archivelogs into a single backup set.
The jobs object contains all backup, restore, and recovery
jobs that have either been submitted, have already been run, or are currently
stored in the job library.
When the Jobs object is selected in the tree list, Jobs property
sheets are displayed.
The Active Jobs page contains a summary of the active jobs that have been submitted to the Oracle Enterprise Manager job system and are not yet completed. You cannot modify these jobs.
Name of the job.
Execution status of the job. Status may be one of the following:
Date and time of the job start time.
The Job History page contains a list of previous job activities, such as multiple executions of a job. These are jobs that have been submitted to an agent and have executed successfully or unsuccessfully. This page also lists deleted jobs. You cannot modify these jobs.
The name of the job.
Status of job is one of the following:
Time when the job started or was deleted. Because the order of agent notifications may vary, it is possible that the Console receives a completed or failed notification before a running notification. If this happens, the start time displays Unknown.
Time when the job finished, failed, or was deleted.
The Job Library page displays jobs created and saved using
either the Backup or Restore Wizard. This is useful if you want to submit
the same job at different times or if you want to make minor modifications
to an existing job without having to redefine it from scratch using one
of the Wizards.
Double-click on an entry in the Job Library list to start the associated Wizard with the stored parameters already set. You can either submit the job, or modify the settings and save it again.
Application generated name of the job.
Application generated description of the job.
The Oracle8 Recovery Manager wizards guide you through complex
tasks, allowing you to concentrate on high-level strategies for managing
your backup and recovery environment.
The Backup Wizard allows you to select from a variety of backup operations. To start the Backup Wizard, select Backup Wizard from the Backup menu. The type of backup you select determines which procedure the Backup Wizard guides you through. The following backups types are available:
For more information on backups and related strategies, see
the Oracle8 Server Backup and Recovery Guide. Refer to the Oracle
Backup Manager online help for a detailed user interface information.
The Introduction page of the Restore Wizard allows you to select from the following types of restore operations:
The type of restore you select determines which procedure
the Restore Wizard guides you through.
Depending on the status of the target database (ARCHIVELOG,
NOARCHIVELOG, mounted and open, or mounted only), some options will be
disabled.
Refer to Oracle Backup Manager online help for a detailed
information.
The Report Wizard allows you to submit a job that generates backup reports. The results of the report are viewed by double clicking on the job entry in the Job History page of the Jobs property sheet. The Job Output dialog displays with the report results. You can use the Report wizard to generate reports for the following backup issues:
Files requiring backup and Files which are unrecoverable
reports should be generated on a regular basis to ensure that the necessary
backups are available to perform recovery, and to ensure that the recovery
can be performed within a reasonable length of time.
In addition to the automated backup procedures you can perform
using the Backup Wizard, Oracle8 Recovery Manager subsystem also allows
you to manually perform specific backup tasks such as creating a backup
set or an image copy.
A backup set is a backup of one or more Oracle files, where
files are multiplexed together. These files are called backup pieces. Files
within a backup set must be extracted using a restore operation.
To create a backup set:
The General page allows you to specify the backup level, a tag, and whether or not the control file is backed up. To backup a range of datafiles, use the Backup Wizard.
Click on the up or down arrow to specify a backup level. Backup Manager allows you to specify up to five levels of backup: 0: full backup, 1-4: incremental backup
Optionally, you can specify a tag by entering a character
string of less than 30 characters. You can also use the drop-down list
box to select an existing tag.
Defining a tag gives you a symbolic way to refer to a collection of image copies or backup sets. You can also use tags to specify specific input files to a restore or switch.
Select this option if you want the control file backed up
with the backup set.
The Channels page allows you to select the channel(s) used for the current backup set.
Drop-down list allowing you to select one of the following channel types:
List of channels selected for use by the current backup.
To remove an entry from the Selected channels list, double-click on the entry.
List of available channels for use by the current backup.
To add an entry to the Selected channels list, double-click
on the Available channels entry.
Multiple selection of channels is only supported with the
Oracle Enterprise Edition.
The Parameters page allows you to set storage parameters for the current backup set.
When selected, it allows you to set the maximum number of
files that can be placed in a single backup set. If the number of files
selected for the current backup exceed this number, multiple backup sets
are created. In addition, multiple channels, if defined and available,
will also be used.
The Schedule page allows you to schedule the execution of a backup or image copy.
Drop-down list allowing you to select the frequency of backup or image copy execution. The choices are Immediately, Once, On Interval, On Day of Week, and On Date of Month.
Note: If you choose a day, such as 31, that is not in a month, the job will not be run in that month.
Choose the first date and time that you want the task executed. This is the starting time for any task scheduled on an interval.
Choose the last date and time that you want the task executed. This option does not apply if you chose the Immediately or Once execution options.
Select the time zone from the pull-down list. The choices
are Agent, Console, and GMT.
Note: Only the Agent time zone is available with this release.
An image copy contains a single file (datafile, archivelog,
or control file) that you can use as-is to perform recovery.
To create an image copy:
The General Page allows you to enter the requisite information
for a complete image copy of a datafile, or control file. An image copy
is a direct copy of the selected input file that contains no header or
trailer blocks.
Image copy backups can be written only to disk. No compression is used. Restoring a file with an image copy involves substituting the image copy for the actual file.
The drive and/or full path to the directory where you store image copies. The filename of the selected input file is used by default. The default backup directory is defined by the default channel for the target database.
Use the drop-down list to select an available channel.
Before performing an image copy, you must define at least one channel.
Optionally, you can specify a tag by entering a character
string of less than 30 characters. You can also use the drop-down list
box to select an existing tag.
Defining a tag gives you a symbolic way to refer to a collection
of image copies or backup sets. You can also use tags to specify specific
input files to a restore or switch.
See Backup Set/Image Copy
Property Sheet: Schedule Page on page 12-28 for a detailed description.
In addition to the automated restore and recover procedures
you can perform using the Restore Wizard, you can manually restore and
recover database objects.
The General page allows you to specify the type of restore operation performed by Backup Manager.
Allow Rman to choose the best available backup set.: Selected
by default, this option allows Backup Manager to select automatically the
most recent backup set or file copy available.
Restore to Tag: When selected, allows you to select the backup set or file copy using the files' tag. Select the desired tag using the drop-down list. If backup sets or file copies are found with the same tag, the tag with the most recent timestamp is selected.
When selected, recovery is automatically performed after
the restore operation.
The Rename page allows you to restore the selected datafile(s) to a new location. When datafiles are restored to a new location, they are considered datafile copies. For this reason, a switch is automatically performed.
The full path and filename of the selected datafile(s). This field is not editable.
Enter a new filename and/or a new path.
You can copy all or sections of the Original Name entry and
paste it into the New Name field by highlighting the desired text and selecting
the desired action from the pop-up menu.
The Channels page allows you to select the channel(s) used for the current restore operation.
Drop-down list allowing you to select one of the following channel types:
List of channels selected for use by the current restore operation.
Use the left arrow button to add channels selected in the
Available channels box to the list of channels in the Selected channels
box.
Use the right arrow button to remove channels selected from
the Selected channels box to the list of channels in the Available Channels
box.
Double-clicking on a channel in either box performs the same operation the arrow keys perform -----it transfers the channel from one box to the other.
List of available channels for use by the current restore
operation.
The General page allows you to convert a copy of a datafile into a datafile used by the target database. When a switch is performed, the datafile copy is registered with the controlfile, thus making it a datafile that can be accessed by the database.
When selected, a drop-down list allows you to select the datafile copy you wish to make current via the datafiles' tag.
When selected, allows you to select from a list of available datafile copies. The multi-column list displays the following file attributes:
The General page allows you to select the channel for recovery of the selected object in the tree list. This property sheet consists of the following:
Drop-down list allowing you to select one of the following channel types:
List of channels selected for use by the current recover
operation.
To remove an entry from the Selected channels list, double-click on the entry.
List of available channels for use by the current recover
operation.
To add an entry to the Selected channels list, double-click
on the Available channels entry.
If any errors exist within the target database's datafiles, you can display their current recovery status by performing the following actions:
The Error Datafiles dialog box appears automatically if a problem is found with one or more datafiles.
The full path and name of the datafile.
Name of the tablespace to which the datafile belongs.
Error, if any, generated by the Recovery Manager utility. See the Oracle8 Backup and Recovery Guide for more information.
Datafile status as to whether the datafile needs recovery. Depending on the type error, the column may be blank.
Recovery status for the datafile. In most cases, RECOVERY
will be the default entry.
The recovery catalog must contain current information about
the target database at all times. To facilitate recovery catalog maintenance,
the Catalog menu consolidates all tasks required to keep the recovery catalog
up-to-date. See Catalog Menu on page
12-8
Primary database operations such as startup, shutdown, switching
a logfile, adding or deleting a log group or member are consolidated in
the Database menu. For more information on these functions see Database
Menu on page 12-9.
A channel establishes a connection from the Oracle8 Recovery
Manager subsystem to the target database for backup or restore operations.
Multiple channels can be created to allow multiple backup sets or image
copies to be read or written in parallel by a single job.
Choose Create from the Channel menu. The Create Channel property
sheet appears.
The General page allows you to create, view, or modify a
channel. A channel establishes a connection from Backup Manager to the
target database for backup or restore operations. Multiple channels can
be created to allow multiple backup sets or file copies to be read or written
in parallel by a single job.
Note: At least one channel must exist before performing backup or restore operations.
User-specified name of the channel.
When checked, specifies that the current channel be used by default whenever the currently connected target database is accessed.
When checked, makes the current channel available to any target database.
Drop-down list allowing you to select from one of the following device types:
Format: Unique backup set name. The following parameters can be used
Destination (active when Channel Type is set to Disk):
Drive and path where backup sets are stored.
The Limits page allows you to set the limits for any backup or copy operation. For any setting, you move the slider bar to change the its value. The middle number on the scale changes according to the position of the slider bar.
When checked, it allows you set the maximum number of megabytes that a backup operation can write to a single backup piece.
When checked, it allows you to control the number of blocks per second read by a backup or copy operation from or to any input datafile. Controlling the read rate ensures that a backup or copy operation does not consume excessive disk bandwidth, which can degrade online performance.
When checked, it allows you to control the maximum number
of input files that a backup operation can have open simultaneously. Setting
maximum number of open files is particularly useful when backing up a large
number of archivelogs into a single backup set.
The stored script capability of Oracle8 allows you to store
a sequence of Recovery Manager commands within the the recovery catalog
for execution at a later time. This allows you to plan, develop, and test
a set of commands for backing up, restoring, and recovering the database.
Each stored script relates to only one database.
To create a stored script:
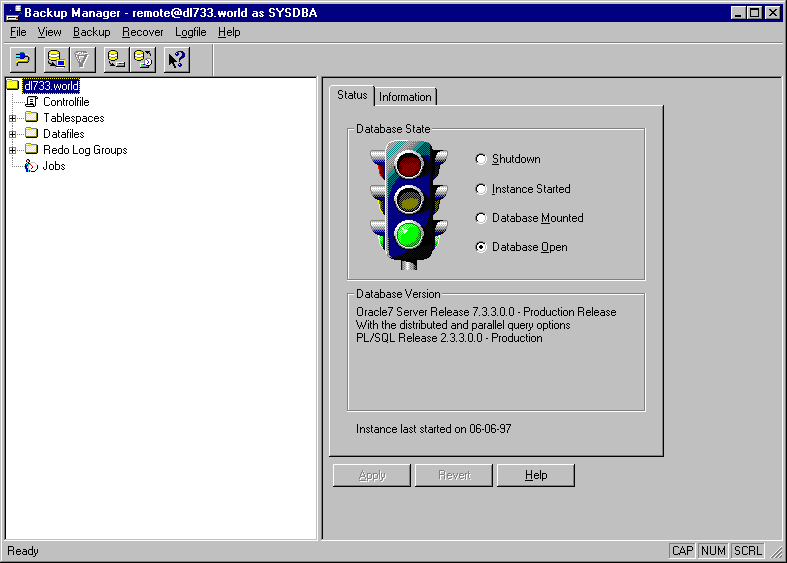
This backup subsystem provides you with an easy-to-use backup
tool for backing up and recovering Oracle7 databases. You can also use
the Operating System Backup subsystem for limited backup and recovery operations
on Oracle8 databases.
After selecting Operating System Backup from the Subsystem
selection dialog box, the Backup Manager window appears.
Backup Manager includes four standard menus, File, View,
Logfile, and Help. It also includes the Backup, Recover, and Logfile menus.
For information on standard application menus, see Application
Menus on page 7-10
The Backup menu includes the following items:
Prepares the selected tablespace for an online backup.
When you choose Begin Online Backup, two columns of the Tablespaces
multi-column list indicate that fact: the Backup Status column changes
to "Active,"and the Online Backup Started column shows the data and time
the backup was started.
The Begin Online Backup menu item is enabled when an individual tablespace is selected, that tablespace is online, and the backup status of that tablespace is not currently active.
Notifies the database that the online backup is complete.
When you choose End Online Backup, two columns of the Tablespaces
multi-column list indicate that fact: the Backup Status column changes
to "Not Active,"and the Online Backup Started column no longer contains
any information for that tablespace.
The End Online Backup menu item is enabled when an individual tablespace is selected, that tablespace is offline, and that tablespace is currently being backed up.
Places the selected tablespace online.
The Place Tablespace Online menu item is enabled when an individual tablespace is selected, and that tablespace is offline.
Places the selected tablespace online.
The Place Tablespace Offline menu item is enabled when an individual tablespace is selected, and that tablespace is online.
Allows you to create and submit jobs for backing up the tablespaces of the database. Jobs can be saved to the job library for future execution.
Displays the Backup Control File dialog box, from which you
can enter the name and directory location of the backup control file for
the database.
The Recover menu contains the following items:
Recover the selected object in the tree list.
Starts the Recovery Wizard that guides you through the recovery
processes.
The Database menu contains the following items:
Shuts down the database.
Starts up the database.
Makes the database accessible only to users with the RESTRICTED SESSION system privilege. Users already connected are not affected.
Makes the database accessible to all users with the CREATE SESSION system privilege.
Allows you to switch redo log groups. Choosing Switch Logfile automatically enables the next redo log group to become the current redo log group.
Forces a checkpoint. During a checkpoint, all modified database buffers are written to the appropriate datafiles.
Creates a new redo log group for the database.
Allows you to remove a redo log group from the database.
The Drop Log Group menu item is enabled when an individual redo log group container is selected.
Allows you to create a new member for an existing redo log group.
Allows you to remove a redo log file from a redo log group.
The Drop Log Member menu item is enabled when an individual
redo log file is selected.
The database object displays the name of the target database.
When selected, the database property sheet displays providing you with
information regarding database status and archive mode. This property sheet
contains the following information.
The Status page contains information about the status of the current database, database version, and any installed options. This page also allows you to change the state of the database by selecting one of the Database State options and clicking Apply.
Instance Started: Instance started but not mounted.
Database Mounted: Database mounted but not open.
Database Open: Database mounted and open.
Database version and any installed options.
Attention: If the database is not running, the message
"ORACLE not available" is displayed.
The Information page contains displays the current state of redo log archival and the system global area.
Log Mode: Specifies whether the connected database
is in ARCHIVELOG mode or NOARCHIVELOG mode. For information on switching
database archive modes, see Oracle 7 Server Administrator's Guide.
Last SCN Archived: The last system change number that
was archived. The SCN uniquely identifies the last committed database transaction.
Archive Destination: Specifies the destination where
the archive log files are to be created. If you are archiving to disk,
it is recommended that a dedicated disk with sufficient storage be used.
Archive Format: Specified the naming convention for the archived log files. ARC, appended with the backup set number (%S) and the backup stamp number (%T), is used to form a unique filename for the backup set.
Automatic Archival: Allows you to specify that redo log files be automatically archived. To enable Automatic archiving upon instance startup, set the LOG_ARCHIVE_START initialization parameter to TRUE. This option is enabled when the connected database is running in ARCHIVELOG mode.
Database Buffers: Size of the database buffer cache
(in bytes).
Fixed Size: Memory allocated to the area of the SGA
that contains general information about the state of the database and the
instance. No user data stored here (in bytes).
Redo Buffers: Size of the redo log buffer (in bytes).
Variable Size: Memory allocated to variable size data
structures (in bytes).
The controlfile object represents the controlfile of the
target database. When selected from the tree-list, the control file property
sheet displays.This property sheet displays all available control files
used by the target database and also displays the name and location of
the control file as well as its status.
The Tablespaces object type container contains each tablespace
in the database arranged alphabetically in a tree list. A particular tablespace
can be expanded to show each of its datafiles.
When you select:
When you select the Tablespaces object type container in the tree list, a multi-column list displays on the right. This list includes a row for each tablespace in the database. The columns of the list are:
Name of the tablespace.
Total size in megabytes of the datafiles that comprise the tablespace.
Backup status of the tablespace: Active (an online backup of this tablespace is currently in progress), Not Active (no online backup of this tablespace is currently in progress); or Offline.
Date and time the online backup of this tablespace started.
If this column is empty, no online backup of this tablespace is currently
in progress.
The Tablespace property sheet allows you to alter the status of the tablespace selected in the tree list. In addition, all datafiles contained within the tablespace are displayed.
The full path and name of the selected tablespace.
Indicates the current status of the selected tablespace and also allows you to change the status. The following options are available:
A scrolling multi-column list displaying all datafiles contained
within the tablespace. For each datafile, the full name and path, size
(K), date and time of the last backup, whether the datafile needs to be
backed up, and any datafile errors are displayed.
The Redo Log Groups object type container contains each redo
log group of the database. A particular redo log group can be expanded
to show its redo log members contained within a Redo Log Members object
type container.
When you select:
For information about managing redo log groups, see the Oracle
Server Concepts, the Oracle Server Administrator's Guide, and
the Oracle Server SQL Reference.
When you select the Redo Log Groups object type container in the tree list, a multi-column list displays on the right. This list includes a row for each redo log group in the database. The columns of the list are:
Group number of the redo log group.
Sequence number of the redo log group.
Space allocated in kilobytes to the redo log group.
Logging status of the redo log group: Current, Active, or Inactive.
Indicates whether the redo log group has been archived. YES or NO.
System Change Number for the first change recorded in the redo log group.
When you select the Redo Log Members object type container in the tree list, a multi-column list displays on the right. This list includes a row for each redo log member in the redo log group. The columns of the list are:
Filename and directory path for the redo log member.
Group number of the redo log group to which this redo log member belongs.
Status of this redo log member: In Use, Invalid (the file is inaccessible), Stale (the contents of the file are incomplete), or Deleted (the file is no longer in use).
Status of the redo log group to which this redo log member belongs: Current, Active, or Inactive.
Indicates whether this redo log member has been archived:
YES or NO.
Redo Log Group Property Sheet
When you select a particular redo log group in the tree list, a property sheet for this redo log group displays on the right. The items of this property sheet are:
Displays the redo log group number for this redo log group.
Click this button to allow Oracle Enterprise Manager to use existing file(s).
Click this button in order to specify the size of the new Redo Log Group file(s).
If you click the New File(s) Size button, enter the new file(s) size in the Bytes box and click K (default) to specify that the new file(s) size is in kilobytes, or M to specify that the new file(s) size is in megabytes.
Displays the filenames and directory paths for the redo log members of this redo log group.
Disabled in this property sheet.
Enter a new member for this redo log group in the New Member box.
Click the Browse button to display the Open dialog box, from which you can select the redo log file you want to enter in the New Member box.
Adds a new redo log member to this redo log group.
The Add button is enabled when you enter a new redo log member
in the New Member box.
When you select a particular redo log member in the tree list, a property sheet for this redo log member displays on the right. The items of this property sheet are:
Enter the new filename of the redo log group member.
Displays the redo log group to which the redo log member
belongs.
This section covers the following topics:
To shut down the database, choose Shutdown Database from
the Backup menu. The Shutdown property sheet appears.
Attention: Before shutting down a release 7.1
or later database, you must connect as SYSDBA or SYSOPER. Before shutting
down a release 7.0 database, you must connect as INTERNAL.
The items of the Shutdown property sheet are described below:
Normal: Shuts down the database in normal mode.
Immediate: Shuts down the database in immediate mode.
(This is the default.)
Abort: Shuts down the database in the abort mode.
Transactional (Oracle8): Provides a specified length of time (Timeout) in which to complete transactions before shutdown occurs. If the Timeout filed is left blank, shutdown does not occur until the last database transaction is complete.
Click this button to shut down the database in the mode you
have selected.
Other applications create separate connections when you start
them. When performing a shutdown in normal mode, remember to close these
windows, or the shutdown will not complete.
To start up the database, choose Startup Database from the
Backup menu. The Startup property sheet appears.
Before starting up a release 7.1 or later database, you must
connect as SYSDBA or SYSOPER. Before starting up a release 7.0 database,
you must connect as INTERNAL.
The items of the Startup property sheet are described below:
Force: Forces an instance to start regardless of the
operating circumstances.
Restrict: Starts an instance in restricted mode. Connections
are limited to those users who have been granted the RESTRICTED SESSION
system privilege.
Parallel: Allows multiple instances to access a single
database concurrently.
No Mount: Starts up the instance and mounts the database.
The database is accessible only to database administrators.
Mount: Mounts a database upon instance startup. The
database is accessible only to database administrators.
Mount and Open: Starts up the instance, and mounts and opens the database.
This checkbox only appears when initialization parameters are stored in the repository. If visible and not checked, a new INIT.ORA file will be created.
Name of the parameter file used to start the instance.
If you do not specify a parameter file, Oracle Enterprise
Manager looks for the parameter file in the default location on your local
machine. For information about the default location for the parameter file,
see your operating system-specific Oracle documentation.
Browse: Displays the standard Open dialog box, allowing you to locate the parameter file.
Click this button to start up the database.
To create a backup job script in order to back up one or
more tablespaces of the database, choose Backup Tablespace Wizard from
the Backup menu. The Backup Tablespace Wizard displays.
It is best to create a separate backup job script for each
database you plan to back up, as it is highly unlikely that the data structures
of any two databases would match.
The Backup Tablespace Wizard includes four pages that you
complete in order to create a backup job script, which you can then run
from the Job subsystem of the Console. For more information about the Backup
Wizard, see Backup Manager online help.
The Recovery Wizard automates the recovery process. The Introduction page of the Recovery Wizard allows you to select from the following types of recovery operations:
The type of recovery you select determines which procedure
the Recovery Wizard guides you through.
Depending on the status of the target database (ARCHIVELOG,
NOARCHIVELOG, mounted and open, or mounted only), some options will be
disabled.
Refer to Oracle Backup Manager online help for a detailed
information.
To create a new redo log group, choose Add Log Group from the Logfile menu. The Create Redo Log Group property sheet appears.
Displays the redo log group number that Oracle Enterprise
Manager has automatically generated for this new redo log group. (For example,
if redo log groups 1 and 2 already exist for the database, 3 appears by
default in the Group # box.)
You can change this default group number if you want.
Click this button to allow Oracle Enterprise Manager to reuse existing file(s).
Click this button in order to specify the size of the new Redo Log Group file(s).
If you click the New File(s) Size button, enter the new file(s) size in the Bytes box and click K (default) to specify that the new file(s) size is in kilobytes, or M to specify that the new file(s) size is in megabytes.
Displays the current members of this redo log group.
The Current Members box is empty when the Create Redo Log Group property sheet first displays. After you add a new member to this redo log group, the new member then appears in this box.
Click this button to remove the redo log group member that is selected in the Current Members box.
Enter a new member for this redo log group in the New member box.
Click this button to display the Open dialog box, from which you can select the redo log file you want to enter in the New Member box.
Click this button to add the new member for this redo log group that you entered in the New Member box.
Click this button to create the new redo log group.
To create a new member for an existing redo log group, choose Add Log Member from the Logfile menu. The Create Redo Log Member property sheet appears.
Enter the filename of the new member of the redo log group shown in the Group box.
From this box, select the redo log group to which you want to add a new member.
Click this button to specify that Oracle Enterprise Manager reuse an existing file.
Click this button to specify that Oracle Enterprise Manager
create a new file.
The following information pertains to Enterprise Backup Utility
installation and configuration.
The user interface for Enterprise Backup Utility subsystem
is similar to Oracle8 Recovery Manager and Operating System Backup subsystems
discussed earlier in this chapter. Hence, many of the operational characteristics
are identical. For specific information on Enterprise Backup Utility installation,
features, and functionality, see the Enterprise Backup Utility documentation.
Attention: The current version of Enterprise Backup
Utility is not compatible with Oracle8 databases. This backup subsystem
is comes standard with Oracle Release 7.3.4. It can also ordered separately.
You will also find EBU 2.1.0.1 in the 7.3.3 bundle on UNIX
platforms.
When installation is complete, there will be an 'obackup'
directory in your oracle home.
A catalog database is analogous to an Oracle 8 recovery catalog: it is a set of tables on a separate database.
Attention: EBU_HOME replaces OBK_HOME beginning with version 2.2.
setenv OBK_HOME $ORACLE_HOME/obackup
Where ORACLE_HOME is the home you installed Enterprise Backup Utility when you ran orainst.
setenv OBK_HOME $ORACLE_HOME/obackup
set path=($path $OBK_HOME/bin)
setenv LD_LIBRARY_PATH ${LD_LIBRARY_PATH}:$OBK_HOME/lib
source ~/.login
cd $OBK_HOME/lib
cd $ORACLE_HOME/obackup/bin
obackup -upgrade
Attention: Beginning with version 2.2, you can specify 'ebu'
in place of 'obackup', although 'obackup' may still be used for backwards
compatibility. If you specify 'obackup', OBK_* environment variables are
used. If you specify 'ebu', EBU_* environment variables are used.
Note: Specifying an Enterprise Backup Utility upgrade
(obackup -upgrade) installs the tables if not already present.
You will be prompted for the catalog connect string (username/password@connect,
which you can enter one at a time or use the above syntax, just like sqlplus).
If you created your own catalog database, enter something
like obk/obk@your_connect_string. It will then ask you for the SYS password
so it can create the user you entered. Once it creates the user, it will
connect to the catalog db as that user and create the tables and other
requisite schema objects.
For more information on installation, see the Enterprise
Backup Utility Administration Guide.