Net8 Getting Started 
Release 8.0.5 for Windows NT and Windows 95/98 
A64419-01
 
Library
 
Product
 
Contents
 
Index
 

Prev Next

10
Performing Administration Tasks

This chapter discusses some common network administration tasks that may need to be performed on the server and client.

Specific topics discussed are:

Performing Oracle Names Server Administration Tasks

Common administration tasks to perform on the Oracle Names Server include:

Starting Oracle Names Server

If you are using Oracle Names, start an Oracle Names Server on the machine where Oracle Names Server is installed and configured with the NAMESCTL80 control utility or the Control Panel:

Use the control utility NAMESCTL80...  Use the Windows NT Control Panel... 
  1. Verify whether the Oracle Names Server is running or not running. 
From the command line, enter:C:\> NAMESCTL80NAMESCTL> STATUSIf the STATUS command indicates the Oracle Names Server is running, go to Step 3. If the Oracle Names Server is not running, go to Step 2. 
  1. Start the Oracle Names Server. Enter: 
NAMESCTL> START 
  1. Exit from the NAMESCTL80 utility. Enter: 
NAMESCTL> EXIT 
  1. From the Control Panel window, double-click Services. 
The Services window appears. Look for the OracleHOME_NAMENamesService80 service. A blank in the Status column indicates that the service is not running. If the service is already running, go to Step 3. 
  1. Select the OracleHOME_NAMENamesService80 service, and click Start. 
The service starts. 
  1. In the Services window, click Close. 


Stopping Oracle Names Server

Stop an Oracle Names Server (if you are using it) when you have completed database connections.

Use the control utility NAMESCTL80...  Use the Windows NT Control Panel... 
  1. From the command line, enter: 
C:\> NAMESCTL80NAMESCTL> STOP 
  1. Exit from the NAMESCTL80 utility. Enter: 
NAMESCTL> EXIT 
  1. From the Control Panel window, double-click Services. 
The Services window appears. Look for the OracleHOME_NAMENamesService80 service. A blank in the Status column indicates that the service is not running. If the service is not running, go to Step 3. 
  1. Select the OracleHOME_NAMENamesService80 service, and click Stop. 
The Services confirmation dialog box appears, prompting you if it is OK to stop the service. 
  1. Click Yes to acknowledge the message, and click Close to exit the Services window. 


Performing Server Administration Tasks

Common administration tasks to perform on the server side include:

Starting the Network Listener

The following table explains how to start the network listener using either the control utility LSNRCTL80 or the Windows NT Control Panel:

Using the control utility LSNRCTL80...  Use the Windows NT Control Panel... 
  1. Verify whether the network listener is running or not running. 
From the command line enter:C:\> LSNRCTL80LSNRCTL> STATUS LISTENER_NAMEwhere LISTENER_NAME is the name of the network listener defined in the LISTENER.ORA file with the alias LISTENER. It is not necessary to identify the network listener if you are using the default network listener, named LISTENER.If the STATUS command indicates the network listener is running, go to Step 2. If the network listener is not running, go to Step 3. 
  1. Even if the network listener is running, Oracle Corporation advises you to stop the network listener, and start it again. To stop the network listener, enter: 
LSNRCTL> SET PASSWORD PASSWORDLSNRCTL> STOP LISTENER_NAMESET PASSWORD is only required if the password is set in the LISTENER.ORA file. The password defaults to ORACLE. 
  1. Start the network listener. Enter: 
LSNRCTL> START LISTENER_NAMEOracleHOME_NAMETNSListenerLSNR is created if this command is run for the first time against a non-default network listener name. 
  1. Exit from the LSNRCTL80 utility. Enter: 
LSNRCTL> EXIT 
  1. From the Control Panel window, double-click Services. 
The Services window appears. Look for OracleHOME_NAMETNSListener80 (the service name if you are using the default network listener name LISTENER) or OracleHOME_NAMETNSListener80LSNR (where LSNR is the non-default network listener name). OracleHOME_NAMETNSListener80LSNR is only created if the following command has been run:LSNRCTL80 START LISTENER_NAMEA blank in the Status column indicates that the service is not running. If the service is already running, go to Step 3. 
  1. Select the OracleHOME_NAMETNSListener80 or OracleHOME_NAMETNSListener80LSNR service, and click Start. 
The service starts. 
  1. In the Services window, click Close. 


Stopping the Network Listener

Stop the network listener when all database connections have completed, and the Oracle Names Server has been stopped.

Using the control utility LSNRCTL80...  Use the Windows NT Control Panel... 
  1. From the command line, enter: 
C:\> LSNRCTL80LSNRCTL> SET PASSWORD PASSWORDLSNRCTL> STOP LISTENER_NAMEwhere LISTENER_NAME is the name of the network listener defined in the LISTENER.ORA file. It is not necessary to define the network listener if you are using the default network listener name, LISTENER.SET PASSWORD is only required if the password is set in the LISTENER.ORA file. The password defaults to ORACLE. 
  1. Exit from the LSNRCTL80 utility. Enter: 
LSNRCTL> EXIT 
  1. From the Control Panel window, double-click Services. 
The Services window appears. Look for OracleTNSListener80 (the service name if you are using the default network listener name LISTENER) or OracleTNSListener80LSNR (where LSNR is the non-default network listener name). OracleTNSListene80LSNR is only created if the following command has been run:LSNRCTL80 START LISTENER_NAMEA blank in the Status column indicates that the service is not running. If the service is not running, go to Step 3. 
  1. Select the OracleTNSListener80 or OracleTNSListener80LSNR service, and click Stop. 
The Services confirmation dialog box appears, prompting you if it is OK to stop the service. 
  1. Click Yes to confirm the message, and click Close to exit the Services window. 


Performing Oracle Connection Manager Administration Tasks

Common administration tasks to perform on the Oracle Connection Manager machine include:

Starting Oracle Connection Manager(s)


Note:  

Start Oracle Names (if you are using it) and the network listener before starting Oracle Connection Manager. 


The table below explains how to start an Oracle Connection Manager using either the command line utility CMCTL80 or the Windows NT Control Panel.

To start  Use the control utility CMCTL80...  Use the Windows NT Control Panel... 

...in an Oracle Names environment 

  1. From the command line, enter: 
C:\> CMCTL80CMCTL> START CMAN 
  1. Exit from the CMCTL80 utility. Enter: 
CMCTL> EXIT 
  1. From the Control Panel window, double-click Services. 
The Services window appears. 
  1. Look for the OracleHOME_NAMECMAdminService80 and OracleHOME_NAMECManService80 services. A blank in the Status column indicates that a service is not running. If these service are already running, go to Step 4. 
  2. Select the OracleHOME_NAMECMAdminService80 service to acquire information about available Oracle Names Servers, and click Start. 
The service starts. 
  1. Select the OracleHOME_NAMECManService80 service to start the Oracle Connection Manager and click Start. A blank in the Status column indicates that the service is not running. 
The service starts. 
  1. In the Services window, click Close. 
 

...in a non-Oracle Names environment 

  1. From the command line, enter: 
C:\> CMCTL80CMCTL> START CM 
  1. Exit from the CMCTL80 utility. Enter: 
CMCTL> EXIT 
  1. From the Control Panel window, double-click Services. 
The Services window appears. Look for the OracleCManService80service. A blank in the Status column indicates that the service is not running. If this service is already running, go to Step 3. 
  1. Select the OracleCManService80 service to start the Oracle Connection Manager, and click Start. 
The service starts. 
  1. In the Services window, click Close. 


Stopping Oracle Connection Manager(s)

Stop the Oracle Connection Manager when the Oracle Names Server and network listener have been stopped:

To stop  Use the control utility CMCTL80...  Use the Windows NT Control Panel... 

...in an Oracle Names environment 

  1. From the command line, enter: 
C:\> CMCTL80CMCTL> STOP CMAN 
  1. Exit from the CMCTL80 utility. Enter: 
CMCTL> EXIT 
  1. From the Control Panel window, double-click Services. 
The Services window appears. Look for the OracleCMAdminService80 and OracleCManService80 services. A blank in the Status column indicates that the service is not running. If these service are already stopped, go to Step 4. 
  1. Select OracleCMAdminService80 from the list of services, and click Stop. 
The Services confirmation dialog box appears, prompting you if it is OK to stop the service. 
  1. Click Yes to acknowledge the message. 
  2. Select OracleCManService80, and click Stop. 
The Services confirmation dialog box appears, prompting you if it is OK to stop the service. 
  1. Click Yes to acknowledge the message, and click Close to exit the Services window. 
 

...in a non-Oracle Names environment 

  1. From the command line, enter: 
C:\> CMCTL80CMCTL> STOP CM 
  1. Exit from the CMCTL80 utility. Enter: 
CMCTL> EXIT 
  1. From the Control Panel window, double-click Services. 
The Services window appears. Look for the OracleCManService80 service. A blank in the Status column indicates that the service is not running. If this service is already stopped, go to Step 3. 
  1. Select OracleCManService80, and click Stop. 
The Services confirmation dialog box appears, prompting you if it is OK to stop the service. 
  1. Click Yes to acknowledge the message, and click Close to exit the Services window. 


Performing Client Administration Tasks

After testing the server side configuration, perform client side administration tasks by:

Starting the Client Cache Service

If you are using Oracle Names, you may enable client caching on clients with the NAMESCTL80 control utility or the Control Panel (for Windows NT only). Client caching will update the SDNS.ORA file with the new Oracle Names Server information. If you do not want to update the SDNS.ORA file, it is not necessary to start this service.

Use the control utility NAMESCTL80...  Use the Windows NT Control Panel... 
  1. At the command prompt, enter: 
C:\> NAMESCTL80NAMESCTL> START_CLIENT_CACHE 
  1. Exit from the NAMESCTL utility. Enter: 
NAMESCTL> EXIT 

Note: The Control Panel is not available for Windows 95 clients. You must use the NAMESCTL80 control utility. 

  1. From the Control Panel window, double-click Services. 
The Services window appears. Look for the OracleHOME_NAMEClientCache80 service. A blank in the Status column indicates that the service is not running. If the service is already running, go to Step 3. 
  1. Select the OracleHOME_NAMEClientCache80 service, and click Start. 
  2. In the Services window, click Close. 


Specifying Naming Methods

To specify the type of names resolution you want to use:

  1. Choose Start > Programs > Oracle for Windows NT/Windows 95 > Oracle Net8 Assistant.
  2. Select the Profile folder.
  3. The profile details appear on the right side of the page.
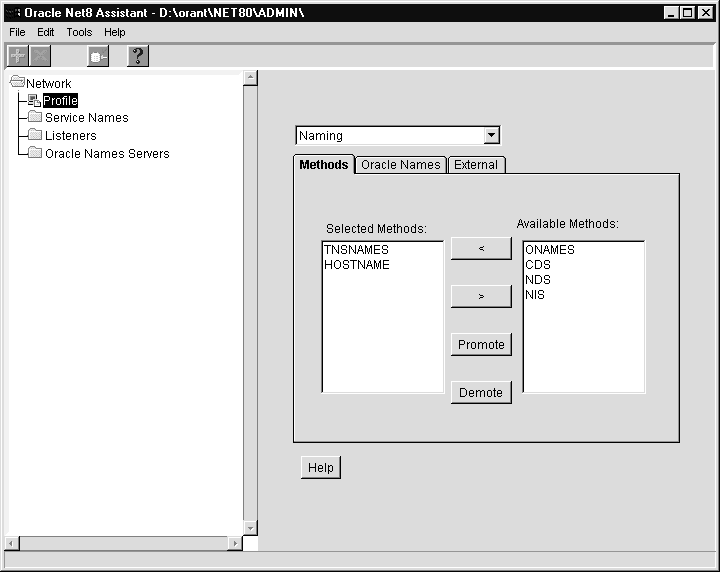
  4. Choose Naming from the drop-down list.
  5. Click the Methods tab.
  6. Choose from the Available Methods list which naming method you want to use:

  7. Naming Method  Description 

    ONAMES 

    Oracle Names  

    Service names are resolved centrally, through a Names Server. You may need to set a Preferred Names Server (using the Oracle Net8 Assistant). See the Oracle Net8 Assistant online help for more information.  

    See "Using the Oracle Names Method" in Chapter 6, "Configuring the Network"

    TNSNAMES 

    Local Naming  

    Service names are resolved using the TNSNAMES.ORA file which resides on the client.  

    See "Using the Local Naming Method" in Chapter 6, "Configuring the Network" 

    HOSTNAME 

    Host Naming  

    Service names are resolved using the Host Naming Adapter. Certain criteria must be met to use host naming names resolution.  

    See "Using the Host Naming Method" in Chapter 6, "Configuring the Network" 

    CDS 

    Cell Directory Services  

    This naming method is available with the Advanced Networking Option (ANO). See Chapter 7, "Connecting To a Database" and Oracle Advanced Networking Option Administrator's Guide

    NDS 

    NetWare Directory Services (NDS) 


  8. Order the naming methods according to which method you want Net8 to try first when resolving service names. Select the naming method in the Selected Methods list, and use the Promote or Demote button to move the selection up or down in the list.
  9. Choose Save Network Configuration from the File menu.
  10. Choose Exit from the File menu to exit the Oracle Net8 Assistant application.

Modifying Service Names and Addresses

If you configured the network using the local naming method, you may:

These changes are saved to the TNSNAMES.ORA file.

Modify a Service Name

To modify a service name:

  1. From a server or client machine, choose Start > Programs > Oracle for Windows NT/Windows 95/98 - HOME_NAME > Oracle Net8 Easy Config.
  2. Oracle Service Name Wizard page displays.

  3. Select Modify.
  4. Select the service name from the list box on the right side of the page, and click Next.
  5. Select the network protocol you want to use (this protocol adapter must also installed on the clients), and click Next.
  6. Enter the appropriate information for your chosen protocol in the fields, and click Next.
  7. Enter the name of the system ID (SID) of the database to which you want to connect in the Database SID field, and click Next. The default SID is ORCL.
  8. Click Test Service to test the simple network you have just configured.
  9. Enter a valid User name and Password, such as SYSTEM and MANAGER, for the database you want to connect to, and click Test.
  10. Click Done when the test is complete.
  11. The final window appears.

  12. Click Finish to save your configuration and dismiss the Oracle Net8 Easy Config application.
  13. Oracle Net8 Easy Config modifies the service name in the TNSNAMES.ORA located in ORACLE_HOME\NET80\ADMIN.

Delete a Protocol Address

To delete a protocol address from a service name in the TNSNAMES.ORA file:

  1. From the server or client machine, choose Start > Programs > Oracle for Windows NT/Windows 95 - HOME_NAME > Oracle Net8 Assistant from the taskbar.
  2. The Oracle Net8 Assistant displays.

  3. Double-click the Service Names folder to expand the directory of existing service names.
  4. Select the service name from which you want to delete the protocol address, and click Delete Address.
  5. Choose Save Network Configuration from the File menu.
  6. The TNSNAMES.ORA file is re-created.

  7. Choose Exit from the File menu.
  8. The Oracle Net8 Assistant application exits.

Delete a Service Name

To delete a service name from the TNSNAMES.ORA file:

  1. From the server or client machine, choose Start > Programs > Oracle for Windows NT/Windows 95 - HOME_NAME > Oracle Net8 Easy Config.
  2. Oracle Service Name Wizard page displays.

  3. Select Delete.
  4. Select the service name from the list box on the right side of the window, and click Next.
  5. A message appears asking you to confirm your decision to delete the service name.

  6. Click OK to confirm.
  7. The final page appears.

  8. Click Finish to save your modifications, and exit the Oracle Net8 Assistant application. Click Cancel to abandon your changes, and exit the Oracle Net8 Assistant application.
  9. If you click Finish, the service name is deleted, and the TNSNAMES.ORA file is re-created.

Add an Additional Address

If you configured the network using the local naming method, you can add an address to an existing service name.

To add an additional protocol address for a service name:

  1. From the server or client machine, choose Start > Programs > Oracle for Windows NT/Windows 95 - HOME_NAME > Oracle Net8 Assistant.
  2. Oracle Net8 Assistant appears.

  3. Double-click the Service Names folder to expand the directory of existing service names.
  4. Select the service name you want to add the additional address to, and click New Address.
  5. Enter the Protocol, Host Name, Port Number, and SID.
  6. Choose Save Network Configuration from the File menu.
  7. The TNSNAMES.ORA file is re-created.

  8. Choose Exit from the File menu.
  9. The Oracle Net8 Assistant application exits.

Enabling Tracing


Note:  

The trace facility uses a large amount of disk space and may have a significant impact upon system performance. Therefore, you should enable tracing only when necessary. 


The trace facility produces a detailed sequence of statements that describe network events as they are executed. Tracing an operation allows you to obtain more information on the internal operations of the components of Net8 than is provided in a log file. This information is output to files that can be evaluated to identify the events that led to an error.

Tracing assists you in diagnosing and troubleshooting networking performance and problems. Components that can be traced using the trace facility are:

Default trace file names are:

Tracing is enabled by:

Using the Oracle Net8 Assistant

The Oracle8 Net8 Assistant can be used to enable:

SQLNET.ORA Tracing

The Oracle8 Net8 Assistant enables tracing for client and/or server by setting parameters in the SQLNET.ORA file. When Net8 is run, SQLNET.TRC is created in ORACLE_HOME\NET80\TRACE.

To enable SQLNET.ORA tracing for a particular client or server:

  1. From the taskbar, choose Start > Programs > Oracle for Windows NT/Windows 95 - HOME_NAME > Oracle Net8 Assistant.
  2. Select Profiles.
  3. The profile details appear on the right side of the screen.

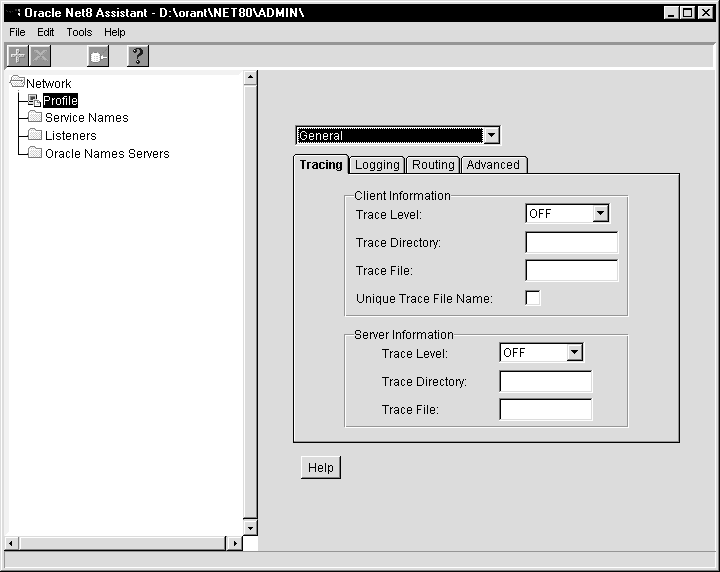
  4. Select General from the drop-down list.
  5. Click the Tracing tab.
  6. The fields for tracing display:

  7. Specify your tracing settings for the client and/or server:

  8. Tracing Setting  Description 

    Trace Level 

    Determines the detail of trace:  

    OFF--Tracing is not enabled. OFF is the default setting.  

    USER--Tracing is set to a level appropriate for users. Traces to identify user-induced error conditions.  

    ADMIN--Tracing is set to a level appropriate to database administrators. Traces to identify installation-specific problems.  

    SUPPORT--Tracing is set to a level appropriate for customer support. 

    Trace Directory 

    Specify the directory to which the trace file will be written. The default directory is ORACLE_HOME\NET80\TRACE. 

    Trace Filename 

    Specify the name of the trace file. You may enter any valid filename. The default filename is TRACE.TRC. 

    Unique Trace File 

    Select this checkbox to create unique trace files named SQLNETTHREAD_ID.TRC. 


  9. Choose Save Network Configuration from the File menu.
  10. Choose Exit from the File menu to exit the Oracle Net8 Assistant.
  11. The Oracle Net8 Assistant application exits.

LISTENER.ORA Tracing

The Oracle8 Net8 Assistant enables tracing for client and/or server by setting parameters in the SQLNET.ORA file. When Net8 is run, LISTENER.TRC is created in ORACLE_HOME\NET80\TRACE.

To enable LISTENER.ORA tracing:

  1. From the taskbar, choose Start > Programs > Oracle for Windows NT - HOME_NAME > Oracle Net8 Assistant on the server.
  2. Select Listeners.
  3. The available network listeners display.

  4. Select a network listener.
  5. The network listener details appear on the right side of the screen.

  6. Select General Parameters from the drop-down list.
  7. Click the Logging and Tracing tab.
  8. The fields for logging and tracing display:
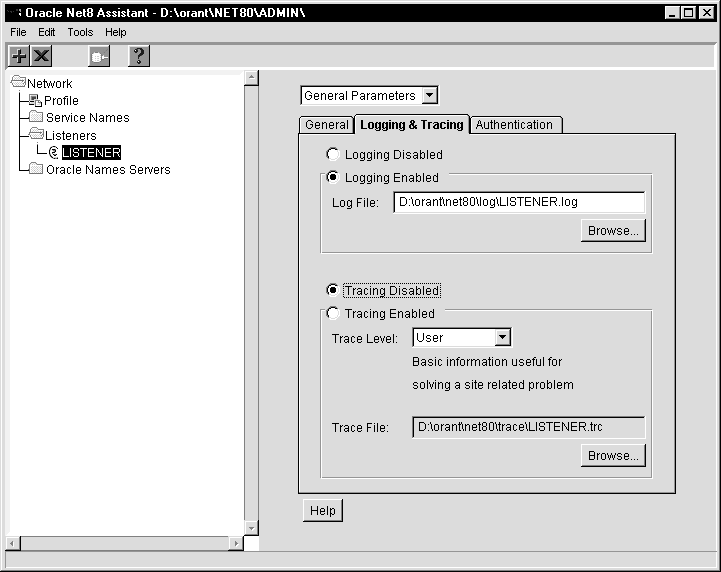
  9. Select Tracing Enabled.
  10. Specify your tracing settings:

  11. Trace Setting  Description 

    Trace Level 

    Determines the detail of trace:  

    OFF--Tracing is not enabled. OFF is the default setting.  

    USER--Tracing is set to a level appropriate for users. Traces to identify user-induced error conditions.  

    ADMIN--Tracing is set to a level appropriate to database administrators. Traces to identify installation-specific problems.  

    SUPPORT--Tracing is set to a level appropriate for customer support. 

    Trace Directory 

    Specify the directory to which the trace file will be written. The default directory is ORACLE_HOME\NET80\TRACE. 

    Trace File 

    Specify the name and directory of the trace file. You may enter any valid filename. The default filename is TRACE.TRC and the default directory is ORACLE_HOME\NET80\TRACE. 


  12. Choose Save Network Configuration from the File menu.
  13. Choose Exit from the File menu to exit the Oracle Net8 Assistant.
  14. The Oracle Net8 Assistant application exits.

Manually Adding Parameters

To set SQLNET.ORA and LISTENER.ORA tracing parameters using component configuration files:

  1. Set trace parameters in the configuration files:

  2. For this type of tracing:  Modify this file...  By adding the following...  To create the following trace file: 

    Client and Server 

    SQLNET.ORA  

    LISTENER.ORA 

    TRACE_LEVEL_CLIENT/LISTENER/SERVER=0/4/10/16  

    TRACE_DIRECTORY_CLIENT/LISTENER/SERVER=directory_name  

    LOG_DIRECTORY_CLIENT/LISTENER/SERVER=directory_name 

    SQLNET.TRC  

    LISTENER.TRC 

    Oracle Names Server 

    NAMES.ORA 

    NAMES.TRACE_LEVEL=0/4/10/16 

    NAMES.TRC 

    Oracle Connection Manager 

    CMAN.ORA 

    TRACING = YES 

    CMAN.TRC 


  3. If you modified the configuration files while the component was running, start or restart the component to enable the changed parameters.

Using the Control Utilities

To set trace parameters using component control utilities:

  1. For the network listener LSNRCTL80 utility, use the TRACE command to set the trace level while the network listener is running.
  2. For Oracle Names NAMESCTL80 utility, use the NAMES.TRACE_LEVEL command to set the trace level while the Names Server is running.

Analyzing Trace Files

Use Trace Assistant to interpret your *.TRC files.

Follow the instructions in section "10.4.3 Using the Trace Assistant to Examine Your Trace Files", in the Oracle Net8 Administrator's Guide to run the Trace Assistant.


Prev
 
Next
 
Oracle 
Copyright © 1998 Oracle Corporation. 
All Rights Reserved. 
 
Library
 
Product
 
Contents
 
Index