Release 8.0.5 for Windows NT and Windows 95/98
A64419-01
Library |
Product |
Contents |
Index |
| Net8
Getting Started
Release 8.0.5 for Windows NT and Windows 95/98 A64419-01 |
|
This chapter describes how to configure your network.
Specific topics discussed are:
Before a database server can receive connections from clients,
clients must be configured with service names (easy to remember aliases
for database addresses) that match the address preconfigured in each server
machine's LISTENER.ORA file. These addresses are used by the client to
connect to the network listener during a connection. During a connection,
a client passes the system ID (SID) of the server to which it wants to
connect.
The LISTENER.ORA file identifies and controls the behavior
of the network listeners that listen for the databases on the machine.
This file includes network listener descriptors and addresses of all network
listeners on a machine, the SIDs of the databases they listen for, and
various control parameters.
Client configuration is accomplished by creating a list of
the service names and addresses of network database destinations through
a TNSNAMES.ORA client configuration file or an Oracle Names Server. A client
(or a server that is part of a distributed database) needs this information
to know where to make connections.
Configuration is based upon one of two models:
Service names can be created using the following configuration
methods:
| Naming Method | Description |
|---|---|
|
Host Naming |
Resolves service names through a TCP/IP network's Domain Name System (DNS) or in the /ETC/HOSTS file. This method is recommended for simple TCP/IP environments. See "Using the Host Naming Method" in this chapter. |
|
Local Naming (no Oracle Names Server) |
Resolves service names to network addresses by using information configured and stored on each individual client. Local Naming is most appropriate for simple distributed networks with a small number of services that change infrequently. See "Using the Local Naming Method" in this chapter. |
|
Oracle Names |
Stores names and addresses of all database services on a network on an Oracle Names Server. Connection requests are routed through an Oracle Names Server, which resolves the service name to a network address. The information is then returned to the client. See "Using the Oracle Names Method" in this chapter. |
|
External Naming |
External naming refers to service name resolution by using a supported third-party naming service. See "Using the External Naming Method" in Chapter 8, "Performing Advanced Configuration". |
Depending on the naming method you use, the following configuration
files may be created or updated in ORACLE_HOME\NET80\ADMIN:
|
Additional Information: See Appendix C, "Configuration Files" for more information about these files. |
The host naming method is enabled by default during Typical
installation for TCP/IP network environments only. The LISTENER.ORA has
a line which specifies the TCP/IP host name of your server. Clients that
use this host name in their connect string can connect.
Your client machine may connect to a database using the host name of the machine on which the database resides if:
Ensure GLOBAL_DBNAME = HOSTNAME as specified in the
ORACLE_HOME\NET80\ADMIN\LISTENER.ORA configuration file, where HOSTNAME
is the TCP/IP host name or alias of the server system.
During the installation of Net8, the GLOBAL_DBNAME of the
default database is set to the system name.
To verify GLOBAL_DBNAME is correctly specified, manually
check the LISTENER.ORA file of use the Oracle Net8 Assistant:
No client configuration is necessary for using the Host Naming
Adapter. The connection is established by using the default TCP/IP port
for the network listener.
If you have multiple databases on a server, you can set TCP/IP
aliases for the server system, and assign a separate GLOBAL_DBNAME parameter
for each different databases in the LISTENER.ORA file.
The client will then connect to the specific database based
on the host name used for connection.
With the local naming method, service names are added to
the TNSNAMES.ORA files. Service names are mapped to database address. Clients
use this service name in their connect string to connect.
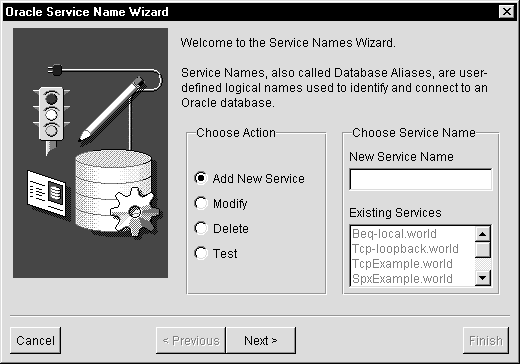
To configure using the local naming method:
The Oracle Net8 Easy Config wizard starts:
The page appropriate for your protocol adapter appears;
in the example here, TCP/IP is assumed:
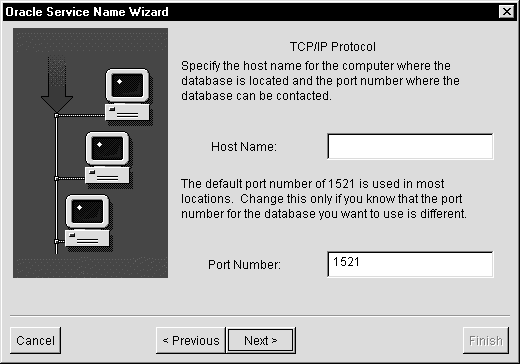
Oracle Net8 Easy Config adds the new service names to the TNSNAMES.ORA in ORACLE_HOME\NET80\ADMIN.
After the server is configured, it is best to simply copy
over the TNSNAMES.ORA configuration file located at ORACLE_HOME\NET80\ADMIN
on the server to the same location on the clients. This will ensure the
files are consistent. Otherwise, you must use the Oracle Net8 Easy Config
tool on every client, introducing possible errors.
Oracle Names simplifies the setup and administration of global,
client/server computing networks. Oracle Names makes network address and
database link information available to all nodes throughout the network.
Each database server's network address is identified with a simple service
name. Client applications then can request a database connection with that
name rather than a lengthy address.
Oracle Names is made up of Names Servers that store a service's
name and network address. Services include databases, database link definitions,
and object aliases. Client applications request a connection using a simple
name, rather than the lengthy address, and the name is resolved to the
address by a Names Server. Oracle Names shields users and applications
from changes made to the network infrastructure. It provides for centralized
administration of network service names.
The diagram below shows that:
The automatic discovery feature of Oracle Names version 8
enables network connectivity with virtually no configuration files.
Oracle Names version 8 includes three features to improve network performance and ease of administration:
There are significant differences between this version of Oracle Names and earlier versions:
The steps to set up an Oracle Names Server include:
Step 3: Define a Well-Known Oracle
Names Server
Step 4: Create a Well-Known Oracle
Names Server
Step 5: Configure Clients and Servers
To Use Oracle Names Server
Ensure the following are installed:
|
Note: Oracle Names Server only supports TCP/IP, Named Pipes and SPX Protocol Adapters. |
|
Additional Information: See "Verifying Installation and Setup" in Chapter 3, "Understanding Post Installation Tasks" to verify installation and the CD-ROM insert for more information about the Oracle Installer and its options. |
On the server, the network listener must be configured to
identify a database listener on that server for an Oracle Names Server.
To configure the network listener:
The Services window appears.
To stop the network listener:
The Services confirmation dialog box appears, prompting you if it is OK to stop the service.
The network listener is stopped. The status column is blank.
The global database name specifies the name by which
the network listener registers the database instance with an Oracle Names
Server and the name by which the Oracle Names Server identifies a database.
You can use any alias, but Oracle Corporation recommends setting the global
database name to the value of the INITSID.ORA's DB_NAME and DB_DOMAIN
parameters. The default global database name is ORACLE.WORLD.
When clients request the connect information for a database
from an Oracle Names Server, this is the alias they use. The domain must
also be added to the end of this name.
Registering services with the Oracle Names Server instructs
the network listener to find and register with a well-known Oracle Names
Server. When the network listener starts, it looks for hosts with the well-known
host names, tries to gather connection information from the Oracle Names
Server, and registers its SID(s) with it.
To define a well-known Oracle Names Server:
For all clients and servers, ensure your network administrator
has named the Oracle Names Servers as a well-known names server, allowing
clients to access the Oracle Names Servers using the well-known name.
Well-known names are dependent on the protocol adapter:
| The well-known host names for TCP connections | The well-known computer Names for Named Pipes connections1 | The well-known service name for an SPX connection |
|---|---|---|
|
oranamesrvr0
|
ORANAMESRVR0
|
oranamesrvr |
| 1 Well-known Names Server names for Names Pipes must be in all uppercase letters. |
This implies you can have as few as one well-known Oracle
Names Server (whose alias would be oranamesrvr0) and as many as five (with
aliases oranamesrvr0 to oranamesrvr4).
The numbers 0 to 4 indicate the order in which the client
tries to contact the Oracle Names Servers, if more than one exists in the
network.
For example, for TCP/IP, Oracle Names Servers are made well-known
by adding aliases oranamesrvr(0-4) to the Domain Name Service (DNS) or
in the SYSTEMROOT\SYSTEM32\DRIVERS\ETC\HOSTS file.
The HOSTS file may include the following entries:
144.25.219.146 host0  oranamesrvr0
144.25.219.147 host1  oranamesrvr1
144.25.219.148 host1  oranamesrvr2
You may use the Oracle Names Control Utility (NAMESCTL80),
or the Oracle Net8 Assistant to create a well-known Oracle Names Server
on the machine where Oracle Names Server is installed.
Prior to creating a well-known Oracle Names Server, you must decide whether:
See Chapter 6, "Oracle Names," of the Oracle
Net8 Administrator's Guide to help with these decisions.
Oracle Corporation recommends you create at two least Oracle
Names Servers, one to act as the Oracle Names Server and one to act as
a backup Oracle Names Server. Each of these should reside on its own machine.
To create a well-known Oracle Names Server, use the Oracle
Net8 Assistant or the NAMESCTL control utility:
| Use the Net8 Assistant... | Use the control utility NAMESCTL80... |
|---|---|
A message appears, saying the Oracle Net8 Assistant does know of any Oracle Names Servers in the network.
- a unique Oracle Name Server name
- an address for the Oracle Names Server
- a choice to store information in a database or replicate
information among Oracle Names Server
If you choose to store information in a database, you are
prompted for the listener address, and database SID, user name and password.
- to identify if this Oracle Names Server is in the root region |
|
To configure the client and server machines to recognize
Oracle Names Servers, use the Oracle Net8 Assistant or the NAMESCTL control
utility:
The Oracle Connection Manager provides three capabilities for Oracle8:
Allows you to multiplex multiple logical client sessions
through a single transport connection to an Oracle server destination.
This permits large numbers of users to access a single database which is
running in multi-threaded server (MTS) mode, and thus increases the server's
scalability. This feature is available only in a TCP/IP network.
Concentration reduces the demand on resources needed to maintain multiple connections between two processes by enabling the server to use fewer connection end points for incoming requests. This enables you to increase the total number of sessions that a server can handle. By using multiple Connection Managers, it is possible for thousands of concurrent users to connect to a server.
Provides a proxy for denying or allowing access to a database server. This feature, implemented only over the TCP/IP protocol, provides network filtering similar to that offered with a firewall.
Replaces the Multi-Protocol Interchange. Allows client and database servers operating on different protocol stacks to communicate with each other.
The clients require a TNSNAMES.ORA file or Oracle Names Server,
the Oracle Connection Manager requires a CMAN.ORA, and the server requires
multiplexing parameters set in the INITSID.ORA.
The steps to set up an Oracle Connection Manager include:
Step 3: Configure Oracle Connection
Manager
Ensure the following are installed:
|
Additional Information: See "Verifying Installation and Setup" in Chapter 3, "Understanding Post Installation Tasks" to verify installation and the CD-ROM insert for more information about the Oracle Installer and its options. |
Set the Oracle Connection Manager address through a TNSNAMES.ORA
file or Oracle Names Server.
If using Oracle Names Server, the Oracle Connection Manager
automatically updates the addresses in the Names Server, inserting the
address for the CMAN into the existing address.
If you are using the local naming method, modify the ORACLE_HOME\NET80\ADMIN\TNSNAMES.ORA
file located in ORACLE_HOME\NET80\ADMIN.
To modify the TNSNAMES.ORA file:
The Oracle Net8 Assistant appears.
The list of current service names appears:
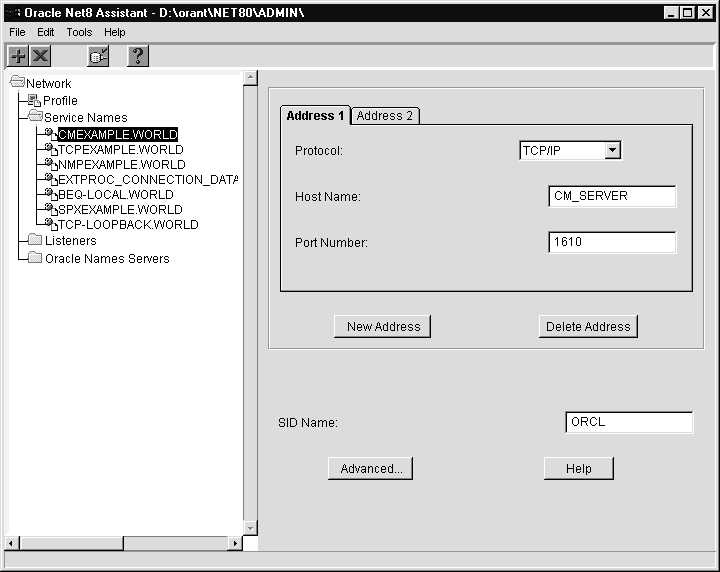
The Advanced Options dialog box appears:
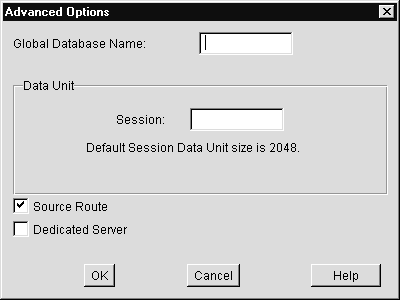
This option creates a source route of addresses through all Oracle Connection Managers to the destination address.
Below is a comparison of a regular TNSNAMES.ORA file and
a TNSNAMES.ORA file with an entry to use the Oracle Connection Manager
(Connection Manager entries are shown in boldface text):
Below is a TNSNAMES.ORA entry set up to use the Oracle Connection Manager with multiple protocols:
INVENTORYDB.WORLD=
   (DESCRIPTION=
       (ADDRESS_LIST=
           (ADDRESS=
               (PROTOCOL=SPX)
               (SERVICE=CMAN)
          (ADDRESS=
               (PROTOCOL=TCP)
               (HOST=INVENTORY)
               (PORT=1521)
          )
        )
       (CONNECT_DATA=
              (SID=ORCL)
       )
      (SOURCE_ROUTE=YES)
    )
In this example, the client will use SPX to connect to the
CMAN, then the CMAN will use TCP/IP to connect to the server. This is the
same functionality that was provided with the Oracle Multi-Protocol Interchange
(MPI) of Oracle7.
Configuration of the Oracle Connection Manager may require
the modification of the CMAN.ORA file located in ORACLE_HOME\NET80\ADMIN
if you are using protocol adapters other than TCP/IP or require additional
features.
If you used protocols other than TCP/IP between the client and
Oracle Connection Manager, you must modify the line beginning  CMAN =
(ADDRESS_LIST=
to listen to the protocols adapter address the same way you
would modify LISTENER.ORA file.
Section 7.3.2, "Enabling Connection Concentration Features,"
of the Oracle Net8 Administrator's Guide
explains how to enable multiplexing.
Section 7.3.3, "Enabling Connection Concentration Features,"
of the Oracle Net8 Administrator's Guide
explains how to enable network access rules.
If you require other optional parameters, you must remove
the `#' preceding those parameters from the CMAN.ORA file.
|
Additional Information: See "Understanding the CMAN.ORA File" in Appendix C, "Configuration Files" for a complete description of the CMAN.ORA file and its parameters. |
To use the multiplexing, configure the server for Multi-Threaded
Server (MTS) by setting MTS parameters in the ORACLE_HOME\DATABASE\INITSID.ORA
for each instance. See Appendix B, "Initialization Parameter Files", in
your Getting Started guide.
Once you have configured the network, test the configuration
by performing a loopback test on the server.
A loopback test uses Net8 to go from the server back
to itself, bypassing the Interprocess Communication (IPC). Performing a
successful loopback verifies that Net8 is functioning on the server side.
The steps to test the configuration are:
Step 1: Start Oracle Names Server
Step 2: Start the Network Listener
Step 3: Start Oracle Connection
Manager
Step 4: Perform a Loopback Test
If you are using Oracle Names, start an Oracle Names Server
on the machine where Oracle Names Server is installed and configured with
the NAMESCTL80 control utility or the Control Panel:
| Use the control utility NAMESCTL80... | Use the Windows NT Control Panel... |
|---|---|
| C:\> NAMESCTL80NAMESCTL> STATUSIf the STATUS command indicates the Oracle Names Server is running, go to Step 3. If the Oracle Names Server is not running, go to Step 2. NAMESCTL> START NAMESCTL> EXIT | The Services window appears. Look for the OracleHOME_NAMENamesService80 service. A blank in the Status column indicates that the service is not running. If the service is already running, close the window and go to the section "Step 2: Start the Network Listener". The service starts. |
For Net8 to accept connections on the server, a network listener
must be started. If you have started an Oracle Names Server, the network
listener upon startup automatically registers the databases specified in
the SID_LIST_LISTENER_NAME section of the ORACLE_HOME\NET80\ADMIN\LISTENER.ORA
file with the well-know Oracle Names Servers.
On the server, start the listener with the LSNRCTL80 control
utility or the Control Panel:
| Use the control utility LSNRCTL80... | Use the Windows NT Control Panel... |
|---|---|
C:\> LSNRCTL80LSNRCTL> STATUS LISTENER_NAME where LISTENER_NAME
is the name of the network listener defined in the LISTENER.ORA file with
the alias LISTENER. It is not necessary to identify the network listener
if you are using the default network listener, named LISTENER.If the STATUS
command indicates the network listener is running, go to Step 2. If the
network listener is not running, go to Step 3.
LSNRCTL> START LISTENER_NAME SET PASSWORD is only required if the password is set in the LISTENER.ORA file. The password defaults to ORACLE. LSNRCTL> START LISTENER_NAMEOracleHOME_NAMETNSListener80LSNR is created if this command is run for the first time against a non-default network listener name. LSNRCTL> EXIT |
The Services window appears. Look for OracleHOME_NAMETNSListener80 (the service name if you are using the default network listener name LISTENER) or OracleHOME_NAMETNSListener80LSNR (where LSNR is the non-default network listener name). OracleHOME_NAMETNSListener80LSNR is only created if the following command has been run:LSNRCTL80 START LISTENER_NAMEA blank in the Status column indicates that the service is not running. If the service is already running, close the window and go to the section "Step 3: Start Oracle Connection Manager". The service starts. |
If you are using Oracle Connection Manager, start it on the
machine where Oracle Connection Manager is installed and configured with
the CMCTL80 control utility or the Control Panel:
A loopback test is when the server makes a connection to
a database on its own machine.
|
Note: The instructions below only apply if you have configured using the local naming method. If you have not configured with the local naming method, connect to the database using the instructions in "Step 5: Connect to the Database" of Chapter 7, "Connecting To a Database". |
To perform the loopback test:
Oracle Net8 Easy Config starts.
The Connection Test page appears:
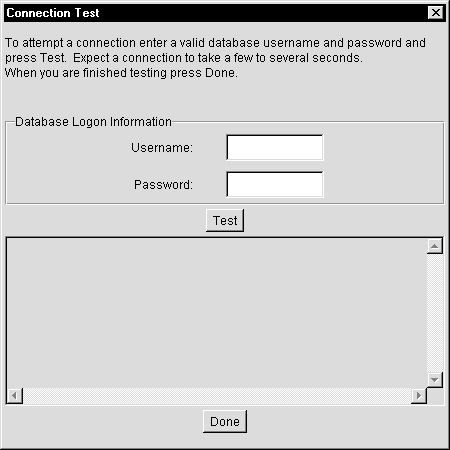
The status of the test appears in the field below the Test button. A successful test display the following message:
The connection test was successful.
The final page appears.
After performing a loopback test, use any of the mechanisms below to test client connections:
If you are using TCP/IP, follow the instructions below to specify the destination address for TCP/IP and use PING to see if the server is running.
Most TCP/IP transports attempt to use the DNS. DNS is a mechanism
used to translate the host name specified in the TNSNAMES.ORA file into
the host internet address (IP). If a DNS is present on your network and
the TCP/IP vendor supports DNS, the host name is successfully translated
to the host address. The host IP address can be determined by using the
Control Panel's Network utility to access DNS information.
Depending on your vendor, workstation configuration, and
network configuration, your TCP/IP software can also use a SYSTEMROOT\SYSTEM32\DRIVERS\ETC\HOSTS
file to map host names to Internet addresses if DNS is not detected or
supported.
If DNS and the HOSTS file are unable to resolve the host name during a remote database connection, the following error message appears:
ORA-12545: TNS: name lookup failure
If your network administrator cannot resolve the problem,
the solution to this error message is to go around DNS and the HOSTS file
by modifying the (HOST = SERVER_NAME) section of the TNSNAMES.ORA,
so SERVER_NAME is changed to the IP address of the server.
The following sections explain how to determine the server's
IP address and verify that DNS and the HOSTS file are working correctly.
If you are not using TCP/IP, go to "Verify
Oracle Database Connections Using TNSPING" in this chapter.
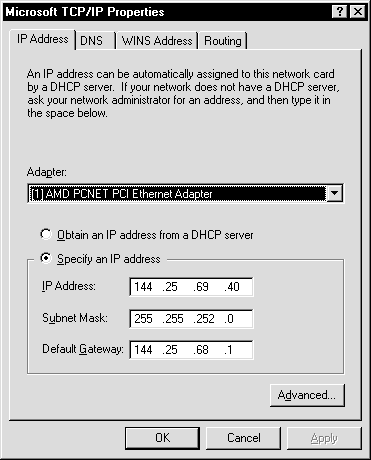
To determine the server's TCP/IP internet address:
|
Note: If you are not authorized for access on the server, ask your server administrator for assistance. |
The Network window appears.
The Microsoft TCP/IP Properties dialog box appears
with the IP Address view:
If you are using TCP/IP, PING allows you to determine if
DNS or the HOSTS file are correctly set up and your network operating system
is functioning correctly.
From the client, enter the following at the command prompt:
C:\> PING SERVER_NAME
where SERVER_NAME is the host name, alias, or Internet
address of the server to which you are trying to connect.
If your network is functioning correctly, the following message appears:
Reply from SERVER_NAME: bytes=nn time=nnms
If there is a problem, this message appears:
Request timed out
Or:
Reply from SERVER_NAME: Destination host unreachable
The following is a partial list of reasons why a host is inaccessible:
If PING returns an error message, ask your network administrator to help you resolve the problem. If the problem is not resolved, and you attempt to make a Net8 connection, you may receive one of the following error messages:
Use the TNSPING80 utility to determine whether or not you
can reach the network listener service. TNSPING80, however, never actually
connects with the network listener. A socket is never created and opened.
TNSPING80 only checks to ascertain that a network listener is present on
the server side.
When you connect to a network listener using TNSPING80, an
estimate of the round trip time in milliseconds appears. If TNSPING80 fails,
a network error message appears without the resource use of a database
connection.
From the client, enter:
TNSPING80 SERVICE_NAME COUNT
where SERVICE_NAME is the service name (defined in
the TNSNAMES.ORA) you created in "Using the Local
Naming Method" of this chapter and COUNT is the number of times
the program attempts to reach the server. COUNT is optional.
The output looks like:
TNS Ping Utility for 32-bit Windows: Version 8.0.4.0.0 - Production on 27 OCT-97
20:20:33

Copyright, 1997(c) Oracle Corporation 1997. All rights reserved.

Attempting to contact (ADDRESS=(COMMUNITY=tcp.world)(PROTOCOL=TCP)(Host=host_
name)(Port=1521))
OK (60 msec)
|
Note: The instructions below only apply if you have configured using the local naming method. If you have not configured with the local naming method, connect to the database using the instructions in "Step 5: Connect to the Database" of Chapter 7, "Connecting To a Database". |
Use the Oracle Net8 Easy Config application to determine
whether or not you can reach the network listener service.
To verify connectivity for a client machine:
Oracle Net8 Easy Config starts.
The Connection Test page appears:
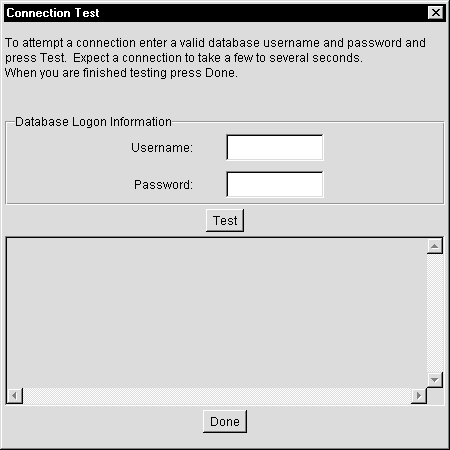
The status of the test appears in the field below the Test button. A successful test displays the following message:
The connection test was successful.
The final page appears.