Troubleshooting the Configuration of the SecurID Authentication Adapter
This chapter describes how to configure the SecurID authentication adapter along with with the Oracle server and clients. It assumes that you are familiar with the Security Dynamics ACE/Server and that the ACE/Server is installed and running.
Refer to Chapter 6, "Using the SecurID Authentication Adapter" for information on using the SecurID card itself. Refer to the Preface for a list of related publications to read.
System Requirements
To use the SecurID authentication adapter included in the Advanced Networking Option release 2.3.2, you need the following:
- SQL*Net release 2.3 or higher
- ACE/Server 1.2.4 or higher
- the Oracle server machine must be running UDP/IP and TCP/IP protocols because Oracle needs to communicate with the ACE/Server. Even though the client uses SQL*Net version 2 to connect to Oracle, Oracle needs UDP to connect to the ACE/Server.
Note: Install the Oracle Advanced Networking Option release 2.3.2 product with the Oracle Installer.
Known Limitations
Following are the known limitations:
- The SecurID authentication adapter does not support database links, also known as "proxy authentication." This is a direct consequence of the fact that the SecurID card codes can only be used once.
- When using the SecurID authentication adapter, password encryption is disabled. This means that the SecurID card code (and, if you use standard cards--the pinnumber), are sent over to the Oracle server in clear text. Because this could be a security problem, Oracle recommends that you turn on the Advanced Networking Option datastream encryption, which ensures that the pinnumber is encrypted when sent to the Oracle server. For information on how to use datastream encryption see Chapter 2, "Configuring Encryption and Checksumming" .
Steps to Perform to Enable SecurID Authentication
This section contains information on the following tasks:
Register the machine on which the Oracle Server resides, as a SecurID client with the ACE server. You can do this with the Security Dynamics tool sdadmin. From the Client menu, choose Create Client (ACE/Server 1.2.4) or Add Client (ACE/Server 2.0), to create a client.
Refer to the Security Dynamics ACE/Server Instruction manual, version 1.2.4 or to the Security Dynamics ACE/Server version 2.0 Administration manual for more detailed information.
Note: Verify that the ACE/Server, the Oracle server, and the Advanced Networking Option is installed.
Make sure that the Oracle server can discover what the correct UDP port for contacting the ACE/Server is. These port numbers are typically stored in a file called services. On the UNIX operating system, this file is typically in the /etc directory. If you are using NIS (Network Information Services) as a naming service, make sure that the services map contains the correct entries for SecurID.
Note: You can verify which port the ACE server is using by running the Security Dynamics tool Kitconts (for ACE/Server 1.2.4) or sdinfo (for ACE/Server 2.0).
Install the Advanced Networking Option on the Oracle Server and Client
Install the Advanced Networking Option on the Oracle server and Oracle client.
Configure Oracle as a SecurID Client (for ACE/Server Release 1.2.4)
1. Install the SecurID configuration files on the Oracle server machine.
You can obtain these files from any other SecurID client or from the machine that runs the ACE/Server.
Note: The information in the following sections is UNIX-specific.
The SecurID configuration files are typically stored in /var/ace. On the Oracle server machine, create this directory and copy the configuration files to it. At the minimum, you need the file sdconf.rec. The configuration files are used by both Oracle and the standard SecurID tools. Because the SecurID tools run setuid root, there can be a problem with the access permissions on the directory /var/ace and the files in this directory. Make sure that the owner of the Oracle executable (for example, the user "oracle7") is able to read all the files in /var/ace and can create new files in this directory.
Attention: Do not attempt to overcome this by running Oracle setuid root. It is not necessary and dangerous to do so.
There are two ways to reach this goal without compromising security. Both ways work, but it is recommended that you use method #1. Both methods allow you to use Oracle with the SecurID authentication adapter and still continue using the other SecurID tools.
Method #1
The owner of the Oracle executable should also own the /var/ace directory and the files in /var/ace. For example, if the owner of the Oracle executable is the user "oracle7," perform the following steps, as root:
# chown oracle7 /var/ace
# chmod 0700 /var/ace
# chown oracle7 /var/ace/*
# chmod 0600 /var/ace/*
Method #2
The other option is to have root own the /var/ace directory and the files in /var/ace, but give the Oracle group read and write access. If the Oracle group is 'dba', you need to perform the following steps, as root:
# chown root /var/ace
# chmod 0770 /var/ace
# chgrp dba /var/ace
# chown root /var/ace/*
# chmod 0660 /var/ace/*
# chgrp dba /var/ace/*
Configure Oracle as a SecurID Client (Release ACE/Server 2.0)
The Oracle process will act as an ACE server client. For this reason, you need to install the ACE client software on the Oracle server machine. For information on how to install an ACE client, refer to the ACE/Server Version 2.0 Client for UNIX manual.
Note the following:
- The VAR_ACE environment variable is not supported. You have to store the configuration data in the /var/ace directory. If you currently have the ACE configuration data in a different location, you should create a symbolic link using the following command:
# ln -s $VAR_ACE /var/ace
- Oracle needs to be able to read and write the ACE configuration data. This data is stored in the directory /var/ace (or $VAR_ACE if you use the symbolic link shown above).
Whether Oracle can read the configuration data depends on how you installed the ACE client software on the Oracle server. During the installation of the ACE client software, you can specify which administrator should own the configuration files.
Attention: Whether you use Method 1 or Method 2 (following), make sure that you do not install Oracle as root.
Method 1: If root is the owner of the ACE server configuration data files, you will have to change the UNIX file permissions so that the owner of the oracle executable can read and write to these files. For example, the following commands give Oracle access to the files, and all the Security Dynamics tools that run as setuid root will still be able to access the files.
# chown oracle7 /var/ace
# chown oracle7 /var/ace/*
# chmod 0770 /var/ace
# chmod 0660 /var/ace/*
If the environment variable VAR_ACE is set to a different location than /var/ace, you should instead execute the following commands:
# ln -s $VAR_ACE /var/ace
# chown oracle7 $VAR_ACE
# chown oracle7 $VAR_ACE/*
# chmod 0770 $VAR_ACE
# chmod 0660 $VAR_ACE/*
Method 2: If the ACE files are not owned by root, you have two options:
1. Install the ACE client or server and Oracle under the same UNIX account. (You have to install the ACE software as root, but you can specify which administrator should own the files. Specify the same user as the owner of the Oracle executable, typically oracle7).
2. Add the owner of the oracle executable to the ACE administrators' group.
Note: Make sure the owner of the oracle executable remains a member of the DBA group; otherwise you will not be able to control your database.
For the change to take effect, do the following:
- Log out and log in again as the Oracle owner.
- Restart your SQL*Net listener.
- Restart your Oracle database.
Configure the SecurID Authentication Adapter with Network Manager
This section provides the procedure for configuring the SecurID authentication adapter.
Select the General Page from Client Profile
In Network Manager, select the Client Profile icon in the Treeview representation of your network (to edit an existing client profile), or the Client Profile icon from the Network Object Tool Bar (to create a new client profile). The General page shown in Figure 6 - 1 appears.
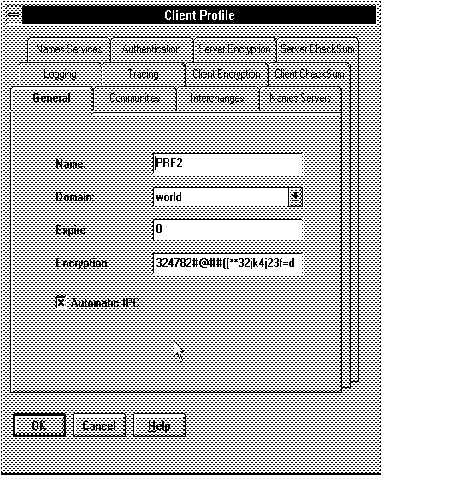 Figure 6 - 1. Client Profile: General Page
Note: Network Manager generates a Client Profile for every community created (for example, TCP.world), and for every node that is a member of more than one community. If you create additional Client Profiles, Network Manager names them PRF2, PRF3, and so forth. Change the names to something more meaningful.
Attention: Use the Client Profile to configure the Advanced Networking Option parameters for servers, the same way you do for clients. (The parameters you configure are generated to SQLNET.ORA files, which reside on both clients and servers.)
Select the Authentication Page from Client Profile
Select this folder tab to configure an authentication service on your network. When you select Authentication, the initial Authentication page shown in Figure 6 - 2 appears.
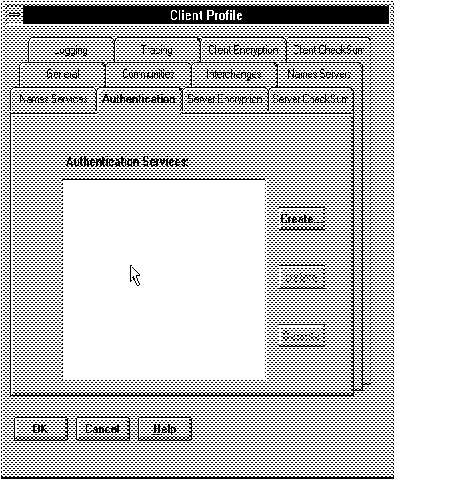 Figure 6 - 2. Client Profile: Initial Authentication Page
To configure the SecurID authentication adapter, select Create from the Initial Authentication page. The Default Authentication Services page displays, as shown in Figure 6 - 3.
Default Authentication Services Page
The Default Authentication Services page is shown in Figure 6 - 3.
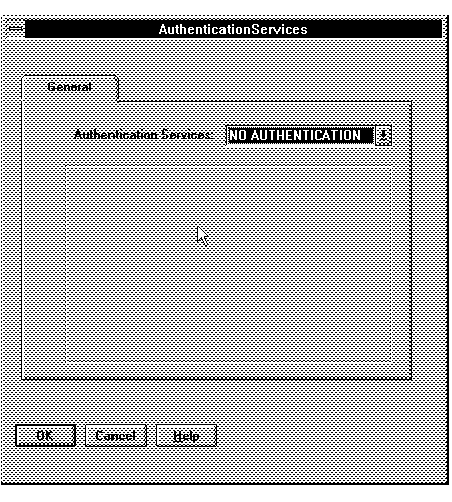 Figure 6 - 3. Default Authentication Services Page
The default is NO AUTHENTICATION, which disables authentication.
Note: You must select NO AUTHENTICATION uniquely. You will not be able to select any other authentication service when NO AUTHENTICATION is selected.
If you want to specify one or more authentication services to be used in a specific order, select one of the authentication services from the drop down list at the top of the page. Choices are: Access Manager, CyberSAFE, Identix, Kerberos (V5), NO AUTHENTICATION, and SecurID.
Note: Access Manager is not supported in this release of the Advanced Networking Option.
Attention: Do not select an authentication service unless it is installed and linked into your SQL*Net network. If you do, it will cause connections to fail because they will look for authentication where none is available.
Each authentication adapter you select has different parameters for which you may need to supply values. Some are required and some are optional. You will be prompted to enter all required parameters for each authentication adapter.
For further information about how to use Oracle Network Manager to configure authentication services, see the Oracle Network Manager Administrator's Guide.
Select the SecurID Authentication Page
If you select SecurID on the default Authentication page, the SecurID page shown in Figure 6 - 4 displays.
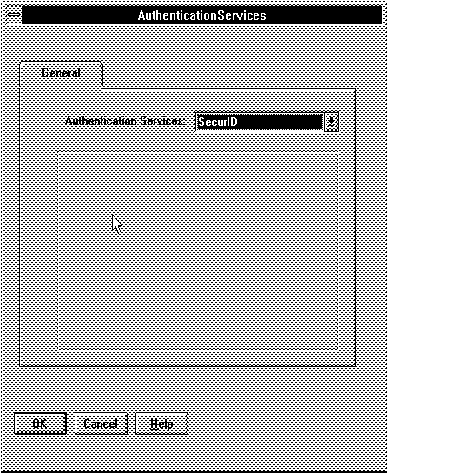 Figure 6 - 4. SecurID Authentication Page
The SecurID authentication service does not require any parameters.
Create Users for the SecurID Adapter
To create users for the SecurID authentication adapter, perform the following steps:
1. Assign a card to a person, using the Security Dynamics sdadmin program. When the sdadmin tool asks for a login name when creating a new user, fill in the same name you will use later to create the Oracle user. Refer to the Security Dynamics documentation for information on how to do this.
If you want the user to be able to specify a new pin number to the card using the Oracle tools, choose the option that allows them to make up their own pin. If you do not allow this, they will have to use the Security Dynamics tools to generate a pincode if their card is in new-pin mode. Activate the user on the Oracle server (the Oracle server should already be registered as a SecurID client).
2. Create an Oracle Server account for this user. You can do this by using SQL*DBA or Server Manager connected as a user with the create user database role. Use the following syntax to create an account:
SQLDBA> connect system/manager
	SQLDBA> create user <os_authent_prefix><username>
			   identified externally;
The os_authent_prefix is an Oracle Server initialization parameter (for example, in INIT.ORA). The os_authent_prefix default value is OPS$. The username should be the same as the name you assigned to the card in step 1.
Note: Because user names can be long and Oracle user names are limited to 30 characters, it is strongly recommended that OS_AUTHENT_PREFIX be set to a null value:
OS_AUTHENT_PREFIX=""
Note: At this point, an Oracle user with <username> should not yet exist.
Example: Assuming you have assigned a card to the user "king", and assuming that os_authent_prefix has been set to a null value (""), at this point, you should create an Oracle user account using the following syntax:
SQLDBA> create user king identified externally;
3. You may want to give this user some database privileges. At the minimum, the user should have the "create session" privilege.
SQLDBA> grant create session to king;
The user 'king' can now connect to Oracle using his or her SecurID card.
Troubleshooting the Configuration of the SecurID Authentication Adapter
This section lists some things to verify if you experience problems while configuring the SecurID Adapter:
- The services map should have an entry for the Security Dynamics ACE server. The service name is typically securid, but the SecurID administrator can choose any name.
Use the SecurID tool kitconts (for ACE/Server 1.2.4) or sdinfo (for ACE/Server 2.0) to verify the name of the authentication service and the port numbers that SecurID is expecting to use. Verify that these port numbers match those in /etc/services, or the services map if you are using NIS.
(Applies to ACE/Server release 1.2.4 only) Verify that the /var/ace/sdconf.rec file is present on the machine running the Oracle server.
Note: Also verify that the permissions on the /var/ace/sdconf.rec file and the directory /var/ace are set so that the Oracle process can read and write in the directory.
(Applies to ACE/Server release 2.0 only) Make sure the ACE configuration data is in the /var/ace directory. Use of the VAR_ACE environment variable is not supported.
Note: Also make sure that the owner of the oracle executable can read and write the files in this directory.
- Check to see if the Oracle server machine is registered as a SecurID client. You can do this by using the Security Dynamics tool sdadmin.
- The user who is trying to connect to Oracle should be activated on the Oracle server, either as a direct user or as part of a group of users. Validate this using the SecurID tool sdadmin.
- Security Dynamics has developed a few logging facilities that can help you find problems. By using sdadmin, you can see a log of the recent system activities, including failed authentication with the reason for the failure.
You can also use sdlogmon to get a similar log listing.
- Turn on SQL*Net tracing by adding the following line to the SQLNET.ORA file on the Oracle side.
trace_level_server = admin
Turning tracing on at the client side is less informative, because all interaction between the Oracle server and the ACE server happens at the Oracle server side of the SQL*Net connection. Be sure to turn off tracing when you have completed your check.
- Make sure that the user has been created in the Oracle database as an externally-identified user with the correct prefix (which defaults to OPS$). When connected as system, enter:
SQL> select * from all_users;
to get a list of all database users.
- When you connect to Oracle as a non-externally identified user, the SecurID log file will indicate a warning. For example, if you connect as 'system' using:
sqlplus system/manager@oracle_dbname
the SecurID log file displays:
03/24/95 10:04 User not on client machinename
Since the Oracle client and server negotiated to use SecurID, because of the SQLNET.AUTHENTICATION_SERVICES line in INIT.ORA, Oracle will contact the ACE/Server to validate 'system'. When validation fails, Oracle will validate the password internally. If the password is valid, you will be able to connect.
If you want to eliminate the warning message, change the SQLNET.ORA file on the Oracle client to:
SQLNET.AUTHENTICATION_SERVICES=(NONE)
Attention: Setting this parameter to this value disables the SecurID authentication adapter. You will no longer be able to connect to Oracle using the SecurID card.