Release 8.0
A58396-01
Library |
Product |
Contents |
Index |
| Oracle8 Backup and Recovery Guide Release 8.0 A58396-01 |
|
![]()
![]()
This chapter describes how to recover a database, and includes the following topics:
See Also: Occasionally, this chapter refers you to Oracle Enterprise Manager. To learn how to use Enterprise Manager/GUI or Server Manager/LineMode, see the Oracle Enterprise Manager User's Guide.
The Oracle distributed database architecture is autonomous in nature. Therefore, depending on the type of recovery operation selected for a single, damaged database, recovery operations may, or may not, have to be coordinated globally among all databases in the distributed database system. Table 12-1 summarizes the different types of recovery operations and whether coordination among nodes of a distributed database system is required.
In special circumstances, one node in a distributed database may require recovery to a past point in time. To preserve global data consistency, it is often necessary to recover all other nodes in the system to the same point in time. This is called "coordinated, time-based, distributed database recovery." The following tasks should be performed with the standard procedures of time-based and change-based recovery described in this chapter.
If the message is, "RESETLOGS after complete recovery through change nnnnnnnn," you have applied all the changes in the database and performed a complete recovery. Do not recover any of the other databases in the distributed system, or you will unnecessarily remove changes in them. Recovery is complete.
If the reset message is, "RESETLOGS after incomplete recovery UNTIL CHANGE nnnnnnnn," you have successfully performed an incomplete recovery. Record the change number from the message and proceed to the next step.
If a master database is independently recovered to a past point in time (that is, coordinated, time-based distributed database recovery is not performed), any dependent remote snapshot that was refreshed in the interval of lost time will be inconsistent with its master table. In this case, the administrator of the master database should instruct the remote administrators to perform a complete refresh of any inconsistent snapshot.
The following scenarios describe various ways to invoke media recovery.
After the database is mounted, but closed, start closed database recovery (complete or incomplete) using either Enterprise Manager's Apply Recovery Archives dialog box, or the RECOVER command with the DATABASE parameter.
The following statement recovers the database up to a specified time using a control file backup:
     RECOVER DATABASE
           UNTIL TIME '1992-12-31:12:47:30' USING BACKUP CONTROLFILE;
After the tablespaces of interest are taken offline, you can start open-database, offline-tablespace recovery using the RECOVER command with the TABLESPACE parameter. You can recover one or more offline tablespaces. The remainder of the database may be left open and online for normal database operation.
The following statement recovers two offline tablespaces:
RECOVER TABLESPACE ts1, ts2;
After the tablespaces that contain the damaged files have been taken offline, and you are positive the associated datafiles are also offline (check the file's status in V$DATAFILE), recover selected datafiles using the RECOVER command with the DATAFILE parameter:
RECOVER DATAFILE 'filename1', 'filename2';
Generally, you should perform database recovery using Enterprise Manager, which prompts you for information and returns messages from the system. The SQL command equivalent of Enterprise Manager media recovery options is the ALTER DATABASE command with the RECOVER clause. If you want to design your own recovery application using SQL commands, use the ALTER DATABASE command.
You can start complete media recovery using the STARTUP command with the RECOVER option in Enterprise Manager. After an instance is started, and the database is mounted, complete media recovery proceeds as described in "Complete Media Recovery" on page "Performing Complete Media Recovery".
See Also: For information about taking tablespaces offline, see "Backing Up Offline Tablespaces and Datafiles".
During complete or incomplete media recovery, redo log files (online and archived) are applied to the datafiles during the roll forward phase of media recovery. Because rollback data is recorded in the redo log, rolling forward regenerates the corresponding rollback segments. Rolling forward proceeds through as many redo log files as necessary to bring the database forward in time. As a log file is needed, Oracle suggests the name of the file. For example, if you are using Enterprise Manager, it returns the following lines and prompts:
ORA-00279: Change #### generated at DD/MM/YY HH:MM:SS needed for thread#
ORA-00289: Suggestion : logfile
ORA-00280: Change #### for thread # is in sequence #
Specify log: [<RET> for suggested | AUTO | FROM logsource |
    CANCEL ]
Similar messages are returned when using an ALTER DATABASE... RECOVER statement. However, no prompt is displayed.
This section describes how log files can be applied in different environments.
Oracle suggests log filenames by concatenating the current values of the initialization parameters LOG_ARCHIVE_DEST and LOG_ARCHIVE_FORMAT and using information from the control file. Thus, if all the required archived log files are mounted at LOG_ARCHIVE_DEST, and the value for LOG_ARCHIVE_FORMAT is never altered, Oracle can suggest and apply log files to complete media recovery automatically without your intervention. If the location specified by LOG_ARCHIVE_DEST is not available (for example, because of media failure), you can change the value for this parameter, move the log files to the new location, and start a new instance before beginning media recovery.
In some cases, you might want to override the current setting for LOG_ARCHIVE_DEST as a source for log files. For example, assume that a database is open and an offline tablespace must be recovered, but not enough space is available to mount the necessary log files at the location specified by LOG_ARCHIVE_DEST. In this case, you can mount the log files to an alternate location, then specify the alternate location to Oracle for the recovery operation. To specify the location where required log files can be found, use the LOGSOURCE parameter of the SET command in Enterprise Manager. Use the RECOVER...FROM parameter of the ALTER DATABASE command in SQL.
|
Note: Overriding the log source does not affect the archive log destination for filled online groups being archived. |
Consider overriding the current setting for LOG_ARCHIVE_DEST when not enough space is available to mount all the required log files at any one location. In this case, you can set the log file source to an operating system variable (such as a logical or an environment variable) that acts as a search path to several locations.
See Also: Such functionality is operating system-dependent. See your operating system-specific Oracle documentation for more information.
If the suggested archived redo log file is correct, apply it. You do not have to specify a filename unless the suggested file is incorrect. After a filename is provided, Oracle applies the redo log file to roll forward the restored datafiles.
In Enterprise Manager, you can have Oracle automatically apply the redo log files that it suggests by choosing either of the following options:
SET AUTORECOVERY ON;Automatic application of the suggested redo log starts once recovery begins.
Suggested redo log files are automatically applied until one is incorrect or recovery is complete. You might need to specify online redo log files manually when using cancel-based recovery or a backup of the control file.
See Also: For examples of logfile application, see your operating system-specific Oracle documentation.
Application of redo log files is similar to the application of log files. However, a prompt for log files is not displayed after media recovery is started. Instead, you must provide the correct log file using an ALTER DATABASE RECOVER LOGFILE statement. For example, if a message suggests LOG1.ARC, you can apply the suggestion using the following statement:
ALTER DATABASE RECOVER LOGFILE 'log1.arc';
As a result, recovering a tablespace requires several statements, as indicated in the following example (DBA input is boldfaced; variable information is italicized.):
> ALTER DATABASE RECOVER TABLESPACE users;
ORA-00279: Change #### generated at DD/MM/YY HH:MM:SS needed for thread #
ORA-00289: Suggestion : logfile1
ORA-00280: Change #### for thread # is in sequence #
> ALTER DATABASE RECOVER LOGFILE 'logfile1';
ORA-00279: Change #### generated at DD/MM/YY HH:MM:SS needed for thread # <D%0>
ORA-00289: Suggestion : logfile2
ORA-00280: Change #### for thread # is in sequence #
> ALTER DATABASE RECOVER LOGFILE 'logfile2';
(Repeat until all logs are applied.)
Statement processed.
> ALTER TABLESPACE users ONLINE;
Statement processed.
In this example, assume that the backup files have been restored, and that the user has administrator privileges.
Like the method you used with Enterprise Manager, automatic application of the redo logs can be started with the following statements, before and during recovery, respectively:
ALTER DATABASE RECOVER AUTOMATIC ...;
ALTER DATABASE RECOVER AUTOMATIC LOGFILE suggested_log_file;
An example of the first statement follows:
> ALTER DATABASE RECOVER AUTOMATIC TABLESPACE users;
Statement processed.
> ALTER TABLESPACE users ONLINE;
Statement processed.
In this example, it is assumed that the backup files have been restored, and that the user has administrator privileges.
An example of the ALTER DATABASE RECOVER AUTOMATIC LOGFILE statement follows:
> ALTER DATABASE RECOVER TABLESPACE users;
ORA-00279: Change #### generated at DD/MM/YY HH:MM:SS needed for thread #
ORA-00289: Suggestion : logfile1
ORA-00280: Change #### for thread # is in sequence #
> ALTER DATABASE RECOVER AUTOMATIC LOGFILE 'logfile1';
Statement processed.
> ALTER TABLESPACE users ONLINE;
Statement processed.
In this example, assume that the backup files have been restored, and that the user has administrator privileges.
See Also: For information about the content of all recovery-related views, see the Oracle8 Reference.
If you are using Enterprise Manager's recovery options (not SQL statements), each time Oracle finishes applying a redo log file, the following message is returned:
Log applied.
Make sure that the message "Log applied" is returned after each application of a redo log file. If the suggested file is incorrect or you provide an incorrect filename, an error message is returned instead. If you see an error message instead of "Log applied," a redo log file required for recovery has not been applied. Recovery cannot continue until the required redo log file is applied.
If an error message is returned after supplying a redo log filename, one of the following errors has been detected:
If you start a media recovery operation and must then interrupt it (for example, because a recovery operation must end for the night and resume the next morning), you can interrupt recovery at any time by taking either of the following actions:
After recovery is canceled, it must be completed before opening a database for normal operation. To resume recovery, restart it. Recovery resumes where it left off when it was canceled.
If a database is in NOARCHIVELOG mode and a media failure damages some or all of the datafiles, usually the only option for recovering the database is to restore the most recent whole database backup. If you are using Export to supplement regular backups, you can instead restore the database by importing an exported backup of the database.
The disadvantage of NOARCHIVELOG mode is that to recover your database from the time of the most recent full backup up to the time of the media failure, you have to re-enter manually all of the changes executed in that interval. However, if your database was in ARCHIVELOG mode, the redo log covering this interval would have been available as archived log files or online log files. This would have enabled you to use complete or incomplete recovery to reconstruct your database and minimize the amount of lost work.
If you have a database damaged by media failure and operating in NOARCHIVELOG mode, and you want to restore from your most recent whole database backup (your only option at this point), perform the following tasks.
See Also: For more information about renaming and relocating datafiles, see the Oracle8 Administrator's Guide.
The RECOVERY_PARALLELISM initialization parameter specifies the number of concurrent recovery processes to use for any recovery operation. Because crash recovery occurs at instance startup, this parameter is useful for specifying the number of processes to use for crash recovery. The value of this parameter is also the default number of processes used for media recovery if the PARALLEL clause of the RECOVER command is not specified. The value of this parameter must be greater than one and cannot exceed the value of the PARALLEL_MAX_SERVERS parameter.
In general, parallel recovery is most effective at reducing recovery time when several datafiles on several different disks are being recovered concurrently. Crash recovery (recovery after instance failure) and media recovery of many datafiles on different disk drives are good candidates for parallel recovery. Parallel recovery requires a minimum of eight recovery processes to improve upon serial recovery.
See Also: For more information on parallel recovery, see Oracle8 Parallel Server Concepts and Administration.
For more information about initialization parameters, see Oracle8 Reference.
This section describes issues related to media recovery preparation, and includes the following topics:
See Also: For information about the appropriate method of recovery for each type of problem, see "Recovery Procedure Examples".
There are three basic media recovery commands, which differ only in the way the set of files being recovered is determined. They all use the same criteria for determining if files can be recovered. Media recovery signals an error if it cannot get the lock for a file it is attempting to recover. This prevents two recovery sessions from recovering the same file. It also prevents media recovery of a file that is in use. You should be familiar with all media recovery commands before performing media recovery.
RECOVER DATABASE performs media recovery on all online datafiles that require redo to be applied. If all instances were cleanly shutdown, and no backups were restored, RECOVER DATABASE indicates a no recovery required error. It also fails if any instances have the database open (since they have the datafile locks). To perform media recovery on an entire database (all tablespaces), the database must be mounted EXCLUSIVE and closed.
RECOVER TABLESPACE performs media recovery on all datafiles in the tablespaces listed. The tablespaces must be offline to perform the recovery. An error is indicated if none of the files require recovery.
RECOVER DATAFILE lists the datafiles to be recovered. The database can be open or closed, provided the media recovery locks can be acquired. If the database is open in any instance, then datafile recovery can only recover offline files.
See Also: For more information about recovery commands, see the Oracle8 SQL Reference.
This section describes topics common to all complete and incomplete media recovery operations. You should be familiar with these topics before proceeding with any recovery process.
You can often use the table V$RECOVER_FILE to determine which files to recover. This table lists all files that need to be recovered, and explains why they need to be recovered.
The following query displays the file ID numbers of datafiles that require recovery:
SELECT file#, online, error
    FROM v$recover_file;

FILE#      ONLINE     ERROR
--------   --------   ---------------------------
   0014    ONLINE
   0018    ONLINE     FILE NOT FOUND
   0032    OFFLINE    OFFLINE NORMAL
...
Use the data dictionary view V$DATAFILE, which contains the file's NAME and FILE#, to find the name of a file based on its file number.
If a media failure permanently damages one or more datafiles of a database, you must restore backups of the damaged datafiles before you can recover the damaged files.
If a damaged datafile cannot be restored to its original location (for example, a disk must be replaced, so the files are restored to an alternate disk), the new locations of these files must be indicated to the control file of the associated database.
If a datafile is damaged and no backup of the file is available, the datafile can still be recovered if:
Use the CREATE DATAFILE clause of the ALTER DATABASE command to create a new, empty datafile, replacing a damaged datafile that has no corresponding backup. However, you cannot create a new file based on the first datafile of the SYSTEM tablespace because it contains information not covered by redo logs. For example, assume that the datafile "disk1:users1" has been damaged, and no backup is available. The following statement re-creates the original datafile (same size) on disk 2:
ALTER DATABASE CREATE DATAFILE 'disk1:users1' AS 'disk2:users1';
This statement enables you to create an empty file that matches the lost file. Oracle looks at information in the control file and the data dictionary to obtain size information. Next, you must perform media recovery on the empty datafile. All archived redo logs written since the original datafile was created must be mounted and reapplied to the new, empty version of the lost datafile during recovery. If the database was created in NOARCHIVELOG mode, the original datafiles of the SYSTEM tablespace cannot be restored using an ALTER DATABASE CREATE DATAFILE statement because the necessary archived redo logs are not available.
All archived redo log files required for the pending media recovery eventually need to be on disk, so that they are readily available to Oracle.
To determine which archived redo log files you need, you can use the tables V$LOG_HISTORY and V$RECOVERY_LOG. V$LOG_HISTORY lists all of the archived logs, including their probable names, given the current archived log file naming scheme (as set by the parameter LOG_ARCHIVE_FORMAT). V$RECOVERY_LOG lists only the archived redo logs that Oracle needs to perform recovery. It also includes the probable names of the files, using LOG_ARCHIVE_FORMAT. Be aware that you will need all the redo information from the time the datafile was added to the database.
If space is available, restore all of the required archived redo log files to the location currently specified by the initialization parameter LOG_ARCHIVE_DEST. By doing this, you enable Oracle to locate automatically the correct archived redo log file when required during media recovery. If sufficient space is not available at the location indicated by LOG_ARCHIVE_DEST, you can restore some or all of the required archived redo log files to any disk accessible to Oracle. In this case, you can specify the location of the archived redo log files before or during media recovery.
After an archived log is applied, you can delete the restored copy of the archived redo log file to free disk space. However, make sure that a copy of each archived log group still exists on offline storage.
See Also: For more information about tables, see the Oracle8 Reference.
If a damaged database is in ARCHIVELOG mode, it is a candidate for either complete media recovery or incomplete media recovery operations. To begin media recovery operations, use one of the following options of Enterprise Manager:
To start any type of media recovery, you must have administrator privileges. All recovery sessions must be compatible. One session cannot start complete media recovery while another performs incomplete media recovery. Also, you cannot start media recovery if you are connected to the database via a multi-threaded server process.
This section describes the steps necessary to complete media recovery operations, and includes the following topics:
Do not depend solely on the steps in the following procedures to understand all the tasks necessary to recover from a media failure. If you haven't already done so, familiarize yourself with the fundamental recovery concepts and strategies in Chapter 4.
This section describes steps to perform closed database recovery of either all damaged datafiles in one operation, or individual recovery of each damaged datafile in separate operations.
ALTER DATABASE DATAFILE 'users1' ONLINE;If a specified datafile is already online, Oracle ignores the statement.
To start closed database recovery of an individual damaged datafile, use the RECOVER DATAFILE statement in Enterprise Manager.
Oracle continues until all required archived redo log files have been applied to the restored datafiles. The online redo log files are then automatically applied to the restored datafiles and notifies you when media recovery is complete. If no archived redo log files are required for complete media recovery, Oracle does not prompt for any. Instead, all necessary online redo log files are applied, and media recovery is complete.
After performing closed database recovery, the database is recovered up to the moment that media failure occurred. You can then open the database using the SQL command ALTER DATABASE with the OPEN option.
See Also: For more information about applying redo log files, see "Applying Redo Log Files".
At this point, an open database has experienced a media failure, and the database remains open while the undamaged datafiles remain online and available for use. The damaged datafiles are automatically taken offline by Oracle.
This procedure cannot be used to perform complete media recovery on the datafiles of the SYSTEM tablespace. If the media failure damages any datafiles of the SYSTEM tablespace, Oracle automatically shuts down the database.
See Also: To proceed with complete media recovery, follow the procedure in "Performing Closed Database Recovery".
Oracle continues until all required archived redo log files have been applied to the restored datafiles. The online redo log files are then automatically applied to the restored datafiles to complete media recovery.
If no archived redo log files are required for complete media recovery, Oracle does not prompt for any. Instead, all necessary online redo log files are applied, and media recovery is complete.
See Also: For more information about redo log application, see "Applying Redo Log Files".
For more information about creating datafiles, see the Oracle8 Administrator's Guide.
Identical to the preceding operation, here an open database has experienced a media failure, and remains open while the undamaged datafiles remain online and available for use. The damaged datafiles are automatically taken offline by Oracle.
Oracle continues until all required archived redo log files have been applied to the restored datafiles. The online redo log files are then automatically applied to the restored datafiles to complete media recovery.
If no archived redo log files are required for complete media recovery, Oracle does not prompt for any. Instead, all necessary online redo log files are applied, and media recovery is complete.
See Also: For information about how to proceed with complete media recovery, see "Performing Closed Database Recovery".
For more information about creating datafiles, see the Oracle8 Administrator's Guide.
This section describes the steps necessary to complete the different types of incomplete media recovery operations, and includes the following topics:
See Also: Do not rely solely on this section to understand the procedures necessary to recover from a media failure.
If your database is affected by seasonal time changes (for example, daylight savings time), you may experience a problem if a time appears twice in the redo log and you want to recover to the second, or later time. To deal with time changes, perform cancel-based or change-based recovery to the point in time where the clock is set back, then continue with the time-based recovery to the exact time.
This section describes how to perform cancel-based recovery.
If you do not have a backup of a specific datafile, you can create an empty replacement file, which can be recovered.
If a datafile was added after the intended time of recovery, it is not necessary to restore a backup for this file, as it will no longer be used for the database after recovery is complete.
If the hardware problem that caused a media failure has been solved and all datafiles can be restored to their original locations, do so, and skip Step 8 of this procedure. If a hardware problem persists, restore damaged datafiles to an alternative storage device.
Oracle continues to apply redo log files.
Oracle returns a message indicating whether recovery is successful.
The first time you open the database subsequent to incomplete media recovery, you must explicitly specify whether to reset the log sequence number by including either the RESETLOGS or NORESETLOGS option. Resetting the redo log:
|
warning: Resetting the redo log discards all changes to the database made since the first discarded redo information. Updates entered after that time must be re-entered manually. |
Use the following rules when deciding to specify RESETLOGS or NORESETLOGS:
To preserve the log sequence number when opening a database after recovery, use the SQL command ALTER DATABASE with the OPEN NORESETLOGS option. To reset the log sequence number when opening a database after recovery, use the SQL command ALTER DATABASE with the OPEN RESETLOGS option. (If you attempt to reset the log when you should not, or if you neglect to reset the log when you should, Oracle returns an error and does not open the database. Correct the error and try again.)
If the log sequence number is reset when opening a database, different messages are returned, depending on whether the recovery was complete or incomplete. If the recovery was complete, the following message appears in the ALERT file:
RESETLOGS after complete recovery through change scnIf the recovery was incomplete, the following message is reported in the ALERT file:
RESETLOGS after incomplete recovery UNTIL CHANGE scn
If you reset the redo log sequence when opening the database, immediately shut down the database normally and make a whole database backup. Otherwise, you will not be able to recover changes made after you reset the logs. Until you take a whole database backup, the only way to recover will be to repeat the procedures you just finished, up to resetting the logs. (You do not need to back up the database if you did not reset the log sequence.)
After opening the database using the RESETLOGS option, check the ALERT log to see if Oracle has detected inconsistencies between the data dictionary and the control file (for example, a datafile that the data dictionary includes but does not list in the new control file).
If a datafile exists in the data dictionary but not in the new control file, Oracle creates a placeholder entry in the control file under MISSINGnnnn (where nnnn is the file number in decimal). MISSINGnnnn is flagged in the control file as being offline and requiring media recovery. The actual datafile corresponding to MISSINGnnnn can be made accessible by renaming MISSINGnnnn, so that it points to the datafile only when the datafile was read-only or offline normal. If, on the other hand, MISSINGnnnn corresponds to a datafile that was not read-only or offline normal, then the rename operation cannot be used to make the datafile accessible, because the datafile requires media recovery that is precluded by the results of RESETLOGS. In this case, the tablespace containing the datafile must be dropped.
In contrast, if a datafile indicated in the control file is not present in the data dictionary, Oracle removes references to it from the new control file. In both cases, Oracle includes an explanatory message in the ALERT file to let you know what was found.
See Also: For more information about creating datafiles, see "Restoring Damaged Datafiles".
To relocate or rename datafiles, see the Oracle8 Administrator's Guide.
For more information about applying redo logs, see "Applying Redo Log Files".
When you are performing time-based, incomplete media recovery, and you are recovering with a backup control file and have read-only tablespaces, contact Oracle Support before attempting this recovery procedure.
If you do not have a backup of a specific datafile, you can create an empty replacement file, which can be recovered.
If a datafile was added after the intended time of recovery, it is not necessary to restore a backup for this file, as it will no longer be used for the database after recovery is complete.
If the hardware problem that caused a media failure has been solved and all datafiles can be restored to their original locations, do so, and skip Step 8 of this procedure. If a hardware problem persists, restore damaged datafiles to an alternative storage device.
ALTER DATABASE DATAFILE 'users1' ONLINE;If a backup of the control file is being used with this incomplete recovery (that is, a control file backup or re-created control file was restored), indicate this in the dialog box or command used to start recovery. If a specified datafile is already online, Oracle ignores the statement.
The first time you open the database subsequent to incomplete media recovery, you must explicitly specify whether to reset the log sequence number by including either the RESETLOGS or NORESETLOGS option. Resetting the redo log:
|
warning: Resetting the redo log discards all changes to the database made since the first discarded redo information. Updates entered after that time must be re-entered manually. |
Use the following rules when deciding to specify RESETLOGS or NORESETLOGS:
To preserve the log sequence number when opening a database after recovery, use the SQL command ALTER DATABASE with the OPEN NORESETLOGS option. To reset the log sequence number when opening a database after recovery, use the SQL command ALTER DATABASE with the OPEN RESETLOGS option. (If you attempt to reset the log when you should not, or if you neglect to reset the log when you should, Oracle returns an error and does not open the database. Correct the error and try again.)
If the log sequence number is reset when opening a database, different messages are returned, depending on whether the recovery was complete or incomplete. If the recovery was complete, the following message appears in the ALERT file:
RESETLOGS after complete recovery through change scnIf the recovery was incomplete, the following message is reported in the ALERT file:
RESETLOGS after incomplete recovery UNTIL CHANGE scn
If you reset the redo log sequence when opening the database, immediately shut down the database normally and make a whole database backup. Otherwise, you will not be able to recover changes made after you reset the logs. Until you take a whole database backup, the only way to recover will be to repeat the procedures you just finished, up to resetting the logs. (You do not need to back up the database if you did not reset the log sequence.)
After opening the database using the RESETLOGS option, check the ALERT log to see if Oracle has detected inconsistencies between the data dictionary and the control file (for example, a datafile that the data dictionary includes but does not list in the new control file).
If a datafile exists in the data dictionary but not in the new control file, Oracle creates a placeholder entry in the control file under MISSINGnnnn (where nnnn is the file number in decimal). MISSINGnnnn is flagged in the control file as being offline and requiring media recovery. The actual datafile corresponding to MISSINGnnnn can be made accessible by renaming MISSINGnnnn, so that it points to the datafile only when the datafile was read-only or offline normal. If, on the other hand, MISSINGnnnn corresponds to a datafile that was not read-only or offline normal, then the rename operation cannot be used to make the datafile accessible, because the datafile requires media recovery that is precluded by the results of RESETLOGS. In this case, the tablespace containing the datafile must be dropped.
In contrast, if a datafile indicated in the control file is not present in the data dictionary, Oracle removes references to it from the new control file. In both cases, Oracle includes an explanatory message in the ALERT file to let you know what was found.
See Also: For more information see the Oracle8 Administrator's Guide.
For more information about applying redo logs, see "Applying Redo Log Files".
This section describes how to perform change-based recovery.
If you do not have a backup of a specific datafile, you can create an empty replacement file, which can be recovered.
If a datafile was added after the intended time of recovery, it is not necessary to restore a backup for this file, as it will no longer be used for the database after recovery is complete.
If the hardware problem that caused a media failure has been solved and all datafiles can be restored to their original locations, do so, and skip Step 8 of this procedure. If a hardware problem persists, restore damaged datafiles to an alternative storage device.
ALTER DATABASE DATAFILE 'users1' ONLINE;If a specified datafile is already online, Oracle ignores the statement.
If a backup of the control file is being used with this incomplete recovery (that is, a control file backup or re-created control file was restored), specify the USING BACKUP CONTROLFILE parameter in the dialog box or command used to start recovery.
The first time you open the database subsequent to incomplete media recovery, you must explicitly specify whether to reset the log sequence number by including either the RESETLOGS or NORESETLOGS option. Resetting the redo log:
|
warning: Resetting the redo log discards all changes to the database made since the first discarded redo information. Updates entered after that time must be re-entered manually. |
Use the following rules when deciding to specify RESETLOGS or NORESETLOGS:
To preserve the log sequence number when opening a database after recovery, use the SQL command ALTER DATABASE with the OPEN NORESETLOGS option. To reset the log sequence number when opening a database after recovery, use the SQL command ALTER DATABASE with the OPEN RESETLOGS option. (If you attempt to reset the log when you should not, or if you neglect to reset the log when you should, Oracle returns an error and does not open the database. Correct the error and try again.)
If the log sequence number is reset when opening a database, different messages are returned, depending on whether the recovery was complete or incomplete. If the recovery was complete, the following message appears in the ALERT file:
RESETLOGS after complete recovery through change scnIf the recovery was incomplete, the following message is reported in the ALERT file:
RESETLOGS after incomplete recovery UNTIL CHANGE scn
If you reset the redo log sequence when opening the database, immediately shut down the database normally and make a full database backup. Otherwise, you will not be able to recover changes made after you reset the logs. Until you take a full backup, the only way to recover will be to repeat the procedures you just finished, up to resetting the logs. (You do not need to back up the database if you did not reset the log sequence.)
After opening the database using the RESETLOGS option, check the ALERT log to see if Oracle has detected inconsistencies between the data dictionary and the control file (for example, a datafile that the data dictionary includes but does not list in the new control file).
If a datafile exists in the data dictionary but not in the new control file, Oracle creates a placeholder entry in the control file under MISSINGnnnn (where nnnn is the file number in decimal). MISSINGnnnn is flagged in the control file as being offline and requiring media recovery. The actual datafile corresponding to MISSINGnnnn can be made accessible by renaming MISSINGnnnn, so that it points to the datafile only when the datafile was read-only or offline normal. If, on the other hand, MISSINGnnnn corresponds to a datafile that was not read-only or offline normal, then the rename operation cannot be used to make the datafile accessible, because the datafile requires media recovery that is precluded by the results of RESETLOGS. In this case, the tablespace containing the datafile must be dropped.
In contrast, if a datafile indicated in the control file is not present in the data dictionary, Oracle removes references to it from the new control file. In both cases, Oracle includes an explanatory message in the ALERT file to let you know what was found.
See Also: For more information about applying redo logs, see "Applying Redo Log Files".
This section describes how to plan for and implement disaster recovery procedures for your primary database, and includes the following topics:
A standby database maintains a duplicate, or standby copy of your primary (also known as production) database and provides continued primary database availability in the event of a disaster (when all media is destroyed at your production site). A standby database is constantly in recovery mode. If a disaster occurs, you can take the standby database out of recovery mode and activate it for online use. A standby database is intended only for recovery of the primary database; you cannot query or open it for any purpose other than to activate disaster recovery. Once you activate your standby database, you cannot return it to standby recovery mode unless you re-create it as another standby database.
|
warning: Activating a standby database resets the online logs of the standby database. Hence, after activation, the logs from your standby database and production database are incompatible. |
You must place the data files, log files, and control files of your primary and standby databases on separate physical media. Therefore, it is impossible to use the same control file for both your primary and standby databases.
This section lists the steps and rules to follow when creating a standby database.
See Also: For information about setting name conversion parameters when you create your standby database, see "Converting Data File and Log File Names".
This section provides the tasks for maintaining your standby database, including information about clearing standby logfiles.
You can clear standby database online logfiles to optimize performance as you maintain your standby database. If you prefer not to perform this operation during maintenance, the online logfiles will be cleared automatically during activation. You can clear logfiles using the following statement:
ALTER DATABASE CLEAR LOGFILE GROUP integer;
You can set the following initialization parameters so that all filenames from your primary database control file are converted for use by your standby database:
If your primary and standby databases exist on the same machine (of course, they should not, but if they are), setting these parameters is advisable, because they allow you to make your standby database filenames distinguishable from your primary database filenames.
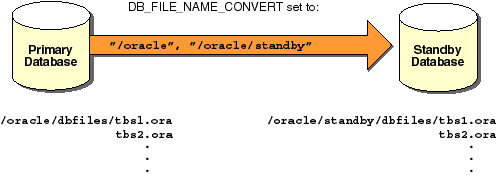
The DB_FILE_NAME_CONVERT and LOG_FILE_NAME_CONVERT parameters must have two strings. The first string is a sequence of characters to be looked for in a primary database filename. If that sequence of characters is matched, it is replaced by the second string to construct the standby database filename.
Figure 12-1 shows how the filename conversion parameters work.
In the event of a disaster, you should (if possible) archive your primary database logs (ALTER SYSTEM ARCHIVE LOG CURRENT), transfer them to your standby site, and apply them before activating your standby database. This makes your standby database current to the same point in time as your primary database (before the failure). If you cannot archive your current online logs, then you must activate the standby database without recovering the transactions from the unarchived logs of the primary database.
After you activate your standby database, its online redo logs are reset. Note that this makes the logs from the standby database and primary database incompatible. Also, the standby database is dismounted when activated, therefore, you are unable to look at tables and views immediately after activation.
Altering the physical structure of your primary database can have an impact on your standby database. The following sections describe the effects of primary database structural alterations on a standby database.
Adding a data file to your primary database generates redo information that, when applied at your standby database, automatically adds the data file name to the standby control file. If the standby database locates the new file with the new filename, the recovery process continues. If the standby database is unable to locate the new data file, the recovery process will stop.
If the recovery process stops, then perform either of the following procedures before resuming the standby database recovery process:
If you don't want the new data file in the standby database, you can take it offline using the DROP option.
See Also: For more information on offline datafile alterations, see "Taking Datafiles in the Standby Database Offline".
Data file renames on your primary database do not take effect at the standby database until the standby database control file is refreshed. If you want the data files at your primary and standby databases to remain in sync when you rename primary database data files, then perform analogous operations on the standby database.
You can add log file groups or members to the primary database without affecting your standby database. Likewise, you can drop log file groups or members from the primary database without affecting your standby database. Similarly, enabling and disabling of threads at the primary database has no effect on the standby database.
You may want to keep the online log file configuration the same at the primary and standby databases. If so, when you enable a log file thread with the ALTER DATABASE ENABLE THREAD at the primary database, you should create a new control file for your standby database before activating it. See "Refreshing the Standby Database Control File" on page -42 for refresh procedures.
If you clear log files at the primary database by issuing the ALTER DATABASE CLEAR UNARCHIVED LOGFILE command, or open the primary database using the RESETLOGS option, you invalidate the standby database. Because the standby database recovery process will not have the archived logs it requires to continue, you will need to re-create the standby database.
If you use the CREATE CONTROLFILE command at the primary database to perform any of the following, you may invalidate the standby database's control file:
If you've invalidated the standby database's control file, you must re-create it using the procedures in "Refreshing the Standby Database Control File".
Using the CREATE CONTROLFILE command with the RESETLOGS option on your primary database will force the next open of the primary database to reset the online logs, thereby invalidating the standby database.
Most initialization parameters at your primary and standby databases should be identical. Specific initialization parameters such as CONTROL_FILES and DB_FILE_STANDBY_NAME_CONVERT should be changed. Differences in other initialization parameters may cause performance degradation at the standby database, and in some cases, bring standby database operations to a halt.
The following initialization parameters play a key role in the standby database recovery process:
The COMPATIBLE parameter must be the same at the primary and standby databases. If it is not, you may not be able to apply the logs from your primary database to your standby database.
MAXDATAFILES must be the same at both databases so that you allow the same number of files at the standby database as you allow at the primary database.
CONTROL_FILES must be different between the primary and standby databases. The names of the control files that you list in this parameter for the standby database must exist at the standby database.
Set the DB_FILE_STANDBY_NAME_CONVERT (or LOG_FILE_STANDBY_NAME_CONVERT) parameter when you want to make your standby database filenames distinguishable from your primary database filenames. For more information on this parameter see "Converting Data File and Log File Names".
See Also: For more information on initialization parameters, see the Oracle8 Reference.
You can take standby database datafiles offline as a means to support a subset of your primary database's datafiles. For example, you decide it is undesirable to recover the primary database's temporary tablespaces on the standby database. So you take the datafiles offline using the ALTER DATABASE DATAFILE 'fn' OFFLINE DROP command on the standby database. If you do this, then the tablespace containing the offline files must be dropped after opening the standby database.
When you perform a direct load originating from either direct path load, table create via subquery, or index create on the primary database, the performance improvement applies only to the primary database; there is no corresponding recovery process performance improvement on the standby database. The standby database recovery process still sequentially reads and applies the redo information generated by the unrecoverable direct load.
Primary database processes using the UNRECOVERABLE option are not propagated to the standby database. Why? Because these processes do not appear in the archived redo logs. If you want to propagate such processes to your standby database, perform any one of the following tasks.
If you perform an unrecoverable operation at the primary database, and attempt to recover at the standby database, you will not receive error messages during recovery. Such error messages appear in the standby database alert log. Thus, you should check the standby database alert log periodically.
See Also: For more details, see "Taking Datafiles in the Standby Database Offline".
The following steps describe how to refresh, or create a copy of changes you've made to the primary database control file.
You can create tables and indexes using the CREATE TABLE AS SELECT command. You can also specify that Oracle create them as unrecoverable. When you create a table or index as unrecoverable, Oracle does not generate redo log records for the operation. Thus, objects created unrecoverable cannot be recovered, even if you are running in ARCHIVELOG mode.
|
Note: If you cannot afford to lose tables or indexes created unrecoverable, take a backup after the unrecoverable table or index is created. |
Be aware that when you perform a media recovery, and some tables or indexes are created as recoverable while others are unrecoverable, the unrecoverable objects will be marked logically corrupt by the RECOVER operation. Any attempt to access the unrecoverable objects returns an ORA-01578 error message. You should drop the unrecoverable objects, and recreate them, if needed.
Because it is possible to create a table unrecoverable and then create a recoverable index on that table, the index is not marked as logically corrupt after you perform a media recovery. However, the table was unrecoverable (and thus marked as corrupt after recovery), so the index points to corrupt blocks. The index must be dropped, and the table and index must be re-created if necessary.
See Also: You can find more information about the impact of UNRECOVERABLE operations on a standby database .
This section describes how read-only tablespaces affect instance and media recovery.
Media recovery with the USING BACKUP CONTROLFILE option checks for read-only files. It is an error to attempt recovery of a read-only file. You can avoid this error by taking all datafiles from read-only tablespaces offline before doing recovery with a backup control file. Therefore, it is very important to have the correct version of the control file for the recovery. If the tablespace will be read-only when the recovery is complete, then the control file must be from a time when the tablespace was read-only. Similarly, if the tablespace will be read-write at the end of recovery, it should be read-write in the control file. If the appropriate control file is not available, you should create a new control file with the CREATE CONTROLFILE command.
If you need to re-create a control file for a database with read-only tablespaces, you must follow some special procedures. Issue the ALTER DATABASE BACKUP CONTROLFILE TO TRACE command to get a listing of the procedure that you need to follow. The procedure is similar to the procedure for offline normal tablespaces, except that you need to bring the tablespace online after the database is open.
Re-creating a control file can also affect the recovery of read-write tablespaces that were at one time read-only. If you re-create the control file after making the tablespace writable, Oracle can no longer determine when the tablespace was changed from read-only to read-write. Thus, you can no longer recover from the read-only version of the tablespace. Instead, you must recover from the time of the most recent backup. It is important to backup a tablespace immediately after making it read-write.
This section describes how to recover from common media failures, and includes the following topics:
Media failures fall into two general categories: permanent and temporary. Permanent media failures are serious hardware problems that cause the permanent loss of data on the disk. Lost data cannot be recovered except by repairing or replacing the failed storage device and restoring backups of the files stored on the damaged storage device. Temporary media failures are hardware problems that make data temporarily inaccessible; they do not corrupt the data. Following are two examples of temporary media failures:
If a media failure affects datafiles of a database, the appropriate recovery procedure depends on the archiving mode of the database, the type of media failure, and the exact files affected by the media failure. The following sections explain the appropriate recovery strategies in various situations.
If either a permanent or temporary media failure affects any datafiles of a database operating in NOARCHIVELOG mode, Oracle automatically shuts down the database. Depending on the type of media failure, you can use one of two recovery paths:
If either a permanent or temporary media failure affects the datafiles of a database operating in ARCHIVELOG mode, the following situations can exist:
If the hardware problem is temporary, correct the problem and restart the database. Usually, instance recovery is possible, and all committed transactions can be recovered using the online redo log.
If the hardware problem is permanent, follow the procedure in "Performing Closed Database Recovery".
If the unaffected portions of the database must remain available, do not shut down the database. First take all tablespaces that contain problem datafiles offline using the temporary option. Then follow the procedure in "Performing Closed Database Recovery".
If a media failure has affected the online redo log of a database, the appropriate recovery procedure depends on the configuration of the online redo log (mirrored or non-mirrored), the type of media failure (temporary or permanent), and the types of online redo log files affected by the media failure (current, active, not yet archived, or inactive online redo log files). The following sections describe the appropriate recovery strategies in various situations.
If the online redo log of a database is mirrored, and at least one member of each online redo log group is not affected by the media failure, Oracle allows the database to continue functioning as normal (error messages are written to the LGWR trace file and ALERT file of the database). However, you should handle the problem by taking one of the following actions:
If all members of an online redo log group are damaged by a media failure, different situations can arise, depending on the type of online redo log group affected by the failure and the archiving mode of the database. You can locate the filename in V$LOGFILE, and then look for the group number corresponding to the one you lost to verify the lost file's status (verify that it was inactive).
SELECT *
FROM v$logfile
;

GROUP#    STATUS       MEMBER
-------   -----------  ---------------------
0001                    log1
0002                    log2
0003                    log3

SELECT *
FROM v$log
;

GROUP#  MEMBERS           STATUS     ARCHIVED
------  -------           ---------  -----------
 0001   1                 INACTIVE   YES
 0002   1                 ACTIVE     YES
 0003   1                 CURRENT    NO
If all members of an inactive online redo log group are damaged, the following situations can arise:
If you notice the problem before the database shuts down, use the ALTER DATABASE CLEAR LOGFILE command.
If the database has already shut down, perform the following tasks:
Clearing a log that has not been archived allows it to be reused without archiving it. However, this will make backups unusable if they were started before the last change in the log (unless the file was taken offline prior to the first change in the log). Hence, if the cleared logfile is needed for recovery of a backup, it will not be possible to recover that backup.
If there is an offline datafile that requires the cleared unarchived log to bring it online, the keywords UNRECOVERABLE DATAFILE are required. The datafile and its entire tablespace will have to be dropped from the database because the redo necessary to bring it online is being cleared, and there is no copy of it.
At this point, you can complete recovery by executing, in order, the following commands:
You can now open the database.
If your database is still running and the lost active log is not the current log, you can use the ALTER SYSTEM CHECKPOINT command. If successful, your active log is rendered inactive, and you can follow the steps .
If unsuccessful, or if your database has already halted, you cannot use the steps . Instead, perform the following tasks:
After restoring the database, redo the work and open the database using the RESETLOGS option. Updates done after the backup have been lost and must be re-executed. Shut down the database and take a whole database backup.
If you have lost multiple groups of the online redo log, use the recovery method for the most difficult log to recover. The order of difficulty, from most difficult to least, follows:
If the database is operating so that filled online redo log groups are being archived, and the only copy of an archived redo log file is damaged, it does not affect the present operation of the database. However, the following situations can arise if media recovery is required in the future:
If a media failure has affected the control files of a database (whether control files are mirrored or not), the database continues to run until the first time that an Oracle background process needs to access the control files. At this point, the database and instance are automatically shut down.
If the media failure is temporary and the database has not yet shut down, immediately correcting the media failure can avoid the automatic shut down of the database. However, if the database shuts down before the temporary media failure is corrected, you can restart the database after fixing the problem (and restoring access to the control files).
The appropriate recovery procedure for media failures that permanently prevent access to control files of a database depends on whether you have mirrored the control files. The following sections describe the appropriate procedures.
Use the following steps to recover a database after one or more control files of a database have been damaged by a permanent media failure, and at least one control file has not been damaged by the media failure.
|
Note: If all control files of a mirrored control file configuration have been damaged, follow the instructions for recovering from the loss of non-mirrored control files. |
If all control files of a database have been lost or damaged by a permanent media failure, but all online redo logfiles remain intact, you can recover by creating a new control file (using the CREATE CONTROLFILE command with the NORESETLOGS option). Then execute RECOVER DATABASE followed by ALTER DATABASE OPEN.
Depending on the existence and currency of a control file backup, you have the following options for generating the text of the CREATE CONTROLFILE command:
An accidental or erroneous operational or programmatic change to the database can cause loss or corruption of data. Recovery may require a return to a state prior to the error.
|
Note: If the database administrator has properly granted powerful privileges (such as DROP ANY TABLE) to only selected, appropriate users, user errors that require database recovery are minimized. |
The following scenario describes how to recover a table that has been accidentally dropped.
See Also: For more information about the Import and Export utilities, see Oracle8 Utilities.