| Oracle7 Server Manager User's Guide | Library |
Product |
Contents |
Index |
| Oracle7 Server Manager User's Guide | Library |
Product |
Contents |
Index |
![]()
![]()
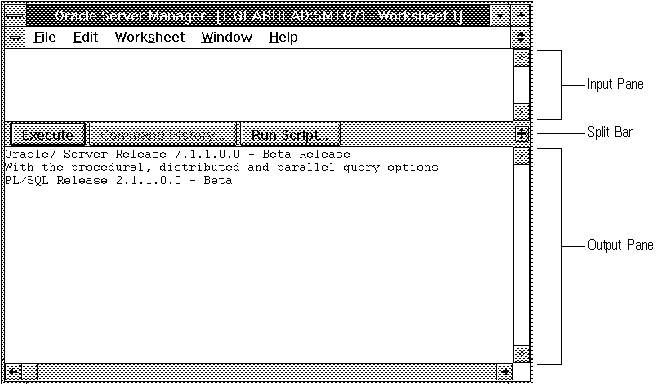 Figure 9 - 1. SQL Worksheet Window
The SQL Worksheet window is described below:
Input Pane
Upper window pane. Enter and edit commands in the input pane.
Output Pane
Lower window pane. Displays recently executed commands and output. Server Manager stores the last 32 KB of output for display in the output pane. The actual amount stored may vary by operating system.
Split Bar
Adjusts the relative sizes of the panes. Click the button and drag the split bar vertically to resize the panes.
Execute
Executes the command in the input pane. See "Executing Commands in the SQL Worksheet" ![]() for information about executing commands in a SQL Worksheet.
for information about executing commands in a SQL Worksheet.
Command History
Displays the Command History dialog box, which displays previously executed commands. See "Using the Command History" ![]() for information about using the command history.
for information about using the command history.
Run Script
Allows you to select and execute a script. See "Running Scripts from the SQL Worksheet" ![]() for information about running scripts from a SQL Worksheet.
for information about running scripts from a SQL Worksheet.
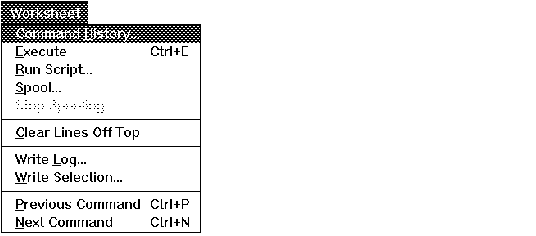 Figure 9 - 2. Worksheet Pull-Down Menu
The Worksheet menu items are described below:
Command History
Displays the Command History dialog box, which displays previously executed commands. Equivalent to the Command History button. See "Using the Command History" ![]() for information about using the command history.
for information about using the command history.
Execute
Executes the command in the input pane. Equivalent to the Execute button or the Enter key. If there are multiple commands in the input pane, commands are executed up to the first terminator (; or /).
See "Executing Commands from the SQL Worksheet" ![]() for information about executing commands in a SQL Worksheet.
for information about executing commands in a SQL Worksheet.
Run Script
Allows you to select and execute a script. Equivalent to the Run Script button. See "Running Scripts from the SQL Worksheet" ![]() for information about running scripts from a SQL Worksheet.
for information about running scripts from a SQL Worksheet.
Spool
Writes output to a specified file. See "Saving Your Work" ![]() for information about spooling the output of a SQL Worksheet.
for information about spooling the output of a SQL Worksheet.
Stop Spooling
Closes the previously opened spool file.
Clear Lines Off Top
Clears the lines that have scrolled off the top of the output pane.
Write Log
Writes the output pane, including lines that have scrolled off the pane, to a specified file. See "Saving Your Work" ![]() for information about saving the output pane.
for information about saving the output pane.
Write Selection
Writes selected text to a specified file. Text can be selected from the input or output pane. See "Saving Your Work" ![]() for information about saving selected text.
for information about saving selected text.
Previous Command
Retrieves the previous command from the command history and enters it in the input pane. The retrieved command replaces the entire contents of the input pane.
You can execute Previous Command repeatedly to work back through the command history. Previous Command is unavailable if you have currently retrieved the oldest command from the command history.
Next Command
Retrieves the next command from the command history and enters it in the input pane. The retrieved command replaces the entire contents of the input pane.
Next Command is unavailable if you have currently retrieved the most recent command from the command history.
Suggestion: Use the keyboard shortcuts to quickly access and execute commands from the command history.
All standard text editing capabilities are available in the input pane of a SQL Worksheet. You can edit text in the input pane using the mouse, keyboard functions, and the Edit menu. In addition, you can select text from the output pane and paste it into the input pane.
When you execute a command, the command and its output appear in the output pane. However, if you set the parameter ECHO to off, only the output of the command is displayed. For information about setting Server Manager parameters, see the SET command in Appendix A, "Server Manager Command Reference."
The following figure illustrates executing a SQL statement in a worksheet.
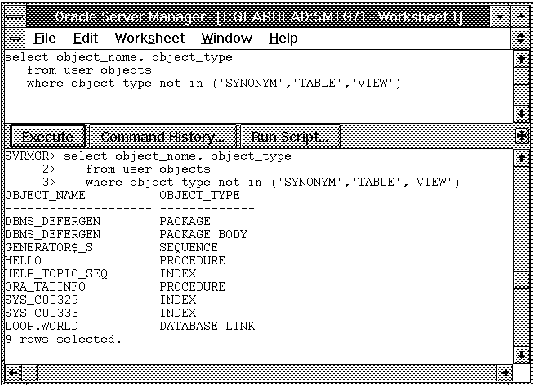 Figure 9 - 3. Executing a Command in the SQL Worksheet
After you execute a command, the command remains in the input pane, but is selected, as shown in Figure 9 - 3. You can then type in the next command, and it replaces the previous command. You do not need to delete the previous command unless you are running Server Manager under Windows.
@
Displays the standard file selection dialog box when you issue the @ command without specifying a filename.
CONNECT
Displays the Connect dialog box when you issue the CONNECT command without specifying complete connect information. For information about the Connect dialog box, see Chapter 1, "Overview of Server Manager."
HELP
Displays the Help window.
SPOOL
Displays the standard file selection dialog box for your platform when you issue the SPOOL command without specifying a filename.
RECOVER
If recovery is needed, displays the Recover dialog box when you issue the RECOVER command without arguments. Otherwise, an error message is generated.
EXIT
Closes the worksheet.
Note: The line mode command HOST is not available in the SQL Worksheet.
Additional Information: For information about the standard file selection dialog box for your system, see your operating system-specific documentation.
If you execute the CONNECT command from the input pane without any arguments, the Connect dialog box appears. You can use the Connect dialog box to specify a new connection for that worksheet. For a description of the Connect dialog box, see Chapter 1, "Overview of Server Manager." You can also specify the connection using arguments in the CONNECT command. For a description of the CONNECT command and its syntax, see Appendix A, "Server Manager Command Reference."
Note: The SQL Worksheet also contains the File pull-down menu, which is described![]() . When you choose Connect from the File menu, the Connect dialog box also appears. However, when you choose Connect from the File menu, you are not changing your worksheet connection. In this case, the connection you are specifying is for a new Administration window.
. When you choose Connect from the File menu, the Connect dialog box also appears. However, when you choose Connect from the File menu, you are not changing your worksheet connection. In this case, the connection you are specifying is for a new Administration window.
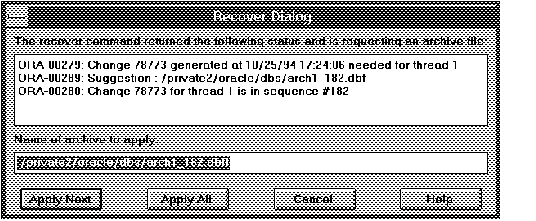 Figure 9 - 4. Recovery Dialog Box
From the Recovery dialog box, you can apply the next log file, apply all the log files, or cancel recovery. You can specify the name of the log file to apply or apply the default. For more information about the Recovery dialog box, see Chapter 6, "Backing Up and Recovering the Database."
The Command History dialog box contains a scrolling list of the commands in the worksheet's command history. The following figure illustrates the Command History dialog box.
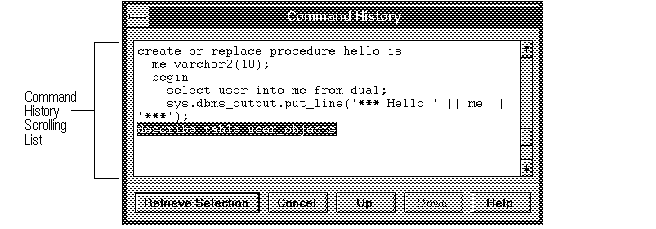 Figure 9 - 5. Command History Dialog Box
The Command History dialog box is described below:
Retrieve Selection
Retrieves the selected command, or selected portion of a command, from the command history scrolling list and enters it in the input pane. See "Retrieving a Selection from the Command History" ![]() for more information about retrieving commands.
for more information about retrieving commands.
Cancel
Closes the dialog box without retrieving any text.
Up
Selects the previous command in the command history.
Down
Selects the next command in the command history.
Help
Displays help information for the Command History dialog box.
To retrieve only a portion of a command from the Command History dialog box, select the text you wish to retrieve and click Retrieve Selection.
The text retrieved from the Command History dialog box is entered in the worksheet's input pane. If no text is selected in the input pane, the retrieved text is inserted at the cursor position. If you have selected text in the input pane, then the retrieved text replaces the selected text.
After you have retrieved text from the command history, you can edit or execute the command, as desired.
The Spool menu item saves all output to a specified file. Server Manager continues to save the output of your worksheet until you choose Stop Spooling from the menu.
The Write Log menu item writes the current contents of your worksheet's output pane to a specified file. The output pane contains the last 32 KB of output and the last 100 lines of text. The actual amount may vary by operating system.
Any text that has scrolled out of the output pane is also written to the file. However, if you have used the Clear Lines Off Top menu item to clear any lines from the output pane, those lines are not written to the file.
The Write Selection menu item writes any text you have selected to a specified file. You can select text from the input or output pane.
Additional Information: Server Manager appends a file extension, such as .log or .txt, to the name of each file created by the Spool, Write Log, and Write Selection commands. These file extensions are operating system-dependent. Refer to your operating system-specific Oracle documentation for information about the file extensions for your system.
You can also run a script from the input pane of a worksheet by entering an @ command followed by the script name. The following figure illustrates running a script from the input pane of a worksheet. If you enter an @ command without a script name, your platform's standard file selection dialog box appears to allow you to specify a script name.
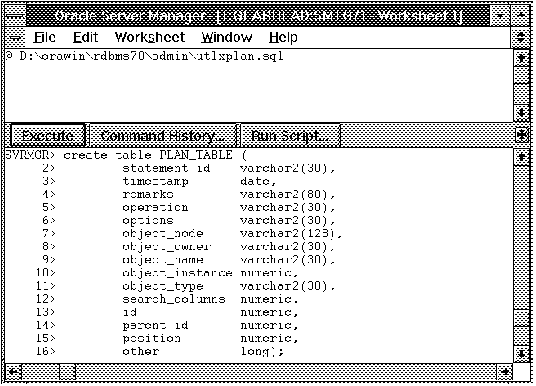 Figure 9 - 6. Running a Script from the Input Pane
Note: In a script you can run other scripts. In the original script you can include the line @@second_scriptname to run another script called second_scriptname. The @@ command indicates that the second script is in the same directory as the original script.
You can also issue the MONITOR command followed by the name of the monitor you want to start. For example, the statement MONITOR LOCK starts a lock monitor. For a list of the monitor names and abbreviations, see Table 1 - 4 ![]() .
.
You may start only one monitor of each type for each connection to an instance. If you try to start a monitor that has already been started, Server Manager brings that monitor window forward.
For a description of the System Monitors and the Monitor dialog box, see Part IV, "System Monitors."
|
Prev Next |
Copyright © 1996 Oracle Corporation. All Rights Reserved. |
Library |
Product |
Contents |
Index |