| Oracle7 Server Manager User's Guide | Library |
Product |
Contents |
Index |
| Oracle7 Server Manager User's Guide | Library |
Product |
Contents |
Index |
This chapter describes the commands available in the Recovery drawer's folders:
The following figure illustrates the Backup object list.
 Figure 6 - 1. Backup Object List
Tablespace
Name of the tablespace.
Size (K)
Size of the tablespace (in kilobytes).
Backup Status
Status of the tablespace: ONLINE, Offline, or Ready for Backup (marked for online backup).
Started
Time the online tablespace backup started.
Tablespaces that are offline can be backed up at any time, so there is no need to mark offline tablespaces for online backup.
After you have marked a tablespace as ready for backup, you can back up the datafiles that belong to the tablespace. You must back up the datafiles through your operating system. You can use the Datafiles folder in the Storage drawer to identify all datafiles belonging to a tablespace.
Attention: In order to perform an online backup, you must be operating in ARCHIVELOG mode. See the Oracle7 Server Administrator's Guide for information about ARCHIVELOG mode.
Additional Information: For information about performing backups on your operating system, see your platform-specific Oracle documentation.
Once you have completed your backup of the tablespace, mark the end of the backup. To mark the completion of an online tablespace backup, choose End Online Backup from the Backup menu.
Attention: If you forget to indicate the end of an online tablespace backup and subsequently shut down the database, Oracle assumes that media recovery is necessary at the next instance startup. Recovery may require the use of the archived redo log files.
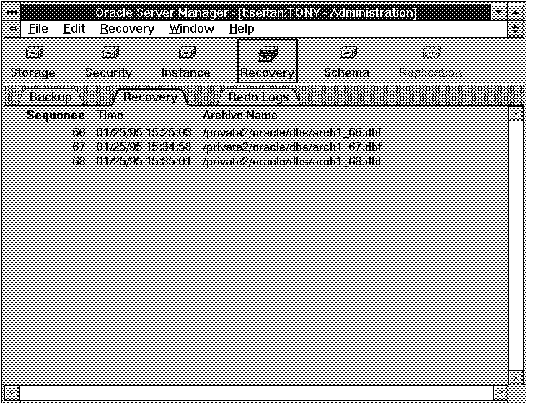
The following figure illustrates the Recovery object list.
 Figure 6 - 2. Recovery Object List
Sequence
Sequence number of the archived log.
Time
Time at which the log was archived.
Archive Name
Name of the file when archived.
The following figure illustrates the Apply Recovery Archives dialog box.
 Figure 6 - 3. Apply Recovery Archives Dialog Box
The Apply Recovery Archives dialog box is described below:
History
An output pane that displays prompts and status messages as recovery proceeds.
Next Archive File
Text entry field that displays the next archived log file to apply.
The Next Archive File field displays the default next log file. You can edit the name of the file or enter the name of a different file to apply.
Remaining Archives
Scrolling list that displays the archived redo logs that still need to be applied.
Save History
Saves the contents of the History pane to a file. Displays the standard file selection dialog box for your platform and allows you to specify the file.
Find Archive
Displays the standard file selection dialog box for your platform, and allows you to select a file to apply next.
Apply Next
Applies the file specified in the Next Archive File field.
Apply All
Applies all remaining archived redo log files. When the last log has been applied, the button's name changes to "Done".
Cancel
Stops the recovery operation. Database is recovered up through the last log file applied.
Additional Information: For information about the standard file selection dialog box for your system, see your operating system-specific documentation.
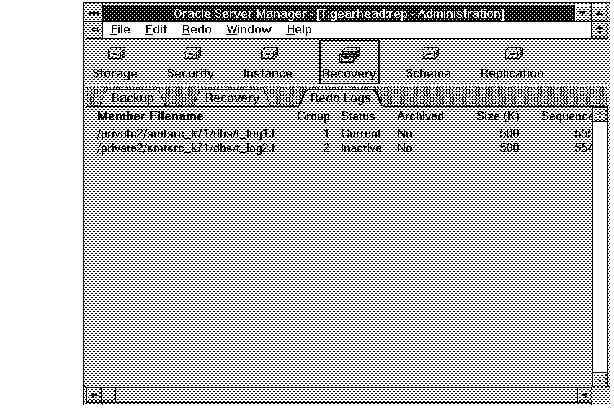
The following figure illustrates the Redo Log object list.
 Figure 6 - 4. Redo Log Object List
Member Filename
Name of the redo log file.
Group
Group number of the redo log group to which the log file belongs.
Status
Status of the redo log group: Current, Active, or Inactive.
Archived
Whether the redo log file has been archived.
Size (K)
Size of the redo log file (in kilobytes).
Sequence
Sequence number of the redo log group.
The following figure illustrates the Add Redo Logfile Group property sheet.
 Figure 6 - 5. Add Redo Logfile Group Property Sheet
Group Number
Group number for the redo log group.
The group number uniquely identifies the redo log group. Server Manager generates the default value automatically. You can enter a different group number in this field, if you desire.
Use existing file(s)
Allows Oracle to reuse existing file(s).
New file(s) size
Instructs Oracle to create new file(s).
Specify the size of the new file(s) in the New file(s) size field. Use the pop-up menu to specify kilobytes or megabytes.
Files scrolling list
Scrolling list of members to be included in the redo log group.
New
Displays the New Logfile dialog box and allows you to specify a member to add to the redo log group.
When you add a new member to the group, its name appears in the Files scrolling list. See "New Logfile Dialog Box" ![]() for a description of the New Logfile dialog box.
for a description of the New Logfile dialog box.
Edit
Displays the Edit Logfile dialog box.
Select the filename you wish to edit from the Files scrolling list and click Edit to edit the filename. See "Edit Logfile Dialog Box" ![]() for a description of the Edit Logfile dialog box.
for a description of the Edit Logfile dialog box.
Remove
Removes a member from the redo log group.
Select the member to be removed from the Files scrolling list and click Remove.
 Figure 6 - 6. New Logfile Dialog Box
Enter the name of the new group member in the Filename text entry field. The file must be fully specified according to the conventions of your operating system. You can also click the Find File button to bring up the standard file selection dialog box for your platform.
Additional Information: For information about specifying filenames for your system, see your operating system-specific Oracle documentation.
 Figure 6 - 7. Edit Logfile Dialog Box
You can edit the filename in the Filename field. You can also click the Find File button to bring up the standard file selection dialog box for your platform.
The following figure illustrates the Drop Logfile Group alert box.
 Figure 6 - 8. Drop Logfile Group Alert Box
Attention: Dropping a log file group drops all of its members. You cannot drop the active redo log group.
The following figure illustrates the Add Redo Logfile Member property sheet.
 Figure 6 - 9. Add Redo Logfile Member Property Sheet
Filename
Name of the file to add to the redo log group.
Enter the name of the file in the Filename field. The file must be fully specified according to the conventions of your operating system.
Find File
Displays the standard file selection dialog box for your platform.
Use Existing File
Allows Oracle to reuse an existing file.
New File
Instructs Oracle to create the specified file.
Group
Scrolling list of existing redo log groups.
To specify the new file's group, select the group number from the Group scrolling list.
The following figure illustrates the Drop Logfile Member alert box.
 Figure 6 - 10. Drop Logfile Member Alert Box
The following figure illustrates the Rename Logfile Member dialog box.
 Figure 6 - 11. Rename Logfile Member Dialog Box
The Rename Logfile Member menu command only renames the log file in the control file. It does not actually rename the file in your operating system. You must rename the file manually.
Additional Information: For information about renaming files on your system, see your operating system-specific Oracle documentation.
To force a checkpoint, select Force Checkpoint from the Redo menu. During a checkpoint, all modified database buffers are written to the appropriate datafiles.
|
Prev Next |
Copyright © 1996 Oracle Corporation. All Rights Reserved. |
Library |
Product |
Contents |
Index |