Last Updated on Wednesday, July 25, 2001 at 01:18:54. by Author: Patrick Decowski
Magnet, General Information/Help
(Expert)(Checklist)
Contents
This is a very quick rundown on what to do to ramp down the magnet. For more detailed
instructions, such as turning the magnet on, have a look at Magnet
Ramp Up and Magnet Ramp Down.
Ramp down (before beam injection):
- Set 'New Setpoint' to 0 (zero), by left clicking on the 'New Setpoint' cell, typing 0
(zero) and hitting 'Return'.
- Enable the ramp down by left clicking on 'DoIt', watching the cell change color
to yellow on red and then pressing the middle mouse button. The cell should turn to
white on black.
- The magnet should start ramping down.
- Set the state to 'StBy' when 'Amps M' shows 0.
The Phobos Magnet System consists of the magnet inside the experimental interaction
region and the magnet power supply and cooling system in the utility building (1010A). The
magnet monitoring happens in two different places: the magnet power supply is monitored
through RHIC controls, the magnetic field and the magnet cooling water temperature is read
out through a DVM in the electronics room (above cabinet #2). The magnet ramp up and ramp
down happens through a special program on the RHIC X-term. The nominal magnet state is
'StBy'/'On' when there are full time shifts and 'Off' when there are no
shifts.
You control the setting of the magnet from a PET page. This page is accessible
from the RHIC X-terminal ('acnxtek79'). In order to access the terminal, make sure that
you are logged in as 'phobos' [FIXME: pointer to non-existing page]. You can startup the
PET page for the magnet by right-clicking somewhere in the root window ('the
background' in the X-terminal), holding the right mouse button and selecting 'Magnet(pet)'
page in the 'Phobos Controls Console' drop-down menu. You should see something similar to
the following picture.
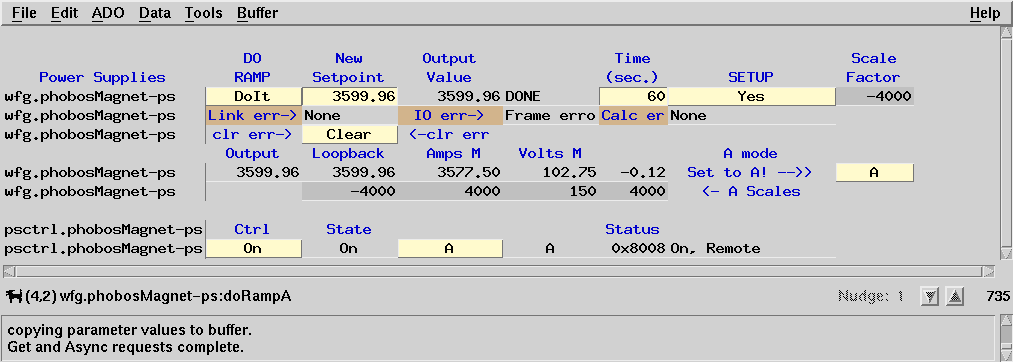
PET pages in general have a few 'quirks' to them. One of them is that in order to
select an item, you first left-click (e.g. use the left most button on the mouse) on the
cell with the mouse, type the value or select the value from a pull-down menu and then
confirm the value by middle-clicking on the same cell. The last item is especially
important for the fields labeled 'Ctrl' and 'DO RAMP'. No action will be taken by the
system until you middle-click on the cell.
Blue text in the picture are labels, text on yellow background are values that can be
changed, text on light-gray background are values read back by the system that can change,
values on dark-Grey background are readback values that will not change.
If you cannot read the whole string under 'Status' (it is sometimes cutoff), click in
the cell and press the '^=' ('Ctrl' and '=' keys simultaneously) to expand the cell
Keep in mind that many of the values from the PET page are duplicated on the Labview
screen of one of the slow-controls computers.
No. The most important thing is that the magnet is 'Off'. The 'Fault' and 'Component
Fault' error messages show up because the 'Air Flow' interlock fires (because the magnet
is off). This message is confusing, but nothing to worry about.
No, don't worry the system is not at 3000V (the maximum voltage that the PS can deliver
is ~115V). Make sure that the 'Mode' on the line 'wfg.phobosMagnet-ps' is set to 'A' and
not 'B'. If you ever read back a 'Volts M' of 3000V, change the 'Mode' back from 'B' to
'A'. The voltage readout unfortunately shares the same readback channel with some
other (engineering) readout. The RHIC engineers sometimes set the 'Mode' to 'B' and
forget to set it back to 'A' afterwards.
If you have problems at any stage, please have a look at Troubleshooting.
If the magnet state is 'Off':
- Sweep the area, making sure that all magnetic materials that do not belong in the area
(tools, screws etc.) are put outside the 5-Gauss line (the red line on the floor). All
people in the vicinity of the magnet should be notified of the intent to energize the
magnet.
- The Operations Manager should have been notified that the magnet is about to be
energized. The Shift Leader should open the 'Phobos Magnet Key'-box on the left hand side
of the door in the electronics room. Take the key out.
- The 'Phobos Magnet Key' should be inserted in the side of the Power Supply.
- Make sure 'Ctrl' on the PET page is in the 'Off' position.
- Set 'Ctrl' to 'StBy' (with a capital 'B'). 'State' should indicate 'Stby', 'Status'
should say 'Stby, Remote' after this. If these values don't show up, go back to 'Off' and
try again. You sometimes have to toggle back and forth a few times to clear the errors. If
it doesn't do anything, make sure that the magnet is not in 'Local' control, go to the PS
and switch the switch on the left hand side from 'Local' to 'Remote' if it is.
- Wait 20-30s. Go to the Power Supply in the Utility building and
verify that the voltage on the 'Output Regulator Monitor' is about -1.5V (negative 1.5V).
If it is a positive voltage DO NOT turn the magnet on, but call the CAS watch and tell
them to come out. Failure to act on this can result in having the magnet 'take off' in an
uncontrolled way and potentially damaging the experiment.
- Continue with 1. under 'If the magnet state is 'StBy' below,
If the magnet state is 'StBy':
- If RHIC is operational, notify MCR at x4662 that you are about to turn on the Phobos
Magnet.
- Notify Cryo Main Control at x3837 that you are about to turn on the Phobos Magnet.
The magnet lowers the line voltage on rampup and cryo sees their UPSes firing.
- Reinitialize 'Time' (the ramp-time) to 180s, even if it indicates 180s (the backend
sometimes looses the setting, while the frontend indicates 180s).
- Set 'New Setpoint' to 0 (zero), even when it already shows 0.
- Select 'Ctrl' and set to 'On'. 'State' should indicate 'On'. 'Status' should be 'On,
Remote'. If this isn't the case, go back to 'Stby', possibly to 'Off'.
- Enable 'DoIt' by first left-clicking on it and then middle-clicking after it changed its
color to yellow text on red background
- Wait 20-30s. Go to the Power Supply in the Utility building and
verify that the voltage on the 'Output Regulator Monitor' is about -1.5V (negative 1.5V).
If it is a positive voltage DO NOT turn the magnet on, but call the CAS watch and tell
them to come out. Failure to act on this can result in having the magnet 'take off' in an
uncontrolled way and potentially damaging the experiment.
- Set 'New Setpoint' to 3600
- Enable 'DoIt'
- At this point you should see the 'Output Value' , 'Loopback', 'Amps M' and 'Volts M'
values increase. Max field will be reached when the 'Output Value' is 3600A. If the
'Loopback', 'Amps M' and 'Volts M' values do not increase (but 'Output Value' does
increase), put a 'New Setpoint' value of 0 and hit 'DoIt'. Do a
"File->Reload". Then go back to step 11 when the 'Setpoint' value reaches 0.
If the 'Loopback', 'Amps M' and 'Volts M' still don't track with the 'Output Value', set
the 'New Setpoint' to 0, hit 'DoIt', then set 'Ctrl' to 'Off'. The DA/AD converter inside
the Power Supply sometimes gets into a funny state and the power needs to be cycled on it.
Take out the 'Phobos Magnet Key' and use the smaller key on the ring to cycle the power on
the DA/AD. You will find the key-switch on the lower right-hand side on the front face of
the Power Supply. When done, re-insert the key into the Power Supply (on the side) and go
back to step 5.
Trouble Shooting... Trouble Shooting... Trouble Shooting...
Trouble Shooting... Trouble Shooting... Trouble Shooting...
- Select "File->Reload", to make sure that the page is reloaded.
- Re-initialize the 'Time' to 180s, even if it already shows that value (it sometimes
'forgets').
- Set 'New Setpoint' to 0 (zero)
- Enable 'DoIt' by first left-clicking on it and then middle-clicking after it changed its
color to yellow text on red background. At this point the 'Amps M' and 'Volts M' values
should decrease and be at 0 after about 180s.
- Select 'Ctrl' and set to 'StBy'
- Select 'Ctrl' and set to 'Off'. The 'Status' display will show 'Off, Error, Remote'.
Don't worry about the 'Error' in the status. This occurs when the air-fans turn off inside
the PS, then the air-flow meters interlock (since there is no more air flow) and raise the
error.
- If the shut-down is for longer OR if there will be work done in the near vicinity of the
magnet you HAVE to take-out the interlock key. It it the key labeled 'Phobos Magnet Key'
on the side of the Power Supply. Take this key out and place it back in the 'Phobos Magnet
Key Switch Box' in the electronics room.
- Notify the Operations Manager of the status of the magnet.
- If you seem to not be able to set a value using the PET page, try reloading the page, by
clicking on 'Reload' under the 'File' menu item.
- If you see the message '...Operation not permitted at this time', reload the page, set
'Setup' to 'Yes', 'Time' to '180', 'New Setpoint' to the value you want to set it to and
enable 'DoIt'. Do all of this, even if you think that you will not change any values. It
seems that the PET page sometimes looses track of its values and that this makes sure that
it knows about its values again.
- If, when ramping up, you can go from 'Off' to 'StBy', but can't get the PS to switch to
'On', go to the PS and check that there are two keys on the back side of the power supply.
- If the magnet does not want to switch from 'Off' to 'StBy', check if
'StatusString' says 'Local'. If it does, go to the PS and switch the 'Control
Switch' from 'Local' to 'Remote'.
- PET pages in general have a few 'quirks' to them. One of them is that in order to select
an item, you first left-click (e.g. use the left most button on the mouse) on the cell
with the mouse, type the value or select the value from a pull-down menu and then confirm
the value by middle-clicking on the same cell. The last item is especially important for
the fields labeled 'Ctrl' and 'DO RAMP'. No action will be taken by the system until you
middle-click on the cell.
- If all else fails, beep the CAS watch on beeper# 4205 or call MCR and ask for the CAS
watch.
1. Go to the RHIC X-term and find the 'Magnets' PET-page. click on it, so that it pops
to the front. You will see something like this:
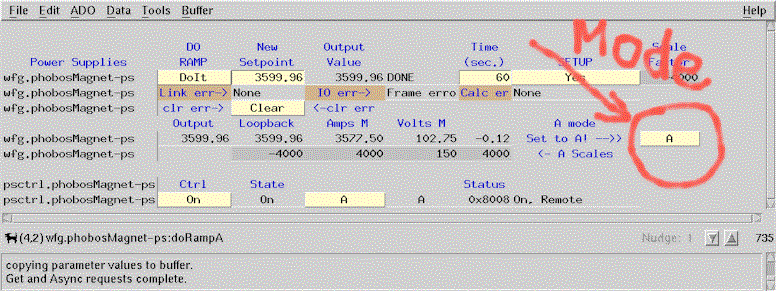
Check that the 'Mode' (indicated by the gigantic, red oval above) is set to 'A'. If it
is set to 'B', you will need to find the mouse, press and hold the left button on top of
the 'Mode' cell, so that a drop down menu with 'A' and 'B' appears. While still holding
the left mouse button, you select 'A' and release the button. The cell will now change
color. It will show a yellow 'A' on a red background. Again, using the mouse, you go to
the cell and click the middle button of the mouse while over it. This should change the
color back to a black 'A' on a light yellow background.
2. Go to the 'MAGMON' computer. You should see the following arrow in the top of the
'MobitorMagnet.vi' window, just below the menu (the line with 'File', 'Edit' etc)

if you see this arrow:

then the VI (virtual instrument - the 'graphical script' of labview) is not
running and you will need to click on it to activate it. If the VI is not running at
all (you don't see any window with 'MobitorMagnet.vi'), you will need to start it by
double clicking on the 'Magnet Monitoring' Icon on the 'Desktop' of the 'MAGMON'
computer.
3. Look at the 'StatusStringM' field on the VI. If it says 'Off', then you can safely
ignore any Error messages such as 'Fault' etc. The magnet should not be in the 'On' state
until further notice.
4. Look at the 'Measured I' and 'Measured V' fields, they should show fluctuating
values. If the magnet is off, then the values fluctuate around 0, otherwise they fluctuate
around the magnet set point. If these fields show 0 exactly, then the magnet monitor lost
contact with the CDEV server (such as when the server was reset). You will need to exit
labview and restart the magnet monitoring by clicking on the 'Magnet Monitoring' Icon on
the 'Desktop' of the 'MAGMON' computer.