Last Updated
on Wednesday, January 22, 2003at
21:53:24.
by
Author: Andrei Sukhanov
DAQ, General Information/Help
(Expert)
Contents
- Status of this Document
- Run Control GUI -
Introduction
- Basic Operation : Launching the GUI
- Basic Operation : Starting a Run
- Basic Operation : What to check for while Running
- Basic Operation : Stopping a Run
- Basic Operation : Restarting an unresponsive GUI
- Run
DAQ in command-line mode
- Known Problems/Errors in
EventBuilding
- Advanced Operation : How to restart parameter
monitoring service
- Advanced Operation : How to sink data files to HPSS
- Expert Operation : How to backup tapes to DLT tape
- Expert Operation : Recovering from FastBus crash due to power dip
- Expert Operation : Recovering from phobosx/vmesparc
crash
- Link to GUI QuickList
- How to contact author
Status of this Document
If you are
looking for the older documentation for running DAQ using terminal based
commands (rc_start and friends) please go to this older page.
This page
describes the procedure for operating the PHOBOS DAQ system using a GUI
interface commissioned for the 2001 run. Please read this document from start
to finish, if you are unfamiliar with the new interface.
A brief
version of this documentation, containing step-wise instructions is avaliable,
and has been pasted next to the DAQ xterm on the console.
Run Control GUI - Introduction
Since a
picture is worth a thousand words, here's an annotated screendump showing
different parts of the GUI. The big red labels describe the approximate
functions of different sections of the GUI.
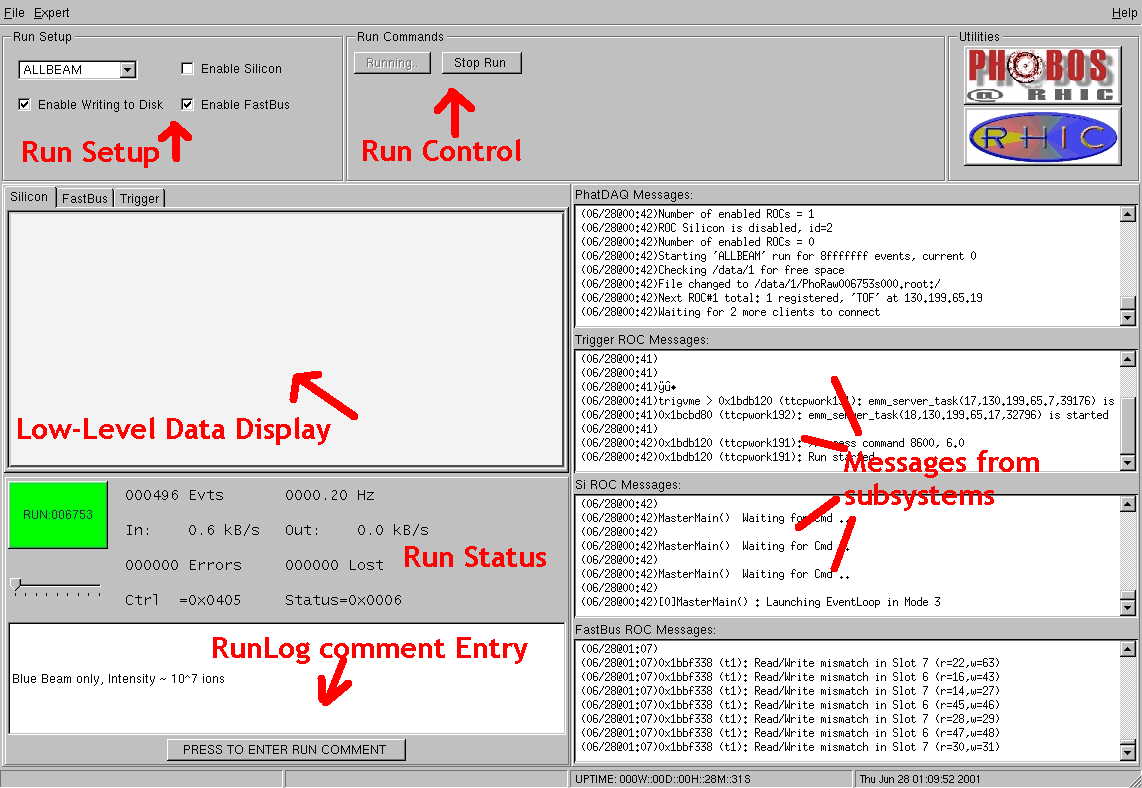
Most control
operations are carried out from the top left 2 panels, for example:
- Setting up a Run type
- Starting / Stopping Runs
In addition,
the bottom left panel is used for entering log comments pertaining to a run in
progress. All the other panels are 'view - only' and provide feedback about the
current running conditions to the user.
Launching the GUI
- Step 1 : Login to phobosun.phobos.bnl.gov computer in
the center of console with USER='runctrl', PASSWD is available in Counting
House Passwd List (in desk drawer on console)
RESULT : OK => Proceed to Step 2
RESULT : NOT OK => Can't find passwd ? Its the same as that for phobos (old passwd)
CONFUSED ? => If you are already logged in and see a desktop in front of you, you need to make sure that you are logged in as 'runctrl'. Try opening a terminal (the terminal icon is on the left-center of the toolbar) and type 'whoami' to find out your loginid. If it's not runctrl, hit 'exit' on the toolbar and login again. - Step 2 : Locate an icon titled
'PhatDAQRunCtrl' in the center of your desktop.
RESULT : OK => Double click on the icon, hit ok on the options dialog that pops up, and proceed to Step 3
RESULT : NOT OK => You can still launch the command from the command line. Open a terminal, and type ./PhatDAQRunCtrl
CONFUSED ? => If you are unable to locate an executable to run or you encounter errors in the startup, call DAQ expert - Step 3: You should see a window
entitled 'Run' popup which looks like so, and after a few messages the GUI
main window should be up on your screen :
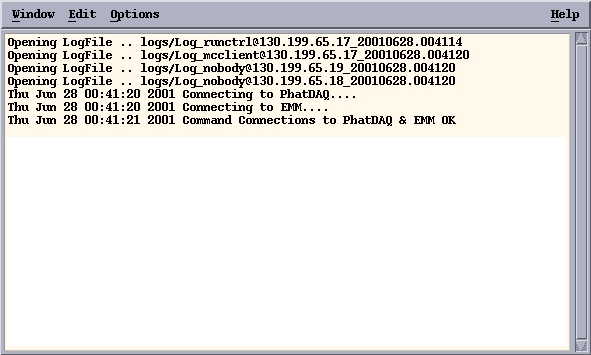
RESULT : OK => As soon as the main GUI window pops up, proceed immediately to Step 4, you have only a limited time to accomplish Step 4!
RESULT : NOT OK => If the 'Run' window prints messages like 'Connecting to PhatDAQ ...' or 'Connecting to EMM ...' continuously without proceeding further, then there is likely a problem with vmesparc, the computer on which DAQ programs run. You must call DAQ expert, and may need to reboot vmesparc as detailed in section below.
CONFUSED ? => Dont be! , you have almost gotten the GUI going. - Step 4: You should see a bunch of
messages in all the 'ROC messages' windows informing you that the
subsystems' programs are being initialised. (ROC=ReadOutController).
You have 2 options :
It is now necessary to initialise the Silicon subsystem by downloading parameters from the database (if database is unavailable, the parameters can be gotten from a file, in expert mode). You must do this initialisation irrespective of whether silicon detectors are switched on or off.
When you see a message saying 'Ready to Recieve Initialisation Parameters' in the Silicon ROC, Go to the 'Expert' Pull down menu at the top of the window and select 'Init Silicon' from it. You MUST do this within about a couple of minutes !
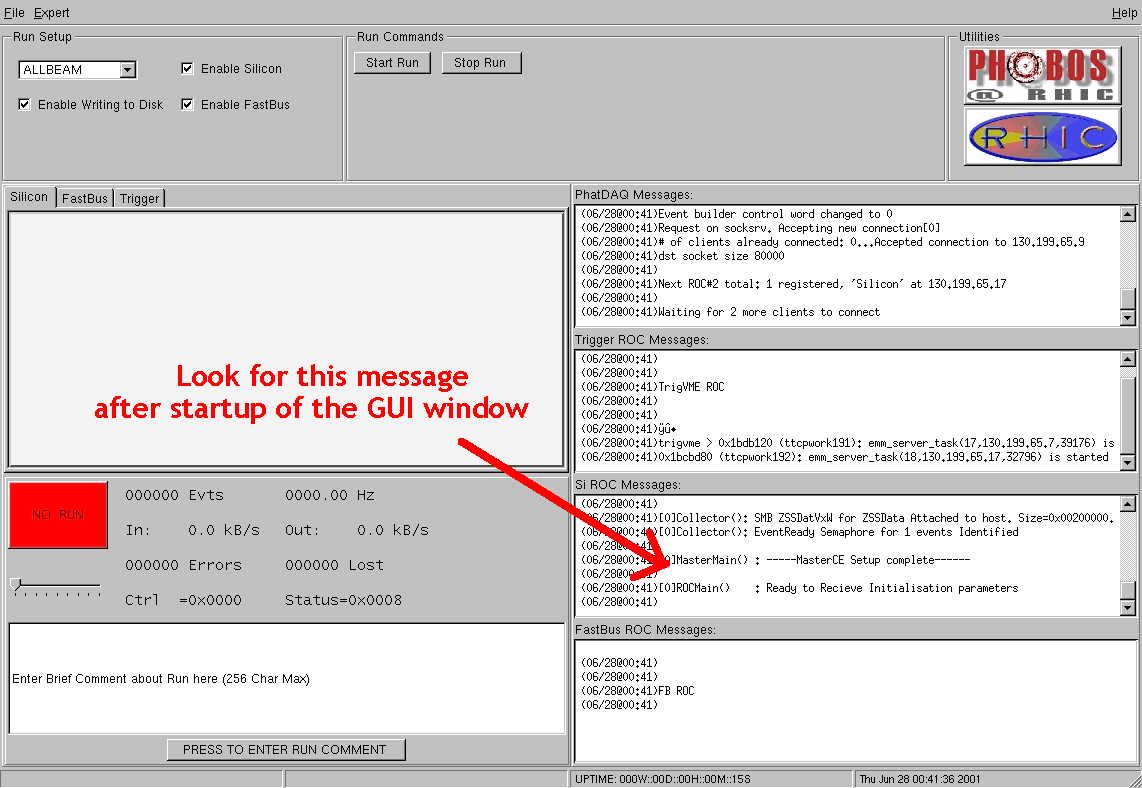
RESULT : OK => You have inited the Silicon, i.e. downloaded the hardware parameters required for operation of Silicon FEC's from Database into the FEC's. You should see the following 'Waiting for command ... ' messages in the Si ROC message window, indicating all is ready for data-taking :
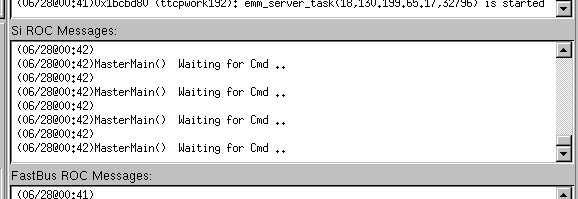
If you are still stuck at the 'Ready to Recieve' message, you probably hit the ExpertMenu->InitSilicon menu item too early, or the command to PhatDAQ was missed. You must issue the ExpertMenu->InitSilicon command ONCE more (but not more than once)
RESULT : NOT OK => If the Silicon ROC (i.e. Mercury programs) wait too long for the Initialisation parameters to be downloaded, it times out and gives up (we are currently working on a feature-fix).
You will see a large number of 00000 .. in the Si ROC Messages window indicating that it has timed out.
The solution is to quit the GUI, using File->QuitPhatDAQ menu option, and start from Step 2 above.
Starting a RUN
Select Runtype from Combo box and choose to Write/Not Write to
Disk
|
Run Type |
Detector Setup |
|
ALLBEAM |
Silicon + Plastic (Normal data taking) |
|
PADDLECOSM |
Plastic Only, NO Silicon (Beam studies with Silicon turned OFF) |
Hit Start
Run.
RESULT :
OK =>
- Beep indicating run has started should be
heard. Messages from ROC windows profess this to be the case.
<pic of properly started run goes here > - Run Status should go green, with current Run
Number (RUN0000 if not writing to disk/db) and status should update every
5 seconds with increasing number of events
RESULT :
NOT OK =>
- Symptom : Start Run button remains depressed,
the Run Status does not go green, and you get a sinking feeling that the
GUI has stopped responding. Possible causes and modes of recovery are
:
- Wait for some time (upto a
couple of minutes) for the GUI to recover. While starting a run, the
GUI needs to send commands to PhatDAQ, the event manager; PhatDAQ needs
to establish communications with all subsystems and write information to
the DB run logbook. All the communications involve setting up handshakes
and we also depend on database responsiveness. If you have finished
mulling over this paragraph and frantically darting around the console,
and the GUI is still not responsive, you can proceed to restarting the
GUI as detailed below.
- You tried to do something
illogical or you did not follow documentation instructions : For example, you are
running without Silicon in data-stream (Silicon ROC has been closed via
Expert->Close connection to Silicon) and you are still trying to take
data with both Silicon and FastBus enabled. Or Silicon ROC was not
properly intialised. In many of these cases, and a few undiscovered ones,
the system could get into an unstable state.
- There has been a genuine
system fault (like database completely unavailable, disks full etc) and
you need to restart the GUI
- In any case, if you encounter a
freeze-up of the GUI, you MUST note in the logbook in as much detail as
possible the conditions under which it happened so we can fix it!
What to check for while running
(Todo more
documentation)
- Check for Green status and increasing event
counter in the GUI along with increasing 'Events Accepted' Scaler on the
scaler display.
- Can enter short Log comments regarding current
run (only RUN status is green with a valid Run Number) in the LogEntry
box.
<pic of logentry goes here > - If running ALLBEAM type with Writing to DISK
enabled, you should hear a beep everytime the sequence switches.
- Continuous scrolling error messages in Silicon
/ FastBus roc are bad, depending on type of message.
<pic of bad messages goes here, plus link to detailed list of serious errors below>
General solution is to STOP the run, and start a new run. If that fails and error messages continue, call expert.
Stopping a Run
(Todo more
documentation)
- In general, STOP run procedure has to go and
clear busy's/set veto's in different subsytem chains and takes TIME (~2-3
seconds). So after hitting STOP run button, you must wait for 2-3
minutes for the RUN status button to go red
indicating everything has been reset properly. - If you are turning on Silicon detectors for
the first time, you MUST quit and restart the GUI and follow the 'Init
Silicon' procedure to ensure that the Silicon detectors are initialised
properly. Otherwise, the data you take is guaranteed to be junk!
< pic of a neatly stopped run goes here>
Restarting an unresponsive GUI
(Todo more
documentation)
Is quite
simple : Locate the parent window in which the GUI was launched (should be
behind the GUI itself, and called 'Run' if you launched it from the icon on the
desktop, else it will be the terminal you typed ./PhatDAQRunControl in). Hit
Ctrl+C in this window, or Use the Window->Close(Alt+F4) menu option to kill
the parent window. This should cause the GUI window to close. You should be
able to restart the GUI as before. All subsystems are reset neatly while
exiting and starting the GUI. If the system was in a really strange state when
you killed the GUI, you may encounter problems while restarting - in which case
you will have to call the expert.
Known Problems/Errors in Event Building
(Todo more
documentation)
Warnings
(that can be ignored)
- PhatDAQ reports 'Broken connection to TOF,
sending handshake to wake it up' : Causes run to be stopped and restarted
automatically. Happens uncomfortably often during high rate conditions.
- PhatDAQ complains 'Error Doubled packets ...'
or 'Error Missing packets ...' : can be ignored if there are only a few
(~10 to 20 at a time, it means those events were lost). If it happens
continuously, stop the run and start a new one.
- TriggerROC complains 'Error : TML1 was blocked
due to missing handshake..' (action is like 2 above)
- SiROC complains 'Waiting for ACK sem from Host
....' .. can be ignored.
Errors
(that should NOT be ignored)
- PhatDAQ complains continuously : 'Error at
ev#XX block YY FEC format error '. This means no events are being built
due to corrupted data received by PhatDAQ. You must stop the run. Try
starting a new one without writing to make sure that errors are not
repeated. Then proceed to stopping and starting a new run with writing
enabled.
Recovering from FastBus tripping off due to power dip
- Step 0 : Exit from the DAQ
gui (you can pause online alarmers too)
- Step 1 : Gate delay generator
at slot 10a of nim rack C (top one) will be in stuck state when the
fastbus crate went down. you need to hit manual trigger button on the
panel to kick-start it.
- Step 2 : leave fastbus crate
off for ~ 15 minutes
- Step 3 : shutdown vmesparc
(preferably in a sane manner, using sync and halt
instructions as root) then power down the Silicon vme crate for few minutes - Step 4 : turn on Silicon VME
crate and wait for it to boot completely. (both vmesparc and
silicon-triggervme processors' consoles on phobosnt machines need to be
watched to make sure that they boot ok).
- Step 5 : after Silicon VME
crate is fully up, turn on fastbus crate and wait for it to boot
completely (watch console messages on phobosnt)
- Step 6 : now try and start
the DAQGui, following the documentation. Try starting
an SIPED run (no need to turn on silicon LV, this is just a daq test).
If you start getting events at high rate (~ 50 Hz) DAQ has been restored. - Step 7 : If DAQGui freezes,
then it means busy signals from DMU-0 and DMU-1 crates are inverted. You
need to :
a) kill DAQGui
b) Follow Steps 3 and 4
c) after 4 is finished fully, hit reset button on fastbus crate to reboot it
d) then follow steps 5 and 6
How to restart parameter monitoring service
If Si Hybrids
reading on PHOBOS portal gets old for 10 min, but DAQ is taking data and
silicon is ON then expect rocdbgateway program crash. Locate the ROCDB window
and press control C there. (If window is missing - open it using ssh
phobos@phobosx)
To start this
program from scratch:
cd $DAQ
rocdbgateway 1 0
Here the first argument enables connection to the database, second argument
enables writing to the file rocdblogMMDD.csv
The program detects if phatdaq is running, in this case it requests the whole
event from the phatdaq, extracts monitoring information from the FEC trailer
blocks and sends it to the datadase.
To change
reporting interval to 60 seconds:
~phobos/DAQ/rocdbgateway 1 0 60
Following
sections taken from old version of document and need to be updated.
How to sink data files to HPSS
All commands
should be executed on phobosx terminal (in HPSS sinking panel).
You should
avoid to occupy the same disk by writing and reading, to change the disk:
rc_change_disk(1);
// change writing disk to /data/1
After that
you can start another data taking run in phatdaq and start sinking data.
To sink data, you use the write_and_recon command. This command will transfer
the file to HPSS and afterwards spawn the automated data validation processing
on the CRS. To use this, use:
~phobsink/bin/write_and_recon [<filename> ...]
You can
ignore messages like "Pseudo-terminal ..", "TPhDatabase
..." "Warning file iostream.h ..."
Any number of
filenames can be specified. Files will be deleted from the local disk after
being transferred. For example:
~phobsink/bin/write_and_recon /data/5/PhoRaw002345*.root
will copy all
the sequences for run 2345 to HPSS and spawn data validation on them.
If for some
reason you do not wish to start the data validation processing, you can use
write_to_HPSS. With write_to_HPSS, you can either write every file in a
particular directory, or a specific file, by entering (in the phobosx terminal
window) the command:
~phobsink/bin/write_to_HPSS <filename or directory name>
So for
example:
~phobsink/bin/write_to_HPSS /data/0
will write
every data file in /data/0 to HPSS. If you wanted to sink only one file, say
for run 2345, you would use:
~phobsink/bin/write_to_HPSS /data/0/PhoRaw002345s000.root
By default,
write_to_HPSS will delete the file from the local directory after copying it to
HPSS and verifying that the sizes match. If you do not want it to do this,
specify the --nodelete flag:
~/phobsink/bin/write_to_HPSS --nodelete /data/0/PhoRaw002345s000.root
If during
sinking a file reports that it exists on HPSS but with a different size, then
write and email to George Heintlzeman with the run number and sequence number
of the file sent, and note it in the run logbook.
If there is a
data file of zero length, do not sink it, but call Andrei to explain what to
do.
If asks you
for passwords, then enter "phobos password on phobosx" until done.
Before start new job's sinking , do the following to stop having to eneter the
password each time
eval
`ssh -agent` [ENTER]
ssh -add [ENTER]
(will ask for passphrase, i.e. phobos on phobosx one) enter it,
Then in that window should sink without asking for password.
How to backup tapes to DLT tape
- mt -f /dev/rmt/1 rewind
- gtar cvf /dev/rmt/1n /data/0
- gtar cvf /dev/rmt/1n /data/1
- ...
The tape
capacity is between 35GB (uncompressed) and 70GB(compressed). The full disk is
about 15 GB.
To list all files on the tape:
- gtar tvf /dev/rmt/1n
- gtar tvf /dev/rmt/1n
- ...
Please send all comments and suggestions regarding this page to Andrei/Pradeep. |