5
Configuring Network Clients
Net8 provides you with a new tool called the Oracle Net8 Assistant to help you configure and manage your network clients easily and efficiently.
This chapter includes the following sections:
5.1 Configuring Network Clients Using Oracle Net8 Assistant
Configuration of network clients involves adding or editing parameters in one of the following:
- Profile
- Local Naming Configuration File
5.1.1 Profile
Net8 allows you to configure features on a client by adding or editing parameters in a profile. A profile is stored in a configuration file located on the client called SQLNET.ORA.
5.1.2 Local Naming Configuration File
If you decide to use local naming as one of your methods to resolve service names, you will need to configure a local naming configuration file. Local naming functions much like an address book, allowing you to enter service names and their related network addresses, as well as optional configuration information, for use whenever a client wishes to connect to a database service. The local naming file is called TNSNAMES.ORA.
5.1.3 Oracle Net8 Assistant
The Oracle Net8 Assistant is a new configuration and management tool allowing you to setup and administer network features and components through a graphical user interface. You can use the Oracle Net8 Assistant to modify your profile and to configure service names on the client.
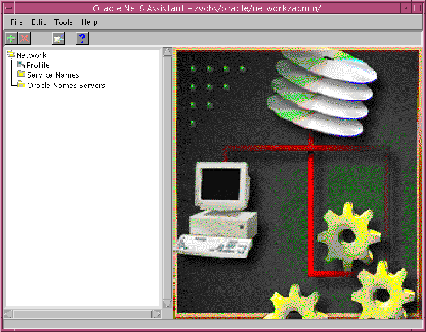
Figure 5-1 depicts what you see when you first start the Oracle Net8 Assistant. Note that "Network" is the first folder displayed in the tree structure. It includes the components of your Net8 network as viewed from your node.
Figure 5-1 Oracle Net8 Assistant Tree Directory
5.1.4 The Oracle Net8 Assistant and Java
The Oracle Net8 Assistant is implemented in Java and as such is available on any platform where Net8 and Java version 1.1.1 are available. The Oracle Net8 Assistant replaces client configuration functionality previously provided by Oracle Network Manager which was supported on Windows platforms only.
On-line Help is available for the Oracle Net8 Assistant. If you have any questions regarding how to use the Oracle Net8 Assistant, or if you are unclear about what you can do within a certain component, click on any HELP button.
5.1.5 Starting the Oracle Net8 Assistant
To start the Oracle Net8 Assistant, select it from the Programs menu on your desktop; or for UNIX platforms, run the shell script "netasst.sh" located in your "oracle/admin/bin" subdirectory.
5.2 Configuring a Profile Using the Oracle Net8 Assistant
A profile on the client configures functionality and defines how Net8 works to establish and maintain connections with services on the network. Use the Oracle Net8 Assistant to modify a profile and:
- configure naming methods
- enable tracing and logging features
- route connections through specific processes
- configure security features
The Oracle Net8 Assistant saves your preferences to a profile. A profile is stored and implemented through a configuration file called SQLNET.ORA. For a complete list of all available parameters that may be configured in a profile, refer to "Profile Parameters (SQLNET.ORA)" in Appendix B, "Configuration Parameters".
5.2.1 Configuring Naming Methods
Net8 will attempt to resolve a service name by using one or more naming methods. in the order in which they are specified in a profile until it establishes a connection. For more information on naming methods, refer to Section 3.3.1, "Naming Methods".
Note that once you have selected naming methods on the client, additional configuration may be necessary for Oracle Names and external naming. For more information on configuring Oracle Names on the client, refer to Section 5.5, "Configuring Clients to Use Oracle Names".
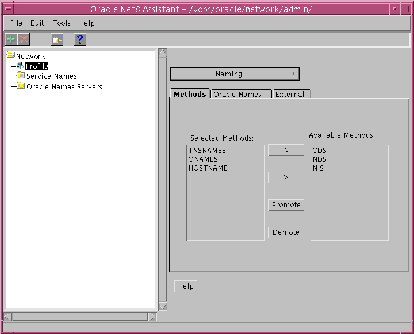
Figure 5-2 depicts the graphical user interface used in the Oracle Net8 Assistant to choose which naming methods a client will use as well as the order in which they will be tried.
Figure 5-2 Oracle Net8 Assistant Profile/Naming
5.2.1.1 Default Naming Methods
By default, Net8 will attempt to resolve a service name to a network address using the following three naming methods in the order that they appear:
- Local Naming (specified in the Oracle Net8 Assistant as TNSNAMES)
- Centralized Naming Using Oracle Names (specified in the Oracle Net8 Assistant as ONAMES)
- Host Naming (specified in the Oracle Net8 Assistant as HOSTNAME)
5.2.1.1.1 Connection Scenario Using Default Naming Methods
If you decide to keep the naming methods that have been set by default, a typical connection scenario would proceed as follows.
A user may attempt to establish a connection to a database service called "hqserv" in the default domain "acme.com" by providing the following information:
User Name: scottPassword: XXXXXService Name: hqserv
Net8 would proceed as follows:
- Verify if a local naming configuration file exists.
- If the file exists, Net8 will check to see if "hqserv" is defined as a service name. If "hqserv" exists, it will attempt to make the connection using the connect descriptor provided.
- If the file does not exist, Net8 will proceed to use the next naming method.
- Verify if Oracle Names is in use by attempting to find a Names Server. Net8 will find a Names Server if either a Preferred Names Server is defined in a client profile, or if a Names Server List exists.
- If Net8 finds a Names Server, it will query the Names Server to resolve the service name.
- If Net8 does not find a Names Server or if a Names Server responds indicating that no such name exists, it will proceed to use the next naming method.
- Use the host name adapter to resolve "hqserv". If "hqserv" matches the host name or host name alias of the machine on a network, it will connect to a database on that machine with a global database name of "hqserv".
5.2.1.2 Adding or Editing Naming Methods
If you wish to change the use or order of a naming method using the Oracle Net8 Assistant, proceed as follows:
- From the Oracle Net8 Assistant, click on the Profile icon in the directory tree.
- Select "Naming" in the pull down menu.
- Click on the "Methods" tab.
- Specify the use of a naming method by moving it from the list of available naming methods to the list of selected methods.
- Specify the order with which the naming methods will be used by promoting or demoting them in the list of selected methods.
- Save your configuration.
5.2.2 Configuring Tracing Features
Use the Oracle Net8 Assistant to enable tracing on a client. Tracing is a feature that enables you to obtain information about the internal operations of Net8 which may be useful in troubleshooting problems in your networking environment. This feature is disabled by default.
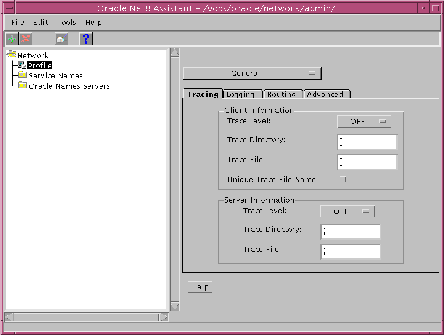
Figure 5-3 depicts the graphical user interface used in the Oracle Net8 Assistant to configure tracing features in a profile.
Figure 5-3 Oracle Net8 Assistant Profile/Tracing
To configure tracing on the client using the Oracle Net8 Assistant, proceed as follows:
- From the Oracle Net8 Assistant, click on the Profile icon in the directory tree.
- Select "General" from the pull down menu.
- Click on the "Tracing" tab.
- Select a trace level from the pull down menu located in the Client Information section. You may choose from one of the following values to specify the level of tracing on a client or server:
- OFF - Tracing disabled
- USER - Trace information applicable for users
- ADMIN - Trace information applicable for database administrators
- SUPPORT - Trace information applicable for customer support staff
- Enter any valid directory name in the Trace Directory field in the Client Information section to specify the directory to which trace files will be written on a client or server.
- Enter any valid file name in the Trace File field in the Client Information section to specify the name of the trace file on the client or server.
- Click on the "Unique File Trace Name" checkbox, if you want a unique identifier appended to each new trace file created.
- Save your configuration.
Note::
The Server Information field in the Tracing tab panel is appropriate only for tracing networking operations on a server.
|
5.2.3 Configuring Logging Features
You may also use the Oracle Net8 Assistant to configure logging features on a client. Logging refers to the process by which network components note and append error-specific information to a log file.
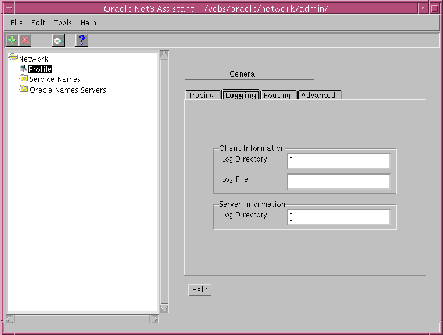
Figure 5-4 depicts the graphical user interface used in the Oracle Net8 Assistant to configure logging features in a profile.
Figure 5-4 Oracle Net8 Assistant Profile/Logging
To configure logging on the client using the Oracle Net8 Assistant, proceed as follows:
- From the Oracle Net8 Assistant, click on the Profile icon in the tree directory.
- Select "General" from the pull down menu.
- Click on the "Logging" tab.
- Enter any valid directory name in the Log Directory field in the Client Information section to specify the directory to which log files will be written on either the client or the server.
- Enter any valid file name in the Log File field in the Client Information section to specify the name of the log file on the client.
- Save your configuration
Note:
The Server Information field in the Log tab panel is appropriate only for logging networking operations on a server.
|
5.2.4 Routing Connection Requests
From the General tab panel, you may specify the way that connection requests are routed from the client to a specific process, for example, always use a dedicated server process.
Figure 5-5 depicts the graphical user interface used in the Oracle Net8 Assistant to configure routing in a profile.
Figure 5-5 Oracle Net8 Assistant Profile/Routing
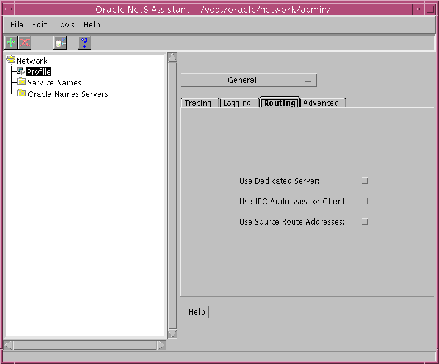
To route connection requests from the client a specific way, using the Oracle Net8 Assistant, proceed as follows:
- From the Oracle Net8 Assistant, click on the Profile icon in the tree directory.
- Select "General" from the pull down menu.
- Click on the "Routing" tab.
- Click on the "Use Dedicated Server" checkbox to cause all connection requests for this client to be made using a dedicated server.
- Click on the "Use IPC Addresses for Client" checkbox to force the client to always attempt a local connection first using interprocess communication (IPC) addresses.
- Click on the "Use Source Route Addresses" checkbox to route connections through Oracle Connection Manager first. For more information on how to route connection requests through Oracle Connection Manager, refer to Section 5.2.4, "Routing Connection Requests".
5.2.5 Configuring Advanced Net8 Functionality
Use the Oracle Net8 Assistant to configure the following advanced Net8 functionality:
- TNS Time-Out Value
- Unique Client Identifiers
- Signal Handling
- Out of Band Breaks
Figure 5-6 depicts the graphical user interface used in the Oracle Net8 Assistant to configure advanced Net8 functionality in a profile.
Figure 5-6 Oracle Net8 Assistant Profile/Advanced
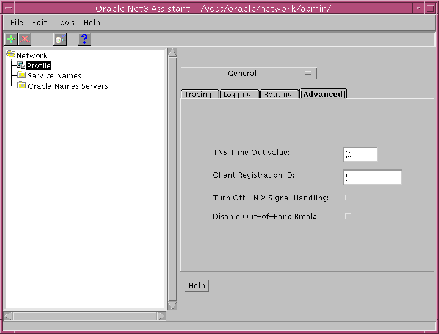
5.2.5.1 TNS Time-Out Value
The TNS Time-out value is a Net8 server function.
5.2.5.2 Registering Unique Client Identifiers
From the "Advanced" tab panel, you may register a unique client identifier with the listener during a connection request. You can do this by entering any alphanumeric string up to 128 characters long in the Client Registration ID field. Net8 disables the unique client registration ID by default.
5.2.5.3 Turning Off Signal Handling
From the "Advanced" tab panel, you may turn signal handling off on UNIX systems. You can do this by clicking on the Turn Off UNIX Signal Handling checkbox. Net8 turns signal handling off by default.
5.2.5.4 Disabling Out of Band Breaks
From the "Advanced" tab panel, you may disable out of band breaks. You can do this by clicking on the Disable Out of Band Breaks checkbox. Net8 enables out of band breaks by default.
5.2.6 Configuring Security Features
To configure a client to use security features made available with either Oracle Security Server or Advanced Networking Option, proceed as follows:
- From the Oracle Net8 Assistant, click on the Profile icon in the tree directory.
- Select either "Oracle Security Server" or "Advanced Networking Options" from the pull down menu.
- Add or edit parameters as applicable.
- Save your configuration.
For more information on Oracle Security Server and Advanced Networking Option parameters, refer to Appendix B, "Configuration Parameters".
5.3 Configuring the Server as a Client
When using database links to initiate connections to other servers, the server needs all of the same configuration information as a client. This includes configuring local naming configuration file and a profile. In most situations, the profile used for the server can also be used for the client.
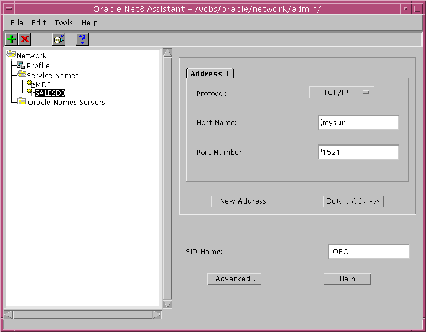
5.4 Configuring Service Names Using the Oracle Net8 Assistant
To add or modify service names, and to specify required network address and database identification information, as well as optional configuration information, associate with service names, use the local service name editing feature of the Oracle Net8 Assistant. When you save your additions or modifications, the Oracle Net8 Assistant will write this information to the local naming configuration file (TNSNAMES.ORA). This information will be used when local naming (TNSNAMES) is specified as a naming method in a profile.
Figure 5-7 depicts the graphical user interface used in the Oracle Net8 Assistant to configure service names.
Figure 5-7 Oracle Net8 Assistant Service Names Component
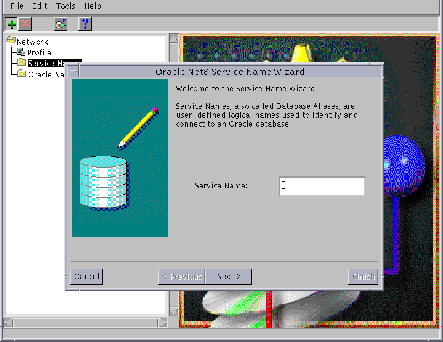
5.4.1 Adding Service Names
To add local service names using the Oracle Net8 Assistant, proceed as follows:
- From the Oracle Net8 Assistant, double-click on the Service Names folder in the directory tree. If local service names exist, they will be displayed in the tree structure.
- Select "Create" from the Edit menu or click on the "+" button to create a new service name. The Service Name Wizard will appear to guide you through the configuration process. Figure 5-8 depicts the graphical user interface used in the Oracle Net8 Assistant Service Name Wizard.
- Be prepared to provide the following for each service name:
- Address Information - which consists of the networking protocol you wish to use to connect and communicate with the database, and any information specific for each protocol. For example, if you were using TCP/IP, you will need the host name of the computer that the database is located on, and the port number of the database listener (this usually defaults to port 1521). For more information on the parameters specific to protocols, refer to Oracle operating system-specific documentation for your platform.
- Database Identification Information - which consists of a protocol independent keyword indicating the System Identifier (SID) of the database instance.
- Save your configuration.
Figure 5-8 Oracle Net8 Service Names Wizard
5.4.2 Modifying Service Names
To modify local service names using the Oracle Net8 Assistant, proceed as follows:
- From the Oracle Net8 Assistant, double-click on the Service Names folder in the directory tree. If local service names exist, they will be displayed in the tree structure.
- Click on any service name object that appears in the Service Names folder to modify parameters for a service name.
- Save you configuration.
5.4.3 Configuring Advanced Service Name Options
You may also configure the following optional information:
5.4.3.1 Global Database Name
The global database name is the name and domain name of the database as given in the database initialization parameter file. If you want to refer to the database by its global database name on the network, then you must specify it with your service name.
5.4.3.2 Session Data Unit (SDU) Size
If you want to optimize the transfer rate of data packets being sent across the network, you can specify the session data unit (SDU) size to change the performance characteristics having to do with the packets sent across the network. For more information on the session data unit, refer to Section 3.4.5, "Optimizing Data Transfer by Adjusting the Session Data Unit (SDU) Size".
5.4.3.3 Source Route Addresses
If you wish to use any of the concentration, network access control, or multi-protocol support features provided by Oracle Connection Manager, you will need to configure your service name for source route addresses. This usually consists of the following:
- configuring a Connection Manager's listening address as your first address, and the server's listening address as your second address.
- specifying that you want to use source routing for these addresses. You can do this from the Advanced Service Names tab panel.
5.5 Configuring Clients to Use Oracle Names
To configure clients to use Oracle Names, you will need to perform the following three tasks:
- Verify that each client is configured to use centralized naming using Oracle Names.
- Verify that each client has discovered Names Servers on the network.
- Start Client Cache (optional).
5.5.1 Configuring the Client to Use Centralized Naming
To configure the client to use Oracle Names as a naming method:
- From the Oracle Net8 Assistant, click on the Profile icon in the directory tree.
- Select "Naming" in the pull down menu.
- Click on the "Methods" tab.
- Verify that "ONAMES" is listed in the field of selected naming methods. If it is not, select it from the list of available methods and move it to the field of selected methods.
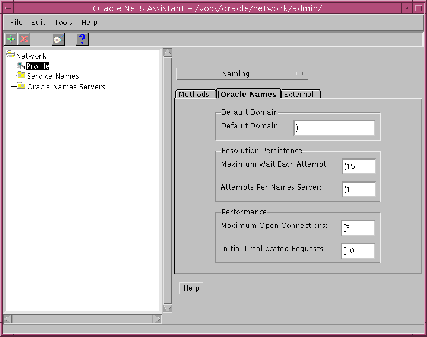
- To specify additional preferences for how a client will use Oracle Names, click on the "Oracle Names" tab. Figure 5-9 depicts the Oracle Net8 Assistant Oracle Names tab panel. Features that you may configure from this panel include:
- Default Domain - indicates the domain name space from which the client will most often request a Names Server. When set, this name will automatically be appended to any unqualified name in an Oracle Names request. Net8 sets the default domain to NULL by default.
Note:
In prior SQL*Net releases, the default domain was set by default to ".world". The ".world" domain was therefore appended to all service names. If you wish to retain this feature with Net8, you will need to change the default setting to the ".world" domain.
|
- Maximum Wait Each Attempt - specifies how long a client will wait for a response from a Names Server before reiterating the request to another Names Server. Net8 will wait for 15 seconds (operating system dependent) by default.
- Attempts Per Names Server - specifies the number of times a client will attempt to iterate through the list of Names Servers before allowing the operation to fail. Net8 will attempt to iterate through the list of Names Servers once before allowing the operation to fail by default.
- Maximum Open Connections - specifies how many connections an Oracle Names client may have open at one time. Net8 allows a client to have 10 connections open at any one time by default. This default value should be sufficient for almost all situations.
- Initial Preallocated Requests - allows you to pre-allocate an initial number of messages in a client's message pool. These messages may be used for future requests to Names Servers. Net8 allocates 10 messages in the pool by default. This default value should be sufficient for almost all situations.
Figure 5-9 Oracle Net8 Assistant Profile/Naming Oracle Names Tab Panel
5.5.2 Discovering Names Servers on the Network
To discover Names Servers on the network, using the Oracle Net8 Assistant:
- From the Oracle Net8 Assistant, click on the Oracle Names Servers folder.
- From the Tools menu, select "Discover Oracle Names Servers". This will automatically find and order Names Servers on the network according to how quickly they respond. It will then generate a Names Server list with these results.
- If the discovery process fails to find a Names Server on the network, a dialog box will appear requesting you to enter the address of any Names Server that you know.
5.5.2.1 How the Discovery Process Works
-
Oracle Names attempts to discover Names Servers on the network by referencing the following:
- Preferred Names Server - which is a Names Servers whose address has been defined in a profile. If your network includes clients that were configured for a previous release of SQL*Net and Oracle Names, your profile may already contain this parameter.
Note::
Addresses for Preferred Names Servers in your profile will override the Names Server list of the discovery process. If you have already generated a Names Server list, you should comment out or delete the addresses of any Preferred Names Server in your profile.
|
- Names Server List - which is created if a REORDER_NS command was executed previously or if the file was copied from another source.
- Well-Known Names Server - A "well known" Names Server is one that listens on a default well-known address. Names Servers started on TCP/IP will listen on port 1575 by default. They become well known if you create an alias through an IP address translation mechanism such as DNS, NIS or a centrally maintained TCP/IP hosts file, from the hostname to one of the following names: oranamesrvr0, oranamesrvr1, oranamesrvr2, oranamesrvr3, oranamesrvr4.
If a Names Server is found, the Oracle Names Control Utility will then send a query for all the Names Servers in the local region. It will then send a 'ping' to each of these servers to determine the time it takes for each Names Server to respond. It will then will sort a list of the Names Servers in increasing order of response time, and create or replace any existing Names Server List file with the sorted list of names and addresses.
5.5.3 Client Cache Daemon Process
Oracle Names version 8 provides a client cache daemon process that allows a client on most platforms to store information retrieved from a Names Server in its local cache. Whenever a client makes a subsequent connection request, it first checks its local cache for the address information. If the information is located, and if it has not exceeded a specified time to live (TTL), the client will use the information to connect to a server, saving the time it would normally take to re-query the Names Server.
The local client-side cache is particularly advantageous if at any time a Names Server is not available. In this case, the local client-side cache has a current list of recently accessed services.
5.5.3.1 Starting the Client Cache Daemon Process
To start the client cache, issue a START_CLIENT_CACHE command from the Oracle Names Control Utility.
For more information about the START_CLIENT_CACHE command, refer to "Oracle Names Control Utility (NAMESCTL)" in Appendix A, "Control Utility Reference".
Note::
Not all platforms support the client-side cache. For more information, refer to your Oracle platform-specific documentation
|