| Oracle Network Manager Administrator's Guide | Library |
Product |
Contents |
Index |
| Oracle Network Manager Administrator's Guide | Library |
Product |
Contents |
Index |
![]()
![]()
If you are installing Oracle Network Manager from floppy disks, use the following disks (for elements not yet installed):
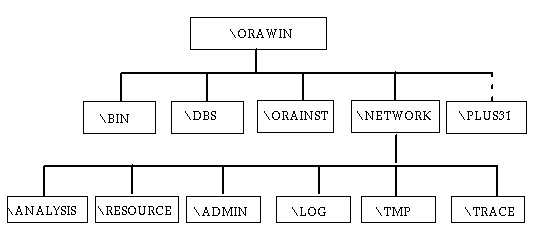
\ORAWIN
Is the default Oracle home directory.
Holds executable programs and batch files for the Oracle database tools and the dynamic link libraries (DLLs) used by the Oracle Network Manager driver.
Holds the files for Toolkit II and message files for products created for the V3 Oracle Installer. It also holds the SQL files required to build the tables to allow Oracle Network Manager to save the network definition to a database.
Holds the Oracle Installer Utilities and other files.
Is created when you install SQL*Net for Windows version 2.
The \NETWORK directory contains the following subdirectories:
\RESOURCE
Contains files used internally by Network Manager.
\ANALYSIS
Contains binary files internal to Network Manager.
If this Windows machine is part of your SQL*Net network, place the .ORA files you create for its client profile using the Network Manager here. This directory also contains a subdirectory containing sample configuration files.
Holds log files placed here by default.
\TMP
Holds the temporary files internal to Oracle Network Manager.
Holds trace files placed here by default.
Depending on the supported products you choose to install, the V3 Oracle Installer will also create the appropriate product subdirectory:
If you install SQL*Plus Version 3.1, for example:
\PLUS31
Holds the executable and other files for SQL*Plus software. Similar subdirectories are created for other Oracle products.
Step 1 Back Up the Disks
To protect your Oracle Network Manager software, make backup copies of all original disks. Use the backup copies for installation. To copy the disks, use the Copy Disk command from the Windows File Manager or use the DOS DISKCOPY command. (See your DOS operating system reference manual for information on the DISKCOPY command.) Label the copies carefully, and store the original disks in a safe place.
Caution: Do not drag the icons or use the DOS COPY command to make backup copies because the disk volume labels will not be copied (the installation process requires proper volume labels).
Note: DOS DISCOPY works for same size disks only; that is, high density to high density or low density to low density.
Step 2 Start Windows
If you are not running Windows, start windows by typing the following:
C:\> WIN
Step 3 Make Sure You Run the Latest Version of the Installer
If you have a previously installed version of the Oracle Installer on your hard disk, check to see that your version is up to date. To be certain that you run the latest version of the Installer, Oracle Corporation suggests you run the Installer included in this package.
Step 4 Run ORAINST from the Install Disk
Insert the Install disk into your floppy disk drive (in this example, A:) Select the Run option from the Program Manager File menu, and type the following:
A:ORAINST
where A is the letter of the drive in which you inserted the Install disk. Click OK.
You can receive help during the installation by choosing Using Oracle Installer.... from the Help menu.
The Installer will copy itself and some other files temporarily to your hard disk. If you have a TEMP variable defined in your AUTOEXEC.BAT file, the files are copied to the specified directory. Otherwise, the Installer creates a directory named T_E_M_P on your startup disk and copies the files to this directory. When the Installer quits, it will erase these files.
Note: If the Installer quits prematurely, due to a power loss on your workstation, for example, you should manually delete the installation files from the directory specified under the environmental variable TEMP or from the T_E_M_P directory.
If this is the first Oracle product you are installing, the Installer will prompt you for the language. Select the language and choose OK.
Enter the name of your company and choose OK.
Step 7 Specify the location of the Oracle home directory
Next, the Installer prompts you to specify the location of your Oracle home directory. Enter the drive and directory, or choose OK to accept the default. If this is the first time you have used the Oracle Installer, your default will be C:\ORAWIN.
If you have previously installed Oracle products, your default Oracle home directory will be your previously specified Oracle home directory. If you wish to use your previously installed products with Oracle Network Manager, choose OK to accept the default location.
Step 8 Insert Product Disk
Insert the Oracle Network Manager disk into drive A: and click the From button. Click on Oracle Network Manager, which appears in the Available Products window. Read the message stating how much disk space Oracle Network Manager requires and how much disk space is free. These numbers, as well as the Oracle Network Manager version number, may differ on your system. If you have enough free disk space to install Oracle Network Manager, click the Install button.
Note: If you chose the From button without an Oracle product disk in the disk drive, choose the Cancel button. Insert the Oracle Network Manager disk and choose the From button again.
Step 9 Install Required Support Files, GUI Common Files, and SQL*Net
The Installer checks your workstation to see if you need to add or update the Required Support Files, the GUI Common Files, and SQL*Net.
If installation or update is needed (to the Required Support Files, for example), the Installer prompts you to insert the Required Support Files disk into the floppy disk drive. Insert the disk and choose OK. After the Required Support Files are installed, the Installer prompts you to remove the Required Support Files disk and to perform the same steps (if necessary) for any other products.
After any such updates, the Installer prompts you to put your Oracle Network Manager disk back into your floppy drive to complete the installation process.
Step 10 Exit
When the Oracle Network Manager installation is complete, the Installer lists the installed products in the Installed Products window. This window only lists products that are designed for the V3 Oracle Installer.
Choose Exit from the File menu to exit the Installer.
Insert your Oracle CD-ROM into your CD-ROM drive and verify that it is mapped to a logical drive letter and that you can access files on the CD-ROM. The installation steps described below assume that the CD-ROM is mapped to the G drive.
Step 2 Start Windows
If you are not running Windows, start windows by typing the following:
C:\> WIN
Step 3 Run ORAINST from the CD-ROM
Select the Run option from the Program Manager File menu, and enter the path name to the ORAINST program for Windows. Consult the Release Notes for the path name to the ORAINST program for windows. For instance, depending on your CD-ROM, you may type the following:
G:\WINDOWS\INSTALL\ORAINST
(Replace G with the letter of the drive in which you inserted the CD-ROM.)
You can receive help during the installation by choosing Using Oracle Installer... from the Help menu.
Enter the name of your company and choose OK.
Step 5 Specify the location of the Oracle home directory
The Installer prompts you to specify the location of your Oracle home directory. Enter the drive and directory, or choose OK to accept the default, which is C:\ORAWIN.
If you have previously installed Oracle products, your default Oracle home directory will be your previously specified Oracle home directory. If you wish to use your previously installed products with Oracle Network Manager, choose OK to accept the default location.
Step 6 Install Oracle Network Manager
Select Oracle Network Manager in the Available Products window. Read the message stating how much disk space Oracle Network Manager requires and how much disk space is free. These numbers, as well as the Oracle Network Manager version number, may differ on your system. If you have enough free disk space to install Oracle Network Manager, click the Install button.
The Installer automatically installs the Required Support Files, the GUI Common Files, and SQL*Net--if you need them installed or updated.
Step 7 Exit
When installation is complete, the Installer lists the installed products in the Installed Products window. (This window only lists products that are designed for the V3 Oracle Installer.) Choose Exit from the File menu to exit the Installer.
Removing a product in this manner deletes all the files associated with that product from your hard disk. Removing a product does not delete that product's tables from the database.
This is also useful to create Windows icons for products that were installed while running Windows under a different operating system. For example, if you install products using Windows running on DOS and you then reboot your workstation and run Windows on OS/2, you can use the Restore Icons command to create the icons for the products you installed.
Step 1
If there is not already a database available, create one following the instructions in Chapter 2 of the Oracle7 Server Administrator's Guide.
Step 2
Set up a database user account for Network Manager, using this command:
GRANT CONNECT, RESOURCE TO NETMAN IDENTIFIED BY NETMAN
Users can save component information to the local or remote database only if the two conditions below are met:
To build tables, use SQL*Plus. Start it as described in the SQL*Plus documentation, and then log on to SQL*Plus with the SYSTEM or equivalent DBA account.
Note: These SQL files will be located in C:\ORAWIN\DBS after installation.
SQL>@ROSBILD.SQL
This command builds tables for use by the Resource Object Store (ROS).
SQL>@NMCBILD.SQL
This command builds tables for use by the Network Manager Objects (NMO) components.
SQL>@ROSDROP.SQL
Warning: Deleting a table will delete all its information.
SQL>@NMCDROP.SQL
Warning: Deleting a table will delete all its information.
SQL>@ROSGRNT.SQL
You will be prompted for the username. Use the same username used when you set up the account (netman).
Note: NMCBILD.SQL creates a non-secure account names/names for use by Oracle Names, which will have read-only access on the tables.
SQL>@NMCGRNT.SQL
You will be prompted for the username.
SQL>@ROSRVKE.SQL
You will be prompted for the username.
SQL>@NMCRVKE.SQL
You will be prompted for the username.
SQL>@ROSUPDT.SQL
SQL>@NMCUPDT.SQL
|
Prev Next |
Copyright © 1996 Oracle Corporation. All Rights Reserved. |
Library |
Product |
Contents |
Index |