Release 8.0
A58246-01
Library |
Product |
Contents |
Index |
| Oracle8 Tuning Release 8.0 A58246-01 |
|
![]()
![]()
This chapter provides an overview of data access methods that can enhance performance, and warns of situations to avoid. You can use hints to force various approaches. Topics in this chapter include:
This section describes:
Indexes improve the performance of queries that select a small percentage of rows from a table. As a general guideline, you should create indexes on tables that are often queried for less than 2% or 4% of the table's rows. This value may be higher in situations where all data can be retrieved from an index, or where the indexed columns can be used for joining to other tables.
This guideline is based on these assumptions:
If these assumptions do not describe the data in your table and the queries that access it, then an index may not be helpful unless your queries typically access at least 25% of the table's rows.
Although cost-based optimization is excellent at avoiding the use of nonselective indexes within query execution, the SQL engine must continue to maintain all indexes defined against a table whether or not they are ever used. Index maintenance presents a significant CPU and I/O resource demand in any I/O intensive application. Put another way, building indexes "just in case" is not a good practice; indexes should not be built until required.
You should drop indexes that are not used. You can detect the indexes that are not referenced in any execution plan by processing all of the application SQL through EXPLAIN PLAN and capturing the resulting plans. Indexes not used in any plan are typically, though not necessarily, nonselective.
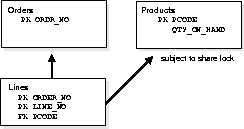
Within an application, indexes sometimes have uses that are not immediately apparent from a survey of statement execution plans. In particular, Oracle8 uses "pins" (nontransactional locks) on foreign key indexes to avoid the need for share locks on the parent table when enforcing foreign key constraints. In many applications this foreign key index never (or rarely) supports a query. In the example shown in Figure 10-1, the need to locate all of the order lines for a given product may never arise. However when no index exists with LINES(PCODE) as its leading portion (as described in "How to Choose Composite Indexes" on page 10-6), then Oracle places a share lock on the Products table each time DML is performed against the Lines table. Such a share lock will be a problem only if the Products table itself is subject to frequent DML. In the example shown we might assume that the column QTY_ON_HAND is volatile, and that table level share locks would cause severe contention problems.
If this contention arises, then to remove it the application must either
Fortunately this issue does not normally affect traditional master/detail relationships where the foreign key is generally used as the leading edge of the primary key, as in the example.
Follow these guidelines for choosing columns to index:
Note: Oracle implicitly creates indexes on the columns of all unique and primary keys that you define with integrity constraints. These indexes are the most selective and the most effective in optimizing performance.
You can determine the selectivity of an index by dividing the number of rows in the table by the number of distinct indexed values. You can obtain these values using the ANALYZE command. Selectivity calculated in this manner should be interpreted as a percentage.
A composite index contains more than one key column. Composite indexes can provide additional advantages over single-column indexes:
A SQL statement can use an access path involving a composite index if the statement contains constructs that use a leading portion of the index. A leading portion of an index is a set of one or more columns that were specified first and consecutively in the list of columns in the CREATE INDEX statement that created the index. Consider this CREATE INDEX statement:
CREATE INDEX comp_ind
    ON tab1(x, y, z);
These combinations of columns are leading portions of the index: X, XY, and XYZ. These combinations of columns are not leading portions of the index: YZ and Z.
Follow these guidelines for choosing columns for composite indexes:
Of course, consider the guidelines associated with the general performance advantages and trade-offs of indexes described in the previous sections. Follow these guidelines for ordering columns in composite indexes:
Even after you create an index, the optimizer cannot use an access path that uses the index simply because the index exists. The optimizer can choose such an access path for a SQL statement only if it contains a construct that makes the access path available.
To be sure that a SQL statement can use an access path that uses an index, be sure the statement contains a construct that makes such an access path available. If you are using the cost-based approach, you should also generate statistics for the index. Once you have made the access path available for the statement, the optimizer may or may not choose to use the access path, based on the availability of other access paths.
If you create new indexes to tune statements, you can also use the EXPLAIN PLAN command to determine whether the optimizer will choose to use these indexes when the application is run. If you create new indexes to tune a statement that is currently parsed, Oracle invalidates the statement. When the statement is next executed, the optimizer automatically chooses a new execution plan that could potentially use the new index. If you create new indexes on a remote database to tune a distributed statement, the optimizer considers these indexes when the statement is next parsed.
Also keep in mind that the means you use to tune one statement may affect the optimizer's choice of execution plans for others. For example, if you create an index to be used by one statement, the optimizer may choose to use that index for other statements in your application as well. For this reason, you should re-examine your application's performance and rerun the SQL trace facility after you have tuned those statements that you initially identified for tuning.
In some cases, you may want to prevent a SQL statement from using an access path that uses an existing index. You may want to do this if you know that the index is not very selective and that a full table scan would be more efficient. If the statement contains a construct that makes such an index access path available, you can force the optimizer to use a full table scan through one of these methods:
The behavior of the optimizer may change in future versions of Oracle, so relying on methods such as the first to choose access paths may not be a good long-range plan. Instead, use hints to suggest specific access paths to the optimizer.
A crude way to determine whether an index is good is to create it, analyze it, and use EXPLAIN PLAN on your query to see if the optimizer uses it. If it does, keep the index unless it is very expensive to maintain. This method, however, is very time and resource expensive. A preferable method is to compare the optimizer cost (in the first row of EXPLAIN PLAN output) of the plans with and without the index.
The parallel query feature utilizes indexes effectively. It does not perform parallel index range scans, but it does perform parallel index lookups for parallel nested loop join execution. If an index is very selective (there are few rows per index entry), then it may be better to use sequential index lookup than parallel table scan.
The fast full index scan is an alternative to a full table scan when there is an index that contains all the columns that are needed for the query. FAST FULL SCAN is faster than a normal full index scan in that it can use multiblock I/O and can be parallelized just like a table scan. Unlike regular index scans, however, no keys can be used, and the rows will not necessarily come back in sorted order. The following query and plan illustrate this feature.
SELECT COUNT(*) FROM t1, t2
WHERE t1.c1 > 50 and t1.c2 = t2.c1;
The plan is as follows:
SELECT STATEMENTSORT AGGREGATEHASH JOINTABLE ACCESS1FULL INDEXT2_C1_IDX FAST FULL SCAN
Since index T2_C1_IDX contains all the columns needed from table T2(C2), the optimizer decides to use a fast full index scan on that index.
FAST FULL SCAN has the following restrictions:
To use this feature you must set the FAST_FULL_SCAN_ENABLED parameter to TRUE.
FAST FULL SCAN has a special index hint, INDEX_FFS, which has the same format and arguments as the regular INDEX hint.
See Also: "INDEX_FFS" on page 8-22
You may wish to re-create an index in order to compact it and clean up fragmented space, or to change the index's storage characteristics. When creating a new index that is a subset of an existing index, or when rebuilding an existing index with new storage characteristics, Oracle uses the existing index instead of the base table to improve performance.
Consider, for example, a table named CUST with columns NAME, CUSTID, PHONE, ADDR, BALANCE, and an index named I_CUST_CUSTINFO on table columns NAME, CUSTID and BALANCE. To create a new index named I_CUST_CUSTNO on columns CUSTID and NAME, you would enter:
CREATE INDEX I_CUST_CUSTNO on CUST(CUSTID,NAME);
Oracle automatically uses the existing index (I_CUST_CUSTINFO) to create the new index rather than accessing the entire table. Note that the syntax used is the same as if the index I_CUST_CUSTINFO did not exist.
Similarly, if you have an index on the EMPNO and MGR columns of the EMP table, and you want to change the storage characteristics of that composite index, Oracle can use the existing index to create the new index.
Use the ALTER INDEX ... REBUILD statement to reorganize or compact an existing index or to change its storage characteristics. The REBUILD uses the existing index as the basis for the new index. All index storage commands are supported, such as STORAGE (for extent allocation), TABLESPACE (to move the index to a new tablespace), and INITRANS (to change the initial number of entries).
ALTER INDEX ... REBUILD is usually faster than dropping and re-creating an index, because it utilizes the fast full scan feature. It thus reads all the index blocks using multiblock I/O, then discards the branch blocks. A further advantage of this approach is that the old index is still available for queries (but not for DML) while the rebuild is in progress.
See Also: Oracle8 SQL Reference for more information about the CREATE INDEX and ALTER INDEX commands.
You can use an existing index on a table to enforce uniqueness, either for UNIQUE constraints or the unique aspect of a PRIMARY KEY constraint. The advantage of this approach is that the index remains available and valid when the constraint is disabled. Therefore, enabling a disabled UNIQUE or PRIMARY KEY constraint does not require that you rebuild the unique index associated with the constraint. This can yield significant time savings on enable operations for large tables.
Using a nonunique index to enforce uniqueness also allows you to eliminate redundant indexes. You do not need a unique index on a primary key column if that column already is included as the prefix of a composite index. The existing index can be used to enable and enforce the constraint and you can save significant space by not duplicating the index.
Nonunique indexes also have significant advantages when enabling enforced constraints (described in the next section). If you use a nonunique index to enforce a UNIQUE constraint, then when you change the constraint from disabled to enforced, you do not need to rebuild the constraint's index. The existing index is used and the enable operation happens very quickly.
An enforced constraint behaves similarly to an enabled constraint. Placing a constraint in the enforced state signifies that any new data entered into the table must conform to the constraint. Existing data is not checked. Placing a constraint in the enforced state allows you to enable the constraint without locking the table.
If you change an enforced constraint from disabled to enabled, the table must be locked. No new DML, queries, or DDL can occur, because no mechanism exists to ensure that operations on the table conform to the constraint during the enable operation. The enforced state ensures that no operation violating the constraint can be performed upon the table. Therefore, a constraint can go from enabled to enforced with a parallel, consistent-read query of the table to determine whether any data violates the constraint. No locking is performed, and the enable operation does not block readers or writers to the table. In addition, enforced constraints can be enabled in parallel: multiple constraints can be enabled at the same time, and each constraint's validity check can performed using parallel query processors.
The best approach to creating a table with integrity constraints is as follows:
Constraints can be created as enforced. Disabled constraints can be made enforced with the statement
ALTER TABLE tablename ENFORCE CONSTRAINT constraint;
This statement is about as fast as ALTER TABLE tablename DISABLE, since both statements lock the table but need not check anything.
The IMPORT utility automatically enforces, then enables, named constraints. It enables constraints more slowly if the name is system generated.
See Also: Oracle8 Concepts for a complete discussion of integrity constraints.
This section describes:
See Also: Oracle8 Concepts, for a general introduction to bitmap indexing.
This section describes three aspects of the indexing scheme you must evaluate when considering whether to use bitmap indexing on a given table: performance, storage, and maintenance.
Bitmap indexes can substantially improve performance of queries with the following characteristics:
You can use multiple bitmap indexes to evaluate the conditions on a single table. Bitmap indexes are thus highly advantageous for complex ad hoc queries that contain lengthy WHERE clauses. Bitmap indexes can also provide optimal performance for aggregate queries.
Bitmap indexes can provide considerable storage savings over the use of multicolumn (or concatenated) B*-tree indexes. In databases that contain only B*-tree indexes, a DBA must anticipate the columns that would commonly be accessed together in a single query, and create a composite B*-tree index on these columns. Not only would this B*-tree index require a large amount of space, but it would also be ordered. That is, a B*-tree index on (MARITAL_STATUS, REGION, GENDER) is useless for a query that only accesses REGION and GENDER. To completely index the database, the DBA would have to create indexes on the other permutations of these columns. For the simple case of three low-cardinality columns, there are six possible composite B*-tree indexes. DBAs must consider the trade-offs between disk space and performance needs when determining which composite B*-tree indexes to create.
Bitmap indexes solve this dilemma. Bitmap indexes can be efficiently combined during query execution, so three small single-column bitmap indexes can do the job of six three-column B*-tree indexes. Although the bitmap indexes may not be quite as efficient during execution as the appropriate composite B*-tree indexes, the space savings more than justifies their use.
If a bitmap index is created on a unique key column, it requires more space than a regular B*-tree index. However, for columns where each value is repeated hundreds or thousands of times, a bitmap index typically is less than 25% of the size of a regular B*-tree index. The bitmaps themselves are stored in compressed format.
Simply comparing the relative sizes of B*-tree and bitmap indexes is not an accurate measure of effectiveness, however. Because of their different performance characteristics, you should keep B*-tree indexes on high-cardinality data, while creating bitmap indexes on low-cardinality data.
Bitmap indexes benefit data warehousing applications, but are not appropriate for OLTP applications with a heavy load of concurrent insert, update, and delete operations. In a data warehousing environment, data is usually maintained by way of bulk inserts and updates. Index maintenance is deferred until the end of each DML operation. For example, if you insert 1000 rows, the inserted rows are all placed into a sort buffer and then the updates of all 1000 index entries are batched. (This is why SORT_AREA_SIZE must be set properly for good performance with inserts and updates on bitmap indexes.) Thus each bitmap segment is updated only once per DML operation, even if more than one row in that segment changes.
Note: The sorts described above are regular sorts and use the regular sort area, determined by SORT_AREA_SIZE. The BITMAP_MERGE_AREA_SIZE and CREATE_BITMAP_AREA_SIZE parameters described in "Initialization Parameters for Bitmap Indexing" on page 10-18 only affect the specific operations indicated by the parameter names.
DML and DDL statements such as UPDATE, DELETE, DROP TABLE, and so on, affect bitmap indexes the same way they do traditional indexes: the consistency model is the same. A compressed bitmap for a key value is made up of one or more bitmap segments, each of which is at most half a block in size (but may be smaller). The locking granularity is one such bitmap segment. This may affect performance in environments where many transactions make simultaneous updates. If numerous DML operations have caused increased index size and decreasing performance for queries, you can use the ALTER INDEX ... REBUILD command to compact the index and restore efficient performance.
A B*-tree index entry contains a single ROWID. Therefore, when the index entry is locked, a single row is locked. With bitmap indexes, an entry can potentially contain a range of ROWIDs. When a bitmap index entry is locked, the entire range of ROWIDs is locked. The number of ROWIDs in this range affects concurrency. For example, a bitmap index on a column with unique values would lock one ROWID per value: concurrency would be the same as for B*-tree indexes. As ROWIDs increase in a bitmap segment, concurrency decreases.
Locking issues affect DML operations, and thus may affect heavy OLTP environments. Locking issues do not, however, affect query performance. As with other types of indexes, updating bitmap indexes is a costly operation. Nonetheless, for bulk inserts and updates where many rows are inserted or many updates are made in a single statement, performance with bitmap indexes can be better than with regular B*-tree indexes.
To create a bitmap index, use the BITMAP keyword in the CREATE INDEX command:
CREATE BITMAP INDEX ...
All CREATE INDEX parameters except NOSORT are applicable to bitmap indexes. Multi-column (concatenated) bitmap indexes are supported; they can be defined over at most 30 columns. Other SQL statements concerning indexes, such as DROP, ANALYZE, ALTER, and so on, can refer to bitmap indexes without any extra keyword.
Note: The COMPATIBLE initialization parameter must be set to 7.3.2 or higher, for bitmap indexing to be available.
System index views USER_INDEXES, ALL_INDEXES, and DBA_INDEXES indicate bitmap indexes by the word BITMAP appearing in the TYPE column. A bitmap index cannot be declared as UNIQUE.
The INDEX hint works with bitmap indexes in the same way as with traditional indexes.
The INDEX_COMBINE hint indicates to the optimizer the indexes that are cost effective to use. The optimizer recognizes all indexes that can potentially be combined, given the predicates in the WHERE clause. However, it may not be cost effective to use all of them.
In deciding which of them actually to use, the optimizer includes nonhinted indexes that look cost effective as well as indexes that are named in the hint. If certain indexes are given as arguments for the hint, the optimizer tries to use some combination of those particular bitmap indexes.
If no indexes are named in the hint, all indexes are considered hinted. Hence, the optimizer will try to combine as many as is possible given the WHERE clause, without regard to cost effectiveness. The optimizer always tries to use hinted indexes in the plan, whether or not it considers them cost effective.
See Also: "INDEX_COMBINE" on page 8-21
To obtain optimal performance and disk space usage with bitmap indexes, note the following considerations:
See Also: Chapter 23, "The EXPLAIN PLAN Command" for information about bitmap EXPLAIN PLAN output.
Bitmap indexes index null values, whereas all other index types do not. Consider, for example, a table with STATE and PARTY columns, on which you want to perform the following query:
SELECT COUNT(*) FROM people WHERE state='CA' and party !='R';
Indexing nulls enables a bitmap minus plan where bitmaps for party equal to 'R' and NULL are subtracted from state bitmaps equal to 'CA'. The EXPLAIN PLAN output would look like this:
SELECT STATEMENT
  SORT                    AGGREGATE
    BITMAP CONVERSION     COUNT
      BITMAP MINUS
        BITMAP MINUS
          BITMAP INDEX    SINGLE VALUE    STATE_BM
          BITMAP INDEX    SINGLE VALUE    PARTY_BM
        BITMAP INDEX      SINGLE VALUE    PARTY_BM
Note that if a NOT NULL constraint existed on party the second minus operation (where party is null) would be left out because it is not needed.
The following two initialization parameters have an impact on performance.
This parameter determines the amount of memory allocated for bitmap creation. The default value is 8 Mb. A larger value may lead to faster index creation. If cardinality is very small, you can set a small value for this parameter. For example, if cardinality is only 2, then the value can be on the order of kilobytes rather than megabytes. As a general rule, the higher the cardinality, the more memory is needed for optimal performance. This parameter is not dynamically alterable at the session level.
This parameter determines the amount of memory used to merge bitmaps retrieved from a range scan of the index. The default value is 1 Mb. A larger value should improve performance, because the bitmap segments must be sorted before being merged into a single bitmap. This parameter is not dynamically alterable at the session level.
If there exists at least one bitmap index on the table, the optimizer will consider using a bitmap access path using regular B*-tree indexes for that table. This access path may involve combinations of B*-tree and bitmap indexes, but might not involve any bitmap indexes at all. However, the optimizer will not generate a bitmap access path using a single B*-tree index unless instructed to do so by a hint.
In order to use bitmap access paths for B*-tree indexes, the ROWIDs stored in the indexes must be converted to bitmaps. Once such a conversion has taken place, the various Boolean operations available for bitmaps can be used. As an example, consider the following query, where there is a bitmap index on column C1, and regular B*-tree indexes on columns C2 and C3.
EXPLAIN PLAN FOR
SELECT COUNT(*) FROM T
WHERE
C1 = 2 AND C2 = 6
OR
C3 BETWEEN 10 AND 20;
SELECT STATEMENT
  SORT AGGREGATE
    BITMAP CONVERSION COUNT
      BITMAP OR
        BITMAP AND
          BITMAP INDEX  C1_IND  SINGLE VALUE
          BITMAP CONVERSION  FROM ROWIDS
            INDEX  C2_IND  RANGE SCAN
        BITMAP CONVERSION  FROM ROWIDS
          SORT  ORDER BY
            INDEX  C3_IND  RANGE SCAN
Here, a COUNT option for the BITMAP CONVERSION row source counts the number of rows matching the query. There are also conversions FROM ROWIDS in the plan in order to generate bitmaps from the ROWIDs retrieved from the B*-tree indexes. The occurrence of the ORDER BY sort in the plan is due to the fact that the conditions on columns C3 result in more than one list of ROWIDs being returned from the B*-tree index. These lists are sorted before they can be converted into a bitmap.
Although it is not possible to size a bitmap index exactly, you can estimate its size. This section describes how to extrapolate the size of a bitmap index for a table from the computed size of a B*-tree index. It also illustrates how cardinality, NOT NULL constraints and number of distinct values, affects bitmap size.
To estimate the size of a bitmap index for a given table, you may extrapolate from the size of a B*-tree index for the table. Use the following approach:
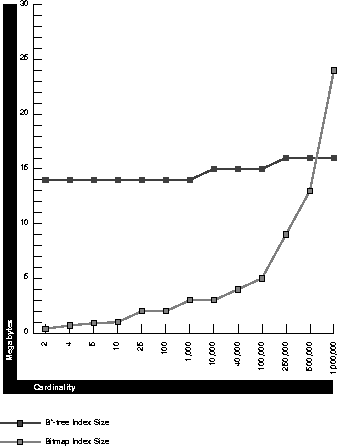
For a 1 million row table, Figure 10-2 shows index size on columns with different numbers of distinct values, for B*-tree indexes and bitmap indexes. Using Figure 10-2 you can estimate the size of a bitmap index relative to that of a B*-tree index for the table. Sizing is not exact: results will vary somewhat from table to table.
Note that randomly distributed data was used to generate the graph. If, in your data, particular values tend to cluster close together, you may generate considerably smaller bitmap indexes than indicated by the graph. Bitmap indexes may be slightly smaller than those in the graph if columns contain NOT NULL constraints.
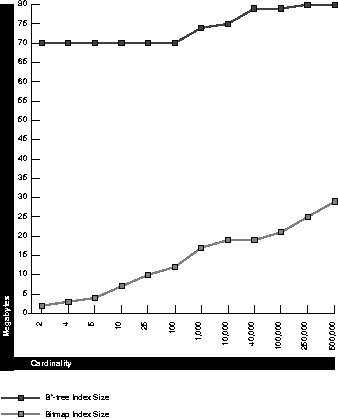
Figure 10-3 shows similar data for a table with 5 million rows. Note that when cardinality exceeds 100,000, bitmap index size does not increase as fast as it does in Figure 10-2. For a table with more rows, there are more repeating values for a given cardinality.
Bitmap indexes have the following restrictions:
Follow these guidelines when deciding whether to cluster tables:
Consider the benefits and drawbacks of clusters with respect to the needs of your application. For example, you may decide that the performance gain for join statements outweighs the performance loss for statements that modify cluster key values. You may want to experiment and compare processing times with your tables both clustered and stored separately. To create a cluster, use the CREATE CLUSTER command.
See Also: For more information on creating clusters, see the Oracle8 Application Developer's Guide.
Hash clusters group table data by applying a hash function to each row's cluster key value. All rows with the same cluster key value are stored together on disk. Consider the benefits and drawbacks of hash clusters with respect to the needs of your application. You may want to experiment and compare processing times with a particular table as it is stored in a hash cluster, and as it is stored alone with an index. This section describes:
Follow these guidelines for choosing when to use hash clusters:
To create a hash cluster, use the CREATE CLUSTER command with the HASH and HASHKEYS parameters.
When you create a hash cluster, you must use the HASHKEYS parameter of the CREATE CLUSTER statement to specify the number of hash values for the hash cluster. For best performance of hash scans, choose a HASHKEYS value that is at least as large as the number of cluster key values. Such a value reduces the chance of collisions, or multiple cluster key values resulting in the same hash value. Collisions force Oracle to test the rows in each block for the correct cluster key value after performing a hash scan. Collisions reduce the performance of hash scans.
Oracle always rounds up the HASHKEYS value that you specify to the nearest prime number to obtain the actual number of hash values. This rounding is designed to reduce collisions.
See Also: For more information on creating hash clusters, see the Oracle8 Application Developer's Guide.