Last updated
(Expert)
Instructions for running DAQ using the GUI 1
What to check for while running. 5
Recovering from Silicon Latchup. 5
How to run DAQ in console command line mode. 7
Known Problems/Errors in Event Building. 11
How to find out that VME ADC is working properly. 12
How to Reset Silicon Latchup. 13
How to reboot usp.phobos.bnl.gov. 13
How to run without VME (only Silicon and Fastbus) 13
Starting the Micro DAQ when system is set to run normal DAQ.. 14
Since a picture is worth a thousand words, here's an annotated screendump showing different parts of the GUI. The big red labels describe the approximate functions of different sections of the GUI.
Most control operations are carried out from the top left 2 panels, for example:
Setting up a Run type
Starting / Stopping Runs
Using the Expert Menus to Reset Silicon Latchup or Restart various DAQ components
If not already logged in, Login to the DAQ X-Term computer in the center of console with USER='runctrl', PASSWD='10oclock'
You should see an icon titled 'PhatDAQRunCtrl' in the center of your desktop (desktop ONE).
Double-Click on this icon to launch the GUI. Hit 'OK' on the options dialog that appears, and you should see a 'Run' window start up.
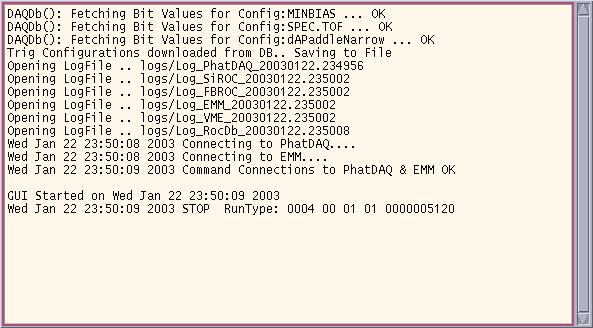
In particular, the six logfiles for the various subsystems should be opened automatically, and the two command connections to PhatDAQ and EMM should be initiated. If the messages stop at any point in the above 'Run' window, this usually indicates that particular subsystem is busy/refusing connection; you should call the DAQ expert on call in this case, and let him/her know the contents of the above window.
If all the connections noted in the 'Run' window are made successfully, the PhatDAQRunControl GUI window should start up.
All the SubSystem windows should update with various messages (the details of these messages are not important for the end-user). All initializations are performed automatically over a period of about 30 sec, and the various messages indicate these initializations are in progress.
System
readiness to take data is indicated by the following message in the
'Silicon ROC Messages' window: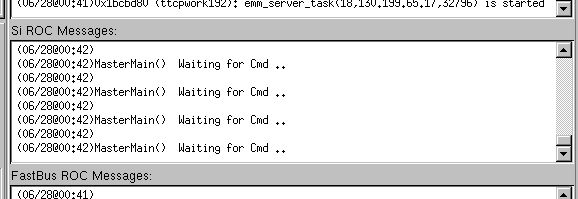
At this point, you can proceed to the Start/Stop Run Section.
Select Runtype from Combo box
Choose to Write/Not Write to Disk
Select Appropriate Trigger configuration for current Running.
Guide to selecting Run Types:
|
Run Type |
Detector Setup |
Special considerations (See details below) |
|
ALLBEAM |
Silicon + Plastic (Normal data taking) |
|
|
PADDLECOSM |
Plastic Only, NO Silicon (Beam studies with Silicon turned OFF) |
None. |
|
SICOSM |
PCAL Cosmic running, (Silicon OFF, Don't care about Plastics) |
PCAL HV should set appropriately, |
|
FBTIME |
FastBus Time Calibrator |
Time Calibrator module should be properly set |
Considerations for Each RunType:
ALLBEAM:
In general, you should STOP RUN before performing any operation with
EITHER Silicon Low Voltage or High Voltage. You can START RUN
immediately after the operation, but it is important for DAQ
stability that you don't have a RUN going while you are ramping
either Low Voltage or High Voltage.
After Silicon Low
Voltage: No special considerations.
PADDLECOSM: No special considerations.
SICOSM: To switch to PCAL cosmic running when there is no beam in the machine, you need to load different High Voltage settings into the PCAL (consult PCAL documentation for this). Don't forget to switch back to normal high voltage settings after you are done with the PCAL cosmic running.
FBTIME: To run FastBus Time Calibrator and FastBus Pedestal runs, have the TOF expert on call set the range and threshold as appropriate.
After following the above considerations, you can hit the large friendly green button labelled 'START RUN' to start the run. A beep indicates run has started, and the DAQ Status window should start updating with the current RUN in green. The Run number is 0 if you are not writing to disk.
Contrary to popular belief, this is not the time to open your laptop and check your email! Proceed to see the section on 'What to check for while running', to see what are the things to monitor while DAQ is running and writing data to disk.
Stopping a Run is as simple as hitting the large friendly red button labelled 'STOP RUN'. Wait ~ 5 seconds after stopping a Run to let all the sub-systems return back to steady state before attempting to start a new run. Final system readiness is indicated by the same message 'Waiting for CMD....' in the SiliconROC messages window.
Check for Green status and increasing event counter in the Silicon ROC Messages.
If running ALLBEAM type with Writing to DISK enabled, you should hear a beep everytime the sequence switches.
You should also monitor the bottom two scalers on the visual scaler display which monitor the input/output Level-0 triggers to the DAQ. Both should be up at ~230 Hz commensurate with what is reported in the DAQ status pane.
If silicon is ON, you also need to keep close, continuous watch on the radiation levels reported by RadMon (chipmunk display). Consult Silicon documentation for details on monitoring Silicon health.
You will see the occasional latchup from various Silicon FEC's, and you will need to reset them using the procedure outlined below.
When the central alarmer alarms that Latchup has occured, acknowledge the alarm and STOP RUN.
Start a new run without writing so that you keep getting updated data from the Silicon FEC's.
Go to the 'Si Latchup VFP Summary' link on the PHOBOS portal to determine which FEC ports have latched up. If there are too many (greater than 8 ports), consult Silicon expert for further instructions - donot reset latchup if there are too many ports latched up as this could trip the Low Voltage power supplies. Consult Silicon Expert in the case of large number of latchups due to adverse beam conditions.
If
less than 8 ports are latched up, Click on 'Si-Expert'->'Reset Si
Latchup' to reset the latchup.
You
should see in VMEROC window response: latchup_reset();
If you don't see it: DAQExpert->Open_connection_to_VME_ROC and repeat 'Si-Expert'->'Reset Si Latchup
Go back to the portal page to ensure that the latched up ports have recovered.
If they have recovered, you can START RUN again.
Ignore this message
Recovery: Stop/Start run.
Recovery: Stop/Start run
Indication:
1. No response
to stop run command in ‘Fastbus ROC Messages’.
2.
Red light L2 on Fastbus crate, module STR340/SFI
Workaround:
1. Stop run
2.
Reboot Fastbus by pressing RST button on module STR340/SFI. It will
take 3 minutes.
3. Wait for red light L4 on STR340/SFI.
4.
DAQExpert/Close Fastbus
5. DAQExpert/Open Fastbus
6.
Start run
Locate 'Run' terminal window behind
the GUI and Ctrl/C in it. GUI should disappear.
Restart GUI by
clicking on RunControlGUI icon.
 Telnet 130.199.65.18
Trying 130.199.65.18...
Connected to 130.199.65.18.
Escape character is '^]'.
 vmeroc >ds_po=0x100.
You will see something like:
[0]readV792.2@fa060000: [60]Status1,2=0043,28,EvCnt=000a77
0000:4a002000 4800406c 4810408d 48014078 48114086 4802406d 4812405c 4803407c
0020:48134079 48044086 4814407f 4805407b 48154085 4806407e 4816407d 48074089
0040:4817409e 48084088 48184098 48094082 48194086 480a407f 481a4072 480b409b
0060:481b4061 480c4096 481c408b 480d409d 481d4084 480e4077 481e4078 480f4085
0080:481f4031 4e000a77
V792.2 – correspond to ADC2.
First word 4a002000– header
Last word 4c000a77 – footer
The rest are codes. For example 48 in each word means slot 9. The lower 13 bits are values
In the above example we see normal pedestals.
When you finished, set the printout mode back to normal:
vmeroc >ds_po=0
Stop the run.
In DAQ GUI / DAQEsxpert select Close VME ROC Connection.
Turn off the power on the VME crate by pressing down the red ON/OFF knob on the bottom right of the crate
Wait 20 seconds.
Turn on the power on the VME crate by pressing up the red ON/OFF knob on the bottom right of the crate
Wait at least 2 minutes 29 seconds after turning power back on until the red light FAIL is off and green light PASS is on (both are on the rightmost module in the crate: AVME 941X)
In DAQ GUI / DAQEsxpert select Open VME ROC Connection.
Press
STOP RUN button to check that VME
ROC Messages is responding with
“Stop run after
0x???? events”.
Micro DAQ runs on the PHOBOS VME crate. It waits for the gate on the first ADC, reads all modules and sends event to the usp.phobos.bnl.gov using UDP protocol. The reader program udq running on usp receives the events and write them to the file usp.phobos.bnl.gov:/data/0/udq_yymmdd_hhmmss.udq.
ssh
phobos@usp.phobos.bnl.gov
cd
/data/0/udqdata
udq 0 60
The first argument controls event printing; if it is 1 then program will print every event. The second argument is the file-change period in minutes.
The program will respond with:
udq - Micro DAQ spooler. Printout=0, File change every 60 min
file udq_031120_165647.udq opened
data socket opened at port 7500 size 30720
StartedlEv:0,rEv:0,d:0,kB:0,ev/s:0
lEv:5,rEv:1650,d:0,kB:2,ev/s:0
lEv:16,rEv:1661,d:0,kB:7,ev/s:1
If it does not respond with incrementing events then probably the server program is not running on vmeroc.phobos.bnl.gov. The simplest way to start it – recycle the power on the vme crate. 5 minutes after recycling the udq should report incoming events.
To work with the data, use scp to copy it to some other machine.
Close connection from the DAQ GUI to VME ROC using [DAQExpert][Close VME ROC Connection]
telnet 130.199.65.18
Trying 130.199.65.18...
Connected to 130.199.65.18.
Escape character is '^]'
Disable reacting to DAQ triggers using:
mEMSD_enable(0)
Spoon Micro DAQ:
sp udq_roc_start
When you finished with uDAQ, recycle the power on the crate to have it back for normal DAQ.
Please send all comments and suggestions regarding this page to Andrei |